


Renderwow
Through proper setup, we can use Arnold to achieve a caustic effect. Today we will show you how to set up a scenario that contains a ’liquid’ grid. Caustics are also enabled in the standard surface shader specified for it.
You cannot use the standard lights of Arnold, instead, we create a polygonal mesh, a plane self-luminous shader is designated for it, then let the GI engine "find" the light. This will get the caustic effect. However, the efficiency of this method is very low, because small self-luminous objects are often difficult to shoot. You need a lot of light or a very large self-luminous object to make the noise wave acceptable.
Just because of this, the user manual indicates that we can achieve "soft" caustics produced by large self-luminous objects.
First, open the scene file. The scene contains a starting basic object. Create a polygonal floor plan. and put it under the grid.
Self-luminous plane
Then create a plane, and as shown below, place it above the grid.

Specifies a standard surface shader for polygonal planes above polygonal meshes, this will represent our light source. Reduce the "base weight" value of standard surface shaders to 0, and increase the "Emission" to around 10.
Grid coloring
In order to specify a standard surface shader for polygonal meshes with refraction caustics, it needs to be set as a glass shader. But before that, it is necessary to ensure that the "Opaque" flag is disabled. Select polygonal meshes, and disable "Opaque" in the Arnold attribute.
Reduce the "Diffuse" value to 0, the "weight" of the specular reflection is increased to 1, the roughness of specular reflection is reduced to 0, the transmitted "weight" is increased to 1, and change the "IOR" to the refractive index of glass (1.5).
Next, a color coloring will be added to the shader. Add some colors to the transmission "Color" of the glass standard surface shaders.
Refraction caustics
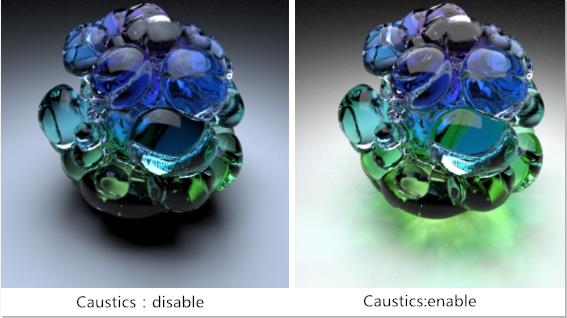
In order to see refracted caustics through glass, refractive caustics must be activated in standard surface shaders designated for glass grids, you can find "Caustics" under "Advanced", please enable this property.
In the following image, you can see the difference after enabling Caustics.
Noise wave
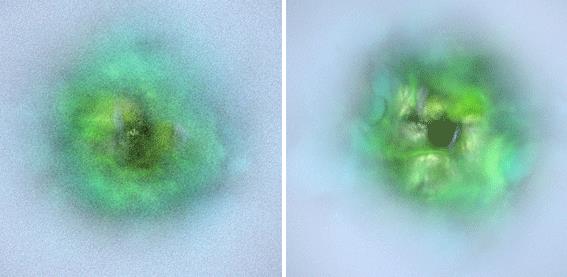
To reduce the noise in caustics, the number of GI diffuse reflection samples must be increased.
the following figure shows the difference between using different GI diffuse reflection sampling numbers to render caustics, there are 3 and 6 GI diffuse reflection samples, respectively.
Be careful when using this property, because increasing this value will significantly increase rendering time. After setting up, you can start rendering.
Points for attention when using this method:
1. Fine adjustment specifies the correct "Emission" quantity of the geometry of the self-luminous shader, otherwise, there may be many white noises.
2. Increasing the number of GI diffuse reflection samples can reduce noise.


