

Renderwow
Animation is an art form. The process of 3D animation can include some very technical tools and workflows in various software applications. But tools like Maya also offer powerful ways to speed up the animation workflow. These tools and workflow adjustments can improve your productivity, let you focus more on your project. Let's take a look at these simple workflow tips.
Isolation of animation channels
When creating animations, especially complex character animations, you may take many actions on many different channels. Characters will move up and down, from one side to the other, rotating on different axes, and different parts of the body will move in different ways and at different times,sometimes it may be difficult to identify and deal with problems. By isolating specific channels, you can temporarily take any action with you to try to troubleshoot, disable related actions.

For example, we want to isolate the role's side-to-side actions during its lifetime. We can select the control we want to view and open Graph Editor, in this case, the action we want to isolate is Translation X. So we can select all other channels and disable them, and choose Curves > Mute Channel. When these channels are disabled, you can only see the character's lateral action. Translation X, which allows you to adjust the curve and time as needed. When finished, just select the disabled channel, and then select Curves > Unmute Channels. Then go back and see the whole animation, this may be a good way to get into the problem area, it will not affect any other animation curve.
Isolated Partial Binding
It is more convenient to isolate different aspects of animation from the perspective of model. As we discussed, your animation may occur visually, from upper body movements to arm and leg movements. Often, it's better to determine the overall action before investing in other aspects of the animation.
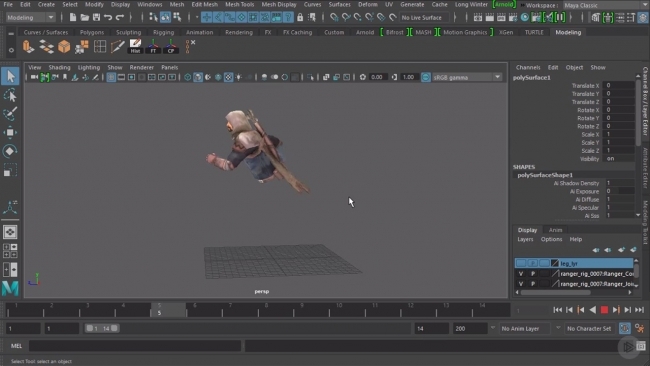
If a character moves around the scene, you can animate the motion of the upper body before confirming the details of the legs. Select the area of your body that you want to "close" and enter Layer Editor. Select Layers>Create Layer From Selected. This places the geometry on its own layer, allowing you to turn it on or off as needed. You can also turn off the visibility of control Curves by turning off NURBS Curves from the viewport filter menu. By "closing" the visibility of your legs, you can better see the overall movement of your body without distraction. Once this action is correct, you can reopen your display layer and continue to make it on your legs. Similarly, this is another way to eliminate visual distraction, focusing on a specific aspect of animation.
Create animator-friendly constraints
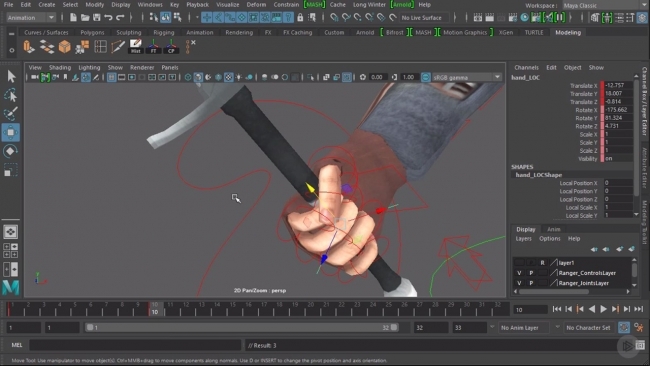
You will have to hold and manipulate objects many times in front of your character. For example, the character has a sword, Swords need to move in a specific way. Most of the time, the character's hand should be fixed on the handle. Sometimes, however, the hand needs to move relative to the sword, perhaps by sliding up and down. In these cases, we can create a simple binding that allows this flexibility.
First, a locator is added to the scene and placed near the handle of the sword. Now rotate the locator to align it with the sword. This is easier by isolating the sword and locator in the viewport. When positioners move along an axis, they will slide along the inside of the handle. Now, simply put the locator's parent in sword geometry. This is a simple parent relationship, not a parent constraint. Now, select the locator and hand control, and then select from the "Rigging" menu set "Constrain > Parent". This will allow parents to confine their hands to locators, also known as swords. When the sword is animated, the hand can follow the sword. You can also slide the handle up and down by animating the locator along the axis. This setting can be used for various props that need to be handled, but it also requires freedom of occasional movement within the handle.
Editable locus
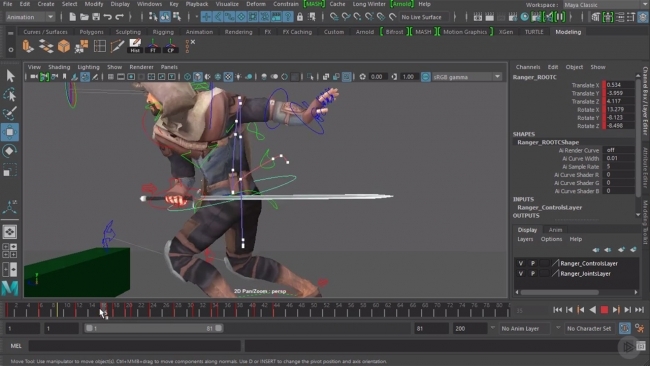
When animating characters, creating good arcs is the key. After all, the concept of arc is one of the 12 principles, which is very important in obtaining attractive animation. Maya can easily view and adjust these arcs through "Editable Motion Trails". Simply select the animation model or control that you want to view the arc, and then under the Animation menu set, select Visualize > Create Editable Motion Trail. By default, an arc is created within the duration of the time slider, but a specific start and end time can be selected in the options. Click Create Motion Trail and display a new curve in the viewport.
If not, make sure that Motion Trail in the viewport filter is turned on, this curve represents the path that your selected object takes throughout its animation. Points on the trajectory represent key frames, which you can clearly see as your animation. By viewing the arc graphically in the viewport, you can see the positions and modes that may need to be adjusted so that you can get the best action. When you edit the key frame on the time slider, the arc will be updated. You can also edit the arc directly by clicking on its point/key frame and moving it to different positions in the viewport. These trajectories give you a lot of control and make sure that all your arcs are the way you want them to be.


