job Rendering Process Management
10.1 Main Job Status Description
After a job is submitted to the cloud rendering platform, it will go through multiple processing stages. The following table lists the main job statuses and their meanings for users to track job progress in real time.
| Status | Description |
|---|---|
Waiting for Analysis |
Job has joined the queue, waiting for scene analysis (drag-and-drop submission) |
Analyzing |
Parsing scene file and identifying asset dependencies |
Analysis Completed |
Scene analysis successful, waiting for user to confirm submission parameters |
Analysis Failed |
Scene analysis exception; please fix according to error prompt and re-analyze |
Preparing |
Job confirmed, preparing to package and upload |
Packaging |
Local assets are being compressed and packaged |
Uploading |
Assets are being uploaded to the cloud |
Unpackaging |
Cloud is decompressing the asset package |
Queuing |
Waiting for cloud idle machine allocation |
Rendering |
Cloud machines are rendering |
Schedule failed |
Cloud resource allocation exception; usually automatically retries |
Arrearage stopped |
Account balance insufficient, job paused; can resume after top-up |
Finished |
All frames rendered successfully, awaiting download |
Be downloading |
Render results are being downloaded to local |
Download complete |
Result files have been successfully saved to local |
Render Failed |
Error occurred during rendering; it is recommended to contact customer service for investigation |
10.2 Job Analysis Function Operations (Drag-and-Drop)
10.2.1 Job List Functions
Analyze Order
![]()
When dragging and dropping multiple scene files for submission simultaneously, if you need to control the analysis order of each job, you can adjust the value in the "Analyze Order" column in the job list when the job status is "Waiting for Analysis". The priority range is 1–10, with higher values indicating higher priority, decreasing step by step.
10.2.2 Right-Click List Functions
Reanalysis
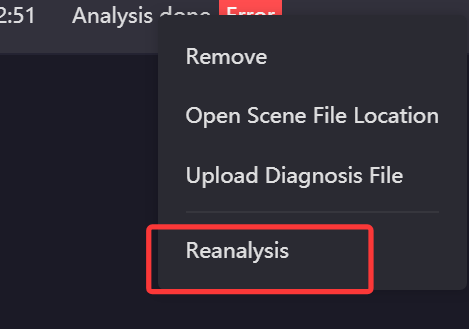
For the following jobs of Maya, Houdini, Clarisse, and Unreal Engine, you can select one or more jobs and right-click to choose "Reanalysis":
-
(1) jobs with analysis failed
-
(2) Jobs with analysis completed (including errors)
-
(3) Jobs with analysis completed and not timed out
Single Job reanalysis: If the original preset is available or has been re-edited in the preset interface, it will directly use that preset for reanalysis; if the original preset is unavailable or memory parameters are missing, the analysis window will pop up, and you can modify the configuration before submitting.
Multi-job reanalysis: The analysis window will pop up uniformly. After completing the configuration, you can batch reanalyze.
10.2.3 Settings Page Functions
Number of Parallel Analyses for Drag-and-Drop Jobs

When dragging and dropping multiple scenes for submission, if you need to control the number of jobs being analyzed simultaneously, you can modify this value in "Settings → Basic Settings". The supported setting range is 1–5. Applicable software includes 3ds Max, Maya, Houdini, Clarisse, Katana, and Unreal Engine.
Note: After modifying and saving this option, the client must be restarted for it to take effect.
Hide timed-out jobs
![]()
To hide jobs that have exceeded 24 hours in the analysis page in the job list, you can check this option in "Settings → Basic Settings".
10.3 Job Upload Related Function Operations
10.3.1 Job List Functions
Upload Order

When multiple jobs are in the uploading state simultaneously, you can adjust the value in the "Upload Order" column in the job list to control the upload order. You can modify this priority at any time before the job enters the "Upload Completed" state. The priority range is 1–10, with higher values indicating higher priority, decreasing step by step.
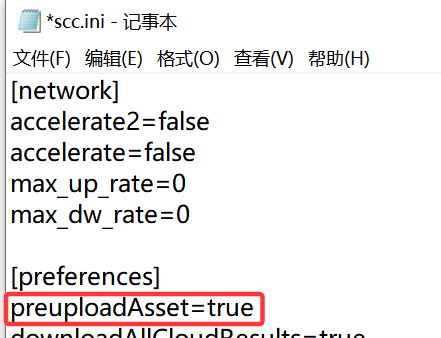
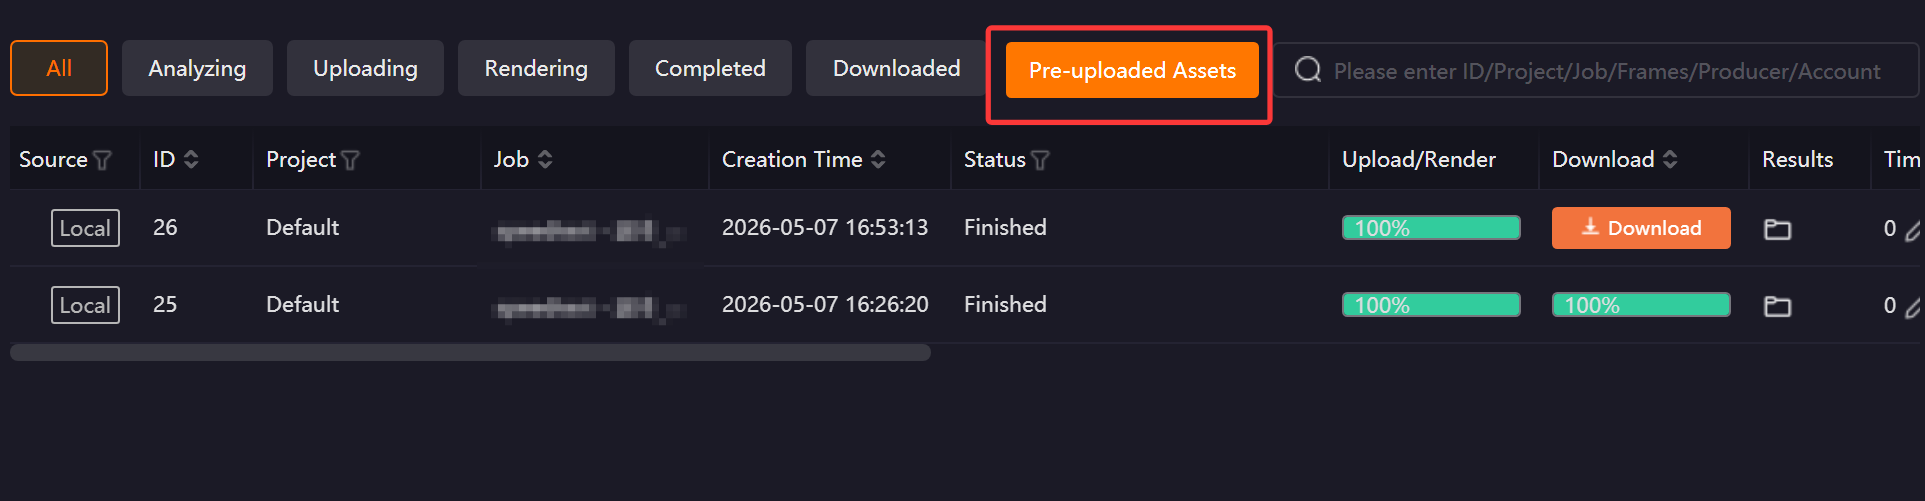
Pre-uploaded assets (Custom Feature)
When scene asset files are large in volume or numerous in quantity, you can upload asset files in advance, and then upload the scene file later, thereby significantly shortening the overall job submission time. This is a custom feature; please contact customer service for assistance in enabling it.
Usage method:
-
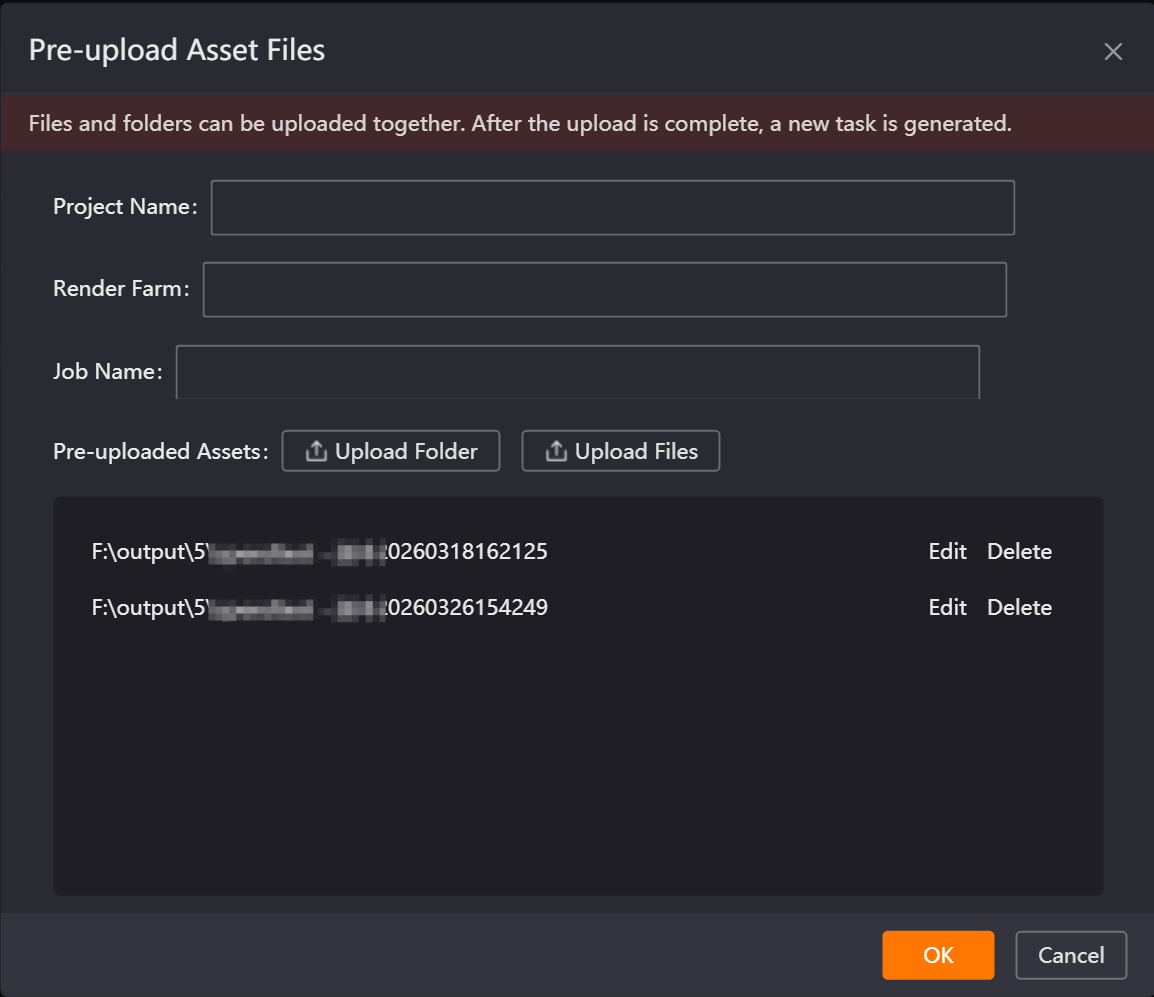
(1) Close the client, add the configuration item preuploadAsset=true in the [preferences] section of the C:\Users\Username\SCC\scc.ini file, save and restart the client. A "Pre-uploaded Assets" button will appear in the upper right corner of the client. Click to open.
 ]
]
-
(2) Contact customer service to obtain render farm information, correctly fill in the corresponding content, upload assets, and click the "OK" button to submit.
10.3.2 Right-Click List Functions
Supply Asset Files
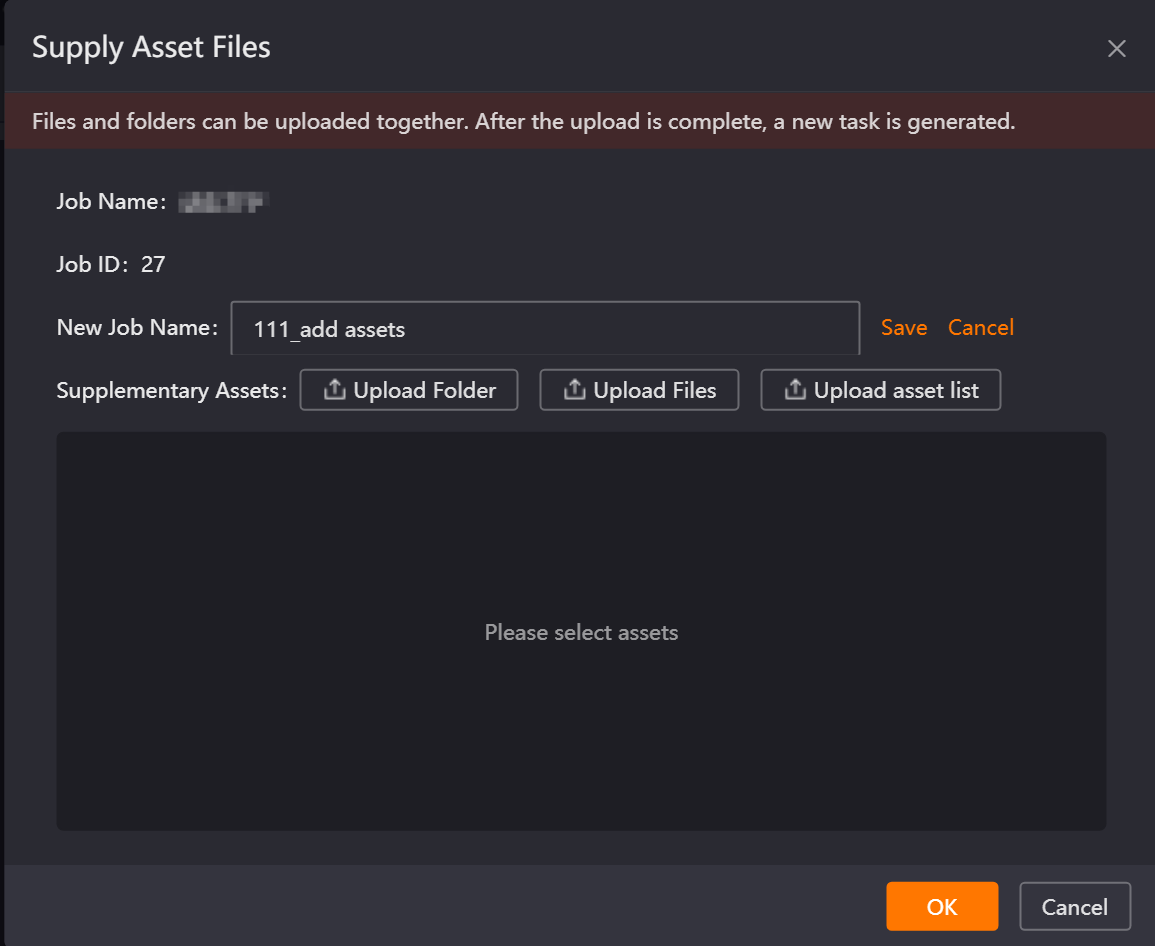
When uploaded jobs have missing assets, or asset files are incorrect causing incorrect render effects, you can upload missing assets separately without resubmitting the entire job. Supports Maya, Houdini, Clarisse, and Cinema 4D jobs.
Usage method:
-
(1) After job upload is complete, select the target job in the job list, right-click and choose "Supply Asset Files", and upload the corresponding assets.
-
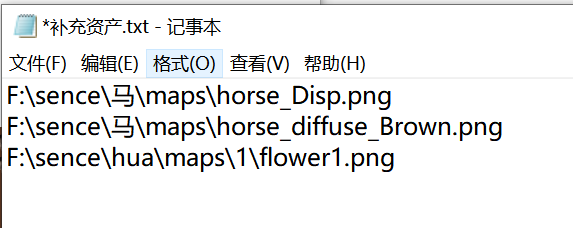
(2) If selecting the "Asset List Upload" method, only .TXT format files are supported. The file content should be asset paths and names, one per line, in the format shown in the figure below.
-
(3) After asset upload is complete, contact customer service for subsequent processing.
Job Resubmit (Only for 3ds Max)
When a 3ds Max job requires high-memory rendering but insufficient memory was selected during submission, you can use the "Job Resubmit" function to reselect the memory configuration without uploading job assets again. Operation: Select the target job in the job list, right-click and choose "Resubmit", reconfigure the memory, and submit.
Precautions:
-
(1) You need to first enable this feature in the Settings page, and it only takes effect for newly submitted jobs.

-
(2) jobs submitted more than 8 days ago cannot use this function.
-
(3) Before use, ensure sufficient disk space, or adjust the "Minimum free disk space" value according to actual conditions. If below this threshold, the system will automatically clean up backup files, causing resubmission to fail.
Resubmit the Job
For submitted Maya, Houdini, Clarisse, and Unreal Engine jobs, you can use the "Resubmit the Job" function to modify the job name, frame sequence, test frames, output path, render type, memory, and other information before resubmitting, without re-uploading all assets, greatly reducing operation costs.
Operation: Select the target job in the job list, right-click and choose "Resubmit the Job", and complete parameter adjustment according to the prompt before submitting.
Note: Because resubmitting the job may involve render farm switching, to ensure job stability and render success rate, it is recommended to use this function under the professional guidance of customer service.
Special Maya Job Resubmit
The Maya job resubmit function uses the new submission method by default, supporting reselection of render layers. If abnormal situations such as incomplete backup files are detected, the system will prompt that only the old method can be used for submission. The old method does not support reselection of render layers.
10.3.3 Settings Page Functions
Upload without packaging
![]()
This option is enabled by default. When the scene contains a large number of large assets, it is recommended to enable this function, which can significantly improve job submission speed.
Batch upload file size (MB)
This setting defines the maximum total size for a batch of files. If a single file exceeds this limit, it will be processed alone in its own batch. Default is 50 MB, modifiable to 10–1000 MB. Generally, no modification is needed. If the network is fast, upload files are large and numerous, time-consuming, and the network is stable without lag, you may increase the value.
Clear error texture cache
Clicking the button will automatically clear the asset MD5 cache on the client side and recalculate the asset MD5s. This is generally not required; however, it may be used if encrypted assets were uploaded by mistake. Simply click Clear and re-upload the assets.

Producer


When an account is used by multiple people, you can modify the Producer information in "Settings → Basic Settings" before submitting jobs. The "Producer" column in the job list supports quick retrieval of jobs by the corresponding Producer.
Data directory
![]()
The data directory is used to store temporary files during job packaging. Reasonable configuration can significantly improve packaging speed:
-
(1) If a solid state drive is installed in the computer, it is recommended to specify the data directory to the SSD drive letter to improve packaging speed.
-
(2) If the submitted scene file is large in volume, it is recommended to select a drive letter with ample disk space to avoid failure due to insufficient space during packaging.
Transfer Protocol

The transfer strategy does not need to be modified by default. If upload or download speed is abnormal, refer to the following troubleshooting steps.
Troubleshooting steps when speed is zero in HTTP transfer mode:
-
(1) Try switching the transfer protocol to TCP transfer in Settings.
-
(2) If there is still no improvement after switching, you can right-click the job, choose "Switch Transfer Method", and change the job’s transfer strategy to proxy mode.
Troubleshooting steps when speed is zero in TCP transfer mode:
-
(1) You can first right-click the job, choose "Switch Transfer Method", and change the job to proxy mode.
-
(2) If there is still no improvement after switching, you can try switching the transfer protocol to HTTP transfer in Settings.
Note: Under normal circumstances, the transfer speed ranking is HTTP transfer > TCP transfer. UDP is a preemptive upload method. If UDP needs to be enabled, it is recommended that all users in the enterprise enable it simultaneously to avoid affecting other users' uploads.
10.4 Job Render Related Function Operations
10.4.1 Job List Functions
Add Nodes
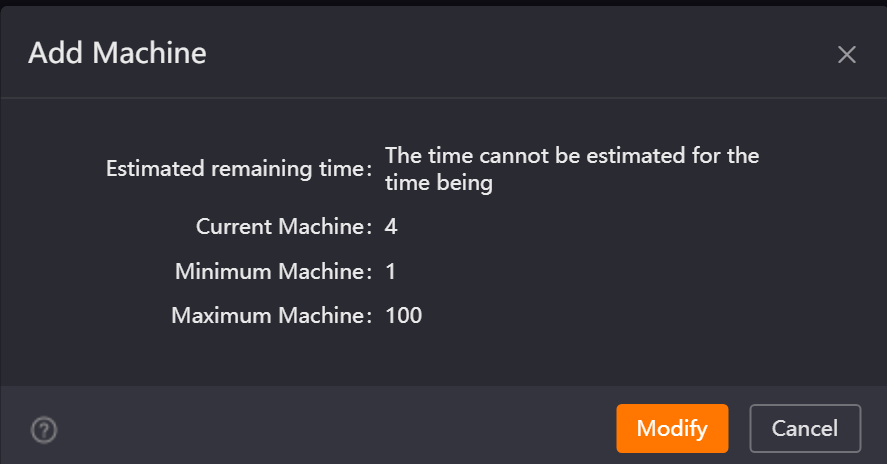
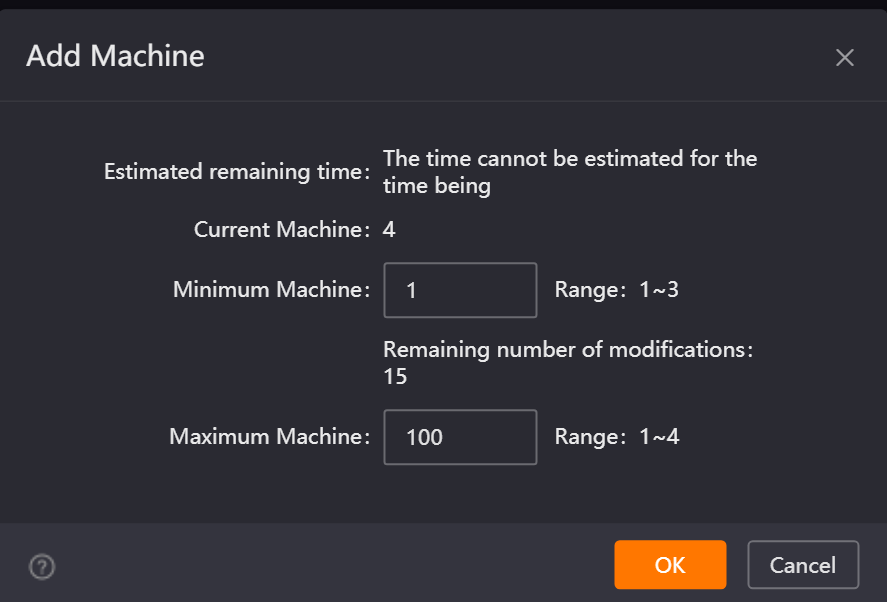
When the job is in the "Rendering" state, you can adjust the machine quantity via the "Add Nodes" function to improve render speed. The meaning of each parameter is as follows:
-
(1) Estimated remaining time: The approximate time required for the current job to complete.
-
(2) Current Active Nodes: The actual number of machines currently used by the job.
-
(3) Minimum Active Nodes: The minimum number of machines the system guarantees the job will always use.
-
(4) Maximum Active Nodes: The upper limit of machines the job can use. When the minimum Active Nodes of all jobs in the farm are satisfied, if there are still idle machines, they will be allocated to jobs according to priority up to the maximum Active Nodes.
Timeout Alert
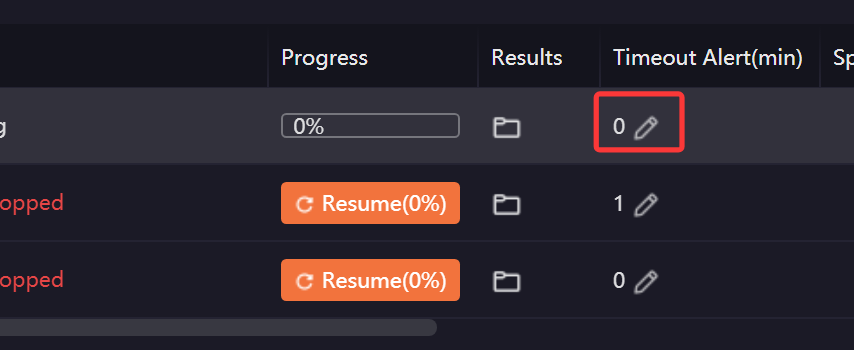
The timeout alert function can monitor the render duration of each frame of the job. When a frame’s render duration exceeds the set threshold, the job will highlight and flash in the list. You can click the pencil icon in the job list to set or modify the timeout time for a single job at any time. After modification, the modified value shall prevail.
10.4.2 Right-Click List Functions
Custom Test Frames
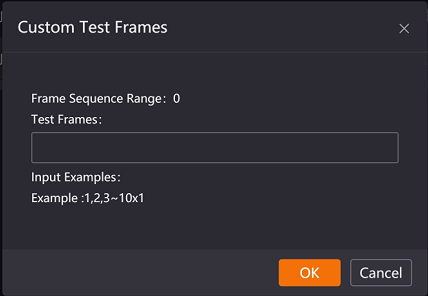
For animation jobs, if you need to add or modify test frames, you can right-click the job and choose "Custom Test Frames" when the job is in the "Queuing" or "Rendering" state. After modification, the cloud will prioritize rendering test frames that have not yet been rendered.
Copy Job Information and Upload Diagnosis File
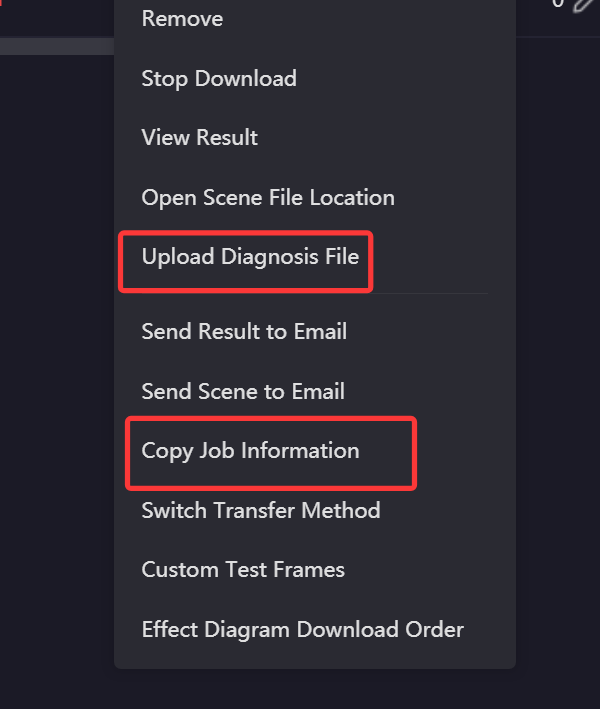
When encountering issues during cloud rendering, you can provide customer service with the information needed for troubleshooting through the following operations:
-
(1) Right-click the target job in the job list, choose "Upload Diagnosis File", and upload the diagnosis file to the server.
-
(2) Right-click the job and choose "Copy Job Information", and send the Job Information to customer service for quick issue identification and resolution.
10.4.6 Stop and Resume
When a job needs to stop rendering, you can right-click the target job in the job list and choose "Stop".
Special reminder: Before stopping a job, it is recommended to consult customer service to confirm whether stopping is necessary. After stopping the job, the cost of the already rendered part will be charged normally, and the current render progress cannot be restored. After resuming the job, there is no guarantee of immediate availability of idle machines, and queuing may occur. Please operate with caution.
-
3ds Max V-Ray jobs support the "Save Intermediate Result and Stop" option: After selecting "Stop", if you need to retain the currently rendered intermediate results, you can check this option. The system will save the intermediate results to the output path before stopping the job; if not needed, directly click "OK" to stop.
-
If test frames were set during job submission and "Pause rendering after test" was selected, after test frame rendering is completed and the effect is confirmed to be correct, you can right-click the job and choose "Resume" to resume full-speed rendering of the remaining frames.
10.4.7 Stop Download and Start Download
If you need to change the output path of render results, you can right-click the job and choose "Stop Download", use the "Set up Path" function to modify the target path, and then choose "Start Download" to restart the download.
To download team job render results:
-
(1) If the download path does not need to be modified, right-click the job and choose "Start Download".
-
(2) If the download path needs to be modified, you can first use the "Set up Path" function to specify the new path, and then choose "Start Download".