Quick Start
2.1 Download and Install the Client
2.1.1 System Requirements
| Item | Minimum Requirements | Recommended Configuration |
|---|---|---|
Operating System |
Windows 7 SP1 (64-bit) |
Windows 10/11 (64-bit) |
Processor |
Dual-core CPU |
Quad-core or higher |
Memory |
4 GB RAM |
8 GB or higher |
Hard Disk Space |
At least 2 GB of available space (for installation) |
SSD + sufficient storage (for downloading results) |
Network |
Broadband network |
20 Mbps or higher (to improve upload speed) |
Other |
— |
We recommend disabling local encryption software or adding the Renderwow directory to the whitelist |
2.1.2 Download Steps
Visit the Renderwow official website download page to obtain the latest client installer:
Official Website: https://www.renderwow.com/
You may click "Free Download" on the official website to download the client directly.

2.1.3 Installation Steps
-
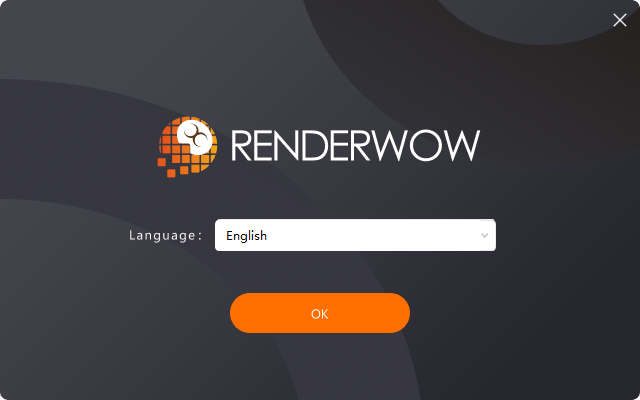
Step 1: Double-click the downloaded installer (.exe). A "Select Language" dialog will appear. It is recommended to keep the default language and click "OK".
-
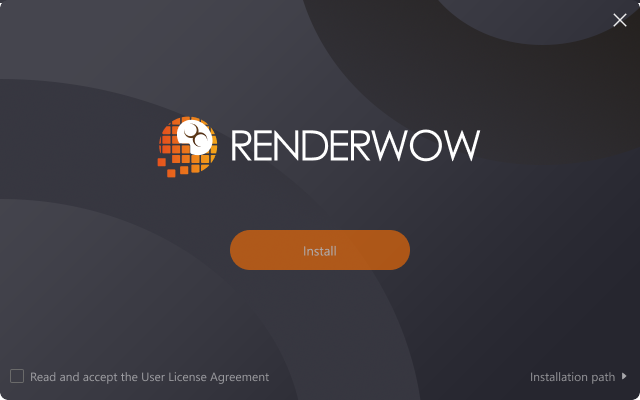
Step 2: Read and accept the license agreement by checking "I accept the User License Agreement".
-
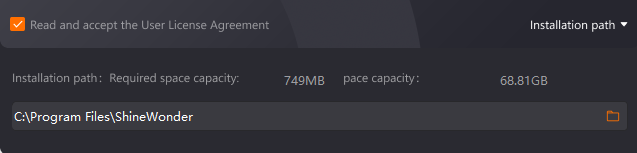
Step 3: Customize the installation path (optional; default is the C: drive) and click "Install".
-
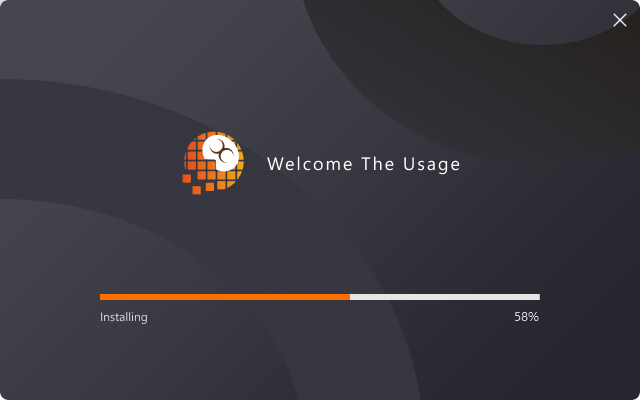
Step 4: Wait for the installation to complete. A Renderwow client shortcut will appear on the desktop. Click "Run Program" to enter the Renderwow client login page.

Note: If you are using local encryption software (e.g., enterprise encryption systems), all .exe files in the Renderwow client installation directory must be set to Read Decrypted Content. Otherwise, encrypted assets uploaded to the cloud will result in rendering failures or incorrect output.
2.2 Account Registration
2.2.1 Registration Methods
You may access the registration page via either of the following methods:
-
Visit the Renderwow official website (https://www.renderwow.com/) and click the "Sign Up" button in the upper-right corner.

-
Open the Renderwow client and click "Sign Up — It’s Free" on the login page.
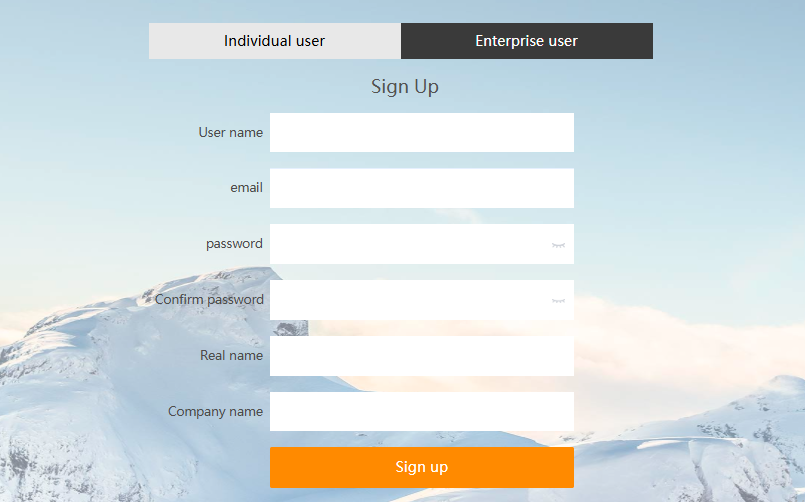
2.2.2 Personal Account Registration
Web and Client Registration

| Field | Description |
|---|---|
Username |
Must start with a letter (not case-sensitive), 6–18 characters, letters, numbers, and underscores only |
Enter a valid email address |
|
Password |
Must contain at least two of the following: numbers, letters, or symbols; 6–16 characters |
Confirm Password |
Re-enter the password |

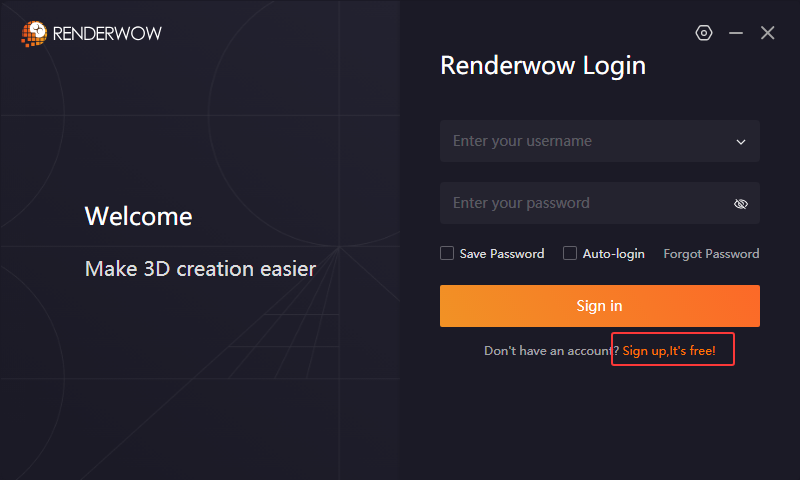
2.3 Client Login
2.3.1 Standard Login
-
Enter your Renderwow registered account and password on the login page.
-
Click "Sign In" to enter the client.
Convenience Features: Check "Save Password" for one-click password-free login; check "Auto-Login" to automatically complete login when the client starts; combine with "Run at startup" to connect to Renderwow immediately on boot.
2.3.2 Forgot Password
Click the "Forgot Password" link on the login page. After verification via the registered email, reset your password.

2.3.3 Proxy Settings
In general, no proxy is required. If network restrictions cause login failures or API timeouts, click the Settings button on the login page to enable proxy functionality:

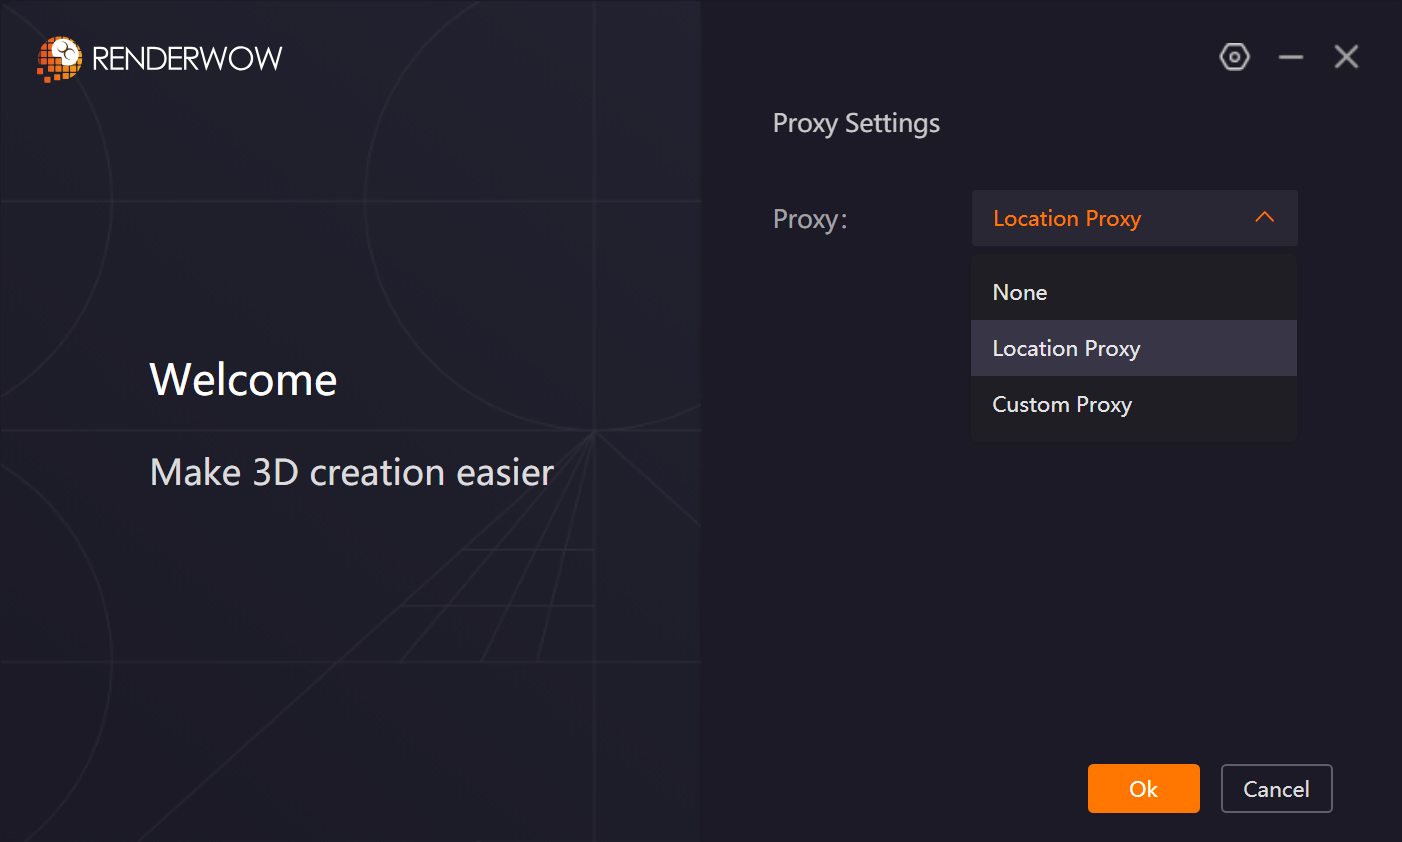
-
Location Proxy: When enabled, location information is automatically retrieved to match you with the optimal acceleration service and resolve login timeout issues (enabled by default in the Renderwow client).
-
Custom Proxy: Applicable to enterprise intranet or air-gapped environments. Supports HTTP, SOCKS4, and SOCKS5 proxy types to resolve login failures, resource loading issues, and other problems, while also supporting transfer proxy acceleration. Currently, the login client only supports anonymous or authenticated HTTP proxies, anonymous SOCKS4, and SOCKS5 proxies. Transfer acceleration supports anonymous or authenticated HTTP proxies, SOCKS4, and SOCKS5 proxies.
-
Note: The "Custom Proxy" and "Location Proxy" functions are mutually exclusive. Enabling Custom Proxy will automatically disable Location Proxy.
2.3.4 Post-Login Initialization
After successful login, the Renderwow client will automatically execute the following background operations. Please wait patiently: clear temporary data, load job data, load download result data, clean expired cache, initialize memory data, and check for and update plugins.
2.4 Installing Plugins
Plugins based in-app submission (3ds Max, Cinema 4D, SketchUp, Blender, Rhino) and drag-and-drop submission (KeyShot) require installing the corresponding software plugins in the client first. The procedure is as follows:
In the client, go to the top navigation bar → Plugins → Select the software type → Select the corresponding version → Click "Install".
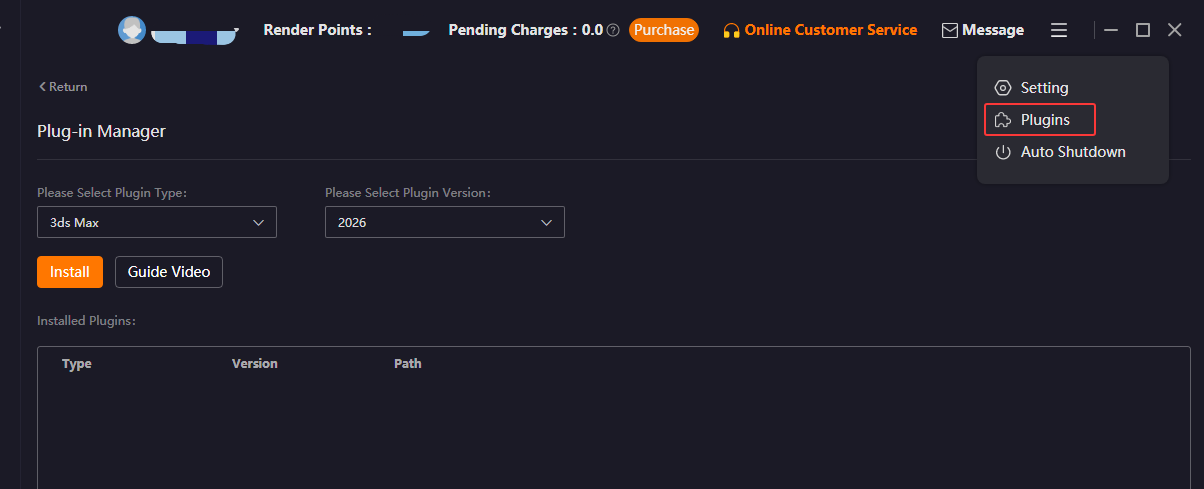
If the software is installed in the default path and the plugin list is empty, Renderwow can automatically detect and complete the installation; otherwise, the software installation path must be selected manually. After successful installation, plugin information can be viewed in the "Installed Plugins" list.
For each rendering software, click "Guide Video" to learn about the Renderwow plugin workflow.
2.5 Submitting Your First Job
Using 3ds Max still-image rendering as an example, quickly complete your first cloud rendering:
-
Open the scene file in 3ds Max and configure the rendering parameters in the Render Setup (renderer, output path, resolution, etc.).
-
Click "Renderwow" in the 3ds Max top menu bar → "Cloud Rendering — Still".
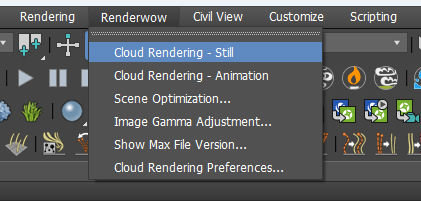
-
Confirm the parameters (version, project, camera, etc.) in the submission window that appears, and click "Submit".

-
Renderwow automatically packages the scene, uploads it to the cloud, renders on cloud machines, and automatically downloads the results to the local specified path.
Warning: Ensure the output path is set correctly before submission; otherwise, Renderwow will prompt you to set the path. Unsaved scenes cannot be submitted.
2.6 Job Lifecycle
Jobs progress through five stages: Submission, Upload, Rendering, Rendering Complete, and Downloaded.
(I) Submission Stage
Submission is divided into plugin submission and drag-and-drop submission. Most applications support only one method; 3ds Max supports both. It is recommended to set test frames for submission and confirm that the results are correct before rendering the full sequence.
Plugin Submission: Open the submission window via the Renderwow menu item within the application, set the parameters, and submit. For each submission, the Renderwow plugin creates a job directory under %USERPROFILE%\SCC\NewJobs and generates a job description file. A single submission may generate multiple jobs. SCC.exe periodically scans this directory; when a new job directory is detected, jobs are generated based on the description file and enter the upload stage.
Drag-and-Drop Submission: Drag the scene file into the Renderwow job list. A submission window will appear; after setting the parameters and confirming, a job under analysis is generated. The client creates a temporary job directory under %USERPROFILE%\SCC\tmp and launches the corresponding DCC application in the background to load the scene and run the analysis script, analyzing camera settings, frame ranges, and other parameters.
Analysis Error: An error button is displayed on the right side of the job status. Click it to view the error reason.

Analysis Success: A Submit button appears. After clicking, a submission confirmation dialog pops up. After modifying parameters and confirming, a formal job directory and description file are generated under %USERPROFILE%\SCC\NewJobs. SCC.exe scans and generates the job to enter the upload stage. At this point, the job under analysis is no longer displayed on the analysis page and is replaced by one or more jobs after submission.
![]()
Concurrent Analysis Limit: The default concurrent analysis limit is 1 job. When local memory is sufficient, this can be modified in the Settings page to enable simultaneous analysis of multiple jobs.

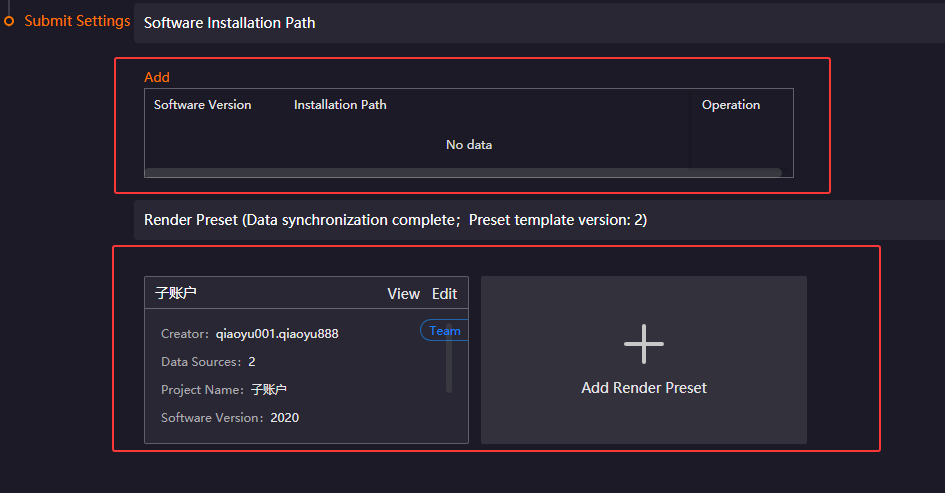
Software Installation Paths and Render Presets: For applications that support plugin submission, the plugin has already obtained the paths for each version. For applications that only support drag-and-drop submission (Maya, Houdini, Clarisse, Katana, Unreal Engine), to prevent submission failures, the installation paths and project presets for each version must be added in advance in Settings → Submission Settings.
(II) Upload Stage
After successful submission, the job enters this stage and sequentially passes through five sub-stages: Asset Analysis, Packaging, Upload, Unpacking, and Cloud Submission.
Asset Analysis: At this point, the job status displays [Analyzing assets]. 3ds Max, SketchUp, and Rhino calculate the MD5 hash of file contents during this stage. If files are large, numerous, or slow to read from NAS storage, this stage may take longer. Maya and other applications calculate the attribute-based MD5 hash based on file path, size, and last modification time. Both MD5 hashes are compared against the cloud asset library; if they exist in the cloud, they are not uploaded. The probability of MD5 hash collisions for file contents is extremely low, allowing files to be reused across users without re-uploading. The probability of attribute-based MD5 hash collisions is high; they are only compared against the user’s own previously uploaded files to determine whether re-upload is required.
Packaging: Once asset analysis is complete, the job enters this stage, and the status displays [Packaging]. Small files under 2 KB are copied to the temporary upload directory, packaged and compressed, and uploaded together. Large files are uploaded individually to reduce packaging wait time and shorten the overall upload duration.
Upload: Once packaging is complete, the job enters this stage, and the status displays [Uploading]. Multiple transfer processes and threads upload large files concurrently, followed by the compressed package. Renderwow provides multiple transfer methods. When the default method is not performing well, right-click the job to switch transfer methods. During this stage, the upload or rendering progress bar is updated.
Unpacking: Once upload is complete, the job enters this stage, and the status displays [Unpackaging]. The cloud decompresses the compressed package and supplements unuploaded files from the asset library.
Cloud Submission: Once unpacking is complete, the job enters this stage. This stage is extremely brief and usually not visible in the client. After successful submission, the job enters the rendering stage.
(III) Rendering Stage
After entering this stage, the job first queues, and then the cloud automatically allocates rendering nodes. Node startup takes 2–5 minutes, and queuing for 2–5 minutes is normal. When nodes are available, the status is [Rendering]; when no nodes are available, the status is [Queuing]. A group of one or more frames rendered by the same node is called a sub-job. After all sub-jobs are completed, the job enters the Rendering Complete stage.
Billing Rules: You are only charged for sub-jobs that render successfully; failed sub-jobs incur no charges. During rendering, the pending charge is calculated based on machine hours consumed. If the pending charge exceeds your account balance plus credit limit, the job automatically stops and you are charged only for the machine hours consumed; no complete rendering results will be available. Please monitor your balance and recharge as needed.
Rendering Node Allocation: The cloud scheduling system automatically calculates the minimum and maximum number of nodes for a job based on the total number of frames, single-frame rendering time, and the system’s default total rendering duration target. It automatically allocates rendering nodes, starting with the minimum count and adding more when idle, without exceeding the maximum. When a job is urgent, right-click the job and select [Add Machine] to manually increase the node count. Once the allotted uses are exhausted, contact customer service for assistance. Renderwow will endeavor to complete the job on time without additional charges.
Result Downloads: After a sub-job renders successfully and is charged, the client updates the rendering progress, automatically downloads the results, and updates the download progress. We recommend avoiding V-Ray’s .vrimg format or Corona’s .cxr format for output, as these files are large and take a long time to download, especially for animation jobs. When your account balance reaches zero or below, downloads automatically pause; this pause is not affected by your credit limit.
Billing Period: After a sub-job is allocated to a rendering node, the rendering environment is first verified; if it doesn’t match, it is switched (e.g., plugin version). Then the DCC is launched, the scene is loaded, and rendering begins. For most applications, the billing duration includes all time for environment preparation, DCC startup, scene loading, etc. Actual rendering time is only part of the total. When scenes are large or take a long time to open, set the number of frames per sub-job accurately to reduce overhead per frame and lower rendering costs. 3ds Max animation are billed based on near-pure rendering time. It is also recommended to set a reasonable number of frames. Recommended: the slowest sub-job should take at least 1 hour to render.
(IV) Rendering Complete Stage
All sub-jobs of the job have completed rendering, and the rendering results enter the download process. After all frame results are downloaded, the job enters the Downloaded stage.
Cloud Retention Policy: Downloaded results are retained for 7 days by default; undownloaded results are retained for 30 days by default. For extended retention, contact customer service.
(V) Downloaded Stage
All rendering results are downloaded locally, and the job is completely finished. It is recommended to regularly clean up expired historical jobs; otherwise, the Renderwow client startup speed will be affected.
Job Processing Architecture
The Renderwow client backend SCC.exe uses a multi-threaded architecture to handle the full job lifecycle. Jobs are processed sequentially across multiple threads. When the next-stage thread is busy, the current job waits until it becomes available. In processing order, the functions of each thread are as follows:
Scan Thread: Single-threaded, responsible for scanning the NewJobs directory for new job directories. If a new job is detected, one or more jobs are generated according to the job description file.
Packaging Thread: Single-threaded, responsible for calculating asset file MD5 hashes, comparing MD5 hashes against the cloud, and packaging and compressing small files.
Upload Thread: Multi-threaded, responsible for uploading large asset files and packaged files. Multiple transfer processes or threads can be launched on demand. When multiple jobs are pending upload, jobs with the highest [Upload Order] are uploaded first. It is normal for some jobs to show no upload speed.
Update Thread: Single-threaded, responsible for communicating with the cloud, querying the latest job status, and updating the rendering progress and other information of jobs in the client.
Download Thread: Multi-threaded, responsible for downloading rendering result files. Multiple download processes or threads can be launched. For jobs with test frames, test frame results are prioritized for download after rendering. Subsequently, jobs with the highest [Download Order] are selected for multi-threaded download. Generally, download threads are allocated to the highest-priority job, and only allocated to the next-priority job when that job has no results to download. It is normal for some jobs to show no download speed when multiple jobs are pending download. To allocate at most one download thread per job and enable concurrent downloading of multiple jobs, go to the Job Download section on the Settings page and change the Download Thread Allocation Strategy to "Download multiple jobs concurrently".
Please note: when downloading multiple jobs simultaneously, the download progress of individual jobs will slow down. Please choose according to your needs.