Advanced Features
14.1 Sub-Accounts and Team Collaboration
Enterprises can create sub-accounts through the main account to achieve multi-person collaborative submission and management of jobs:
| Function | Description |
|---|---|
Create Sub-Account |
Main account logs in to the official website User Center → Sub-Accounts → Add Sub-Account, set account/password/permissions |
Permission Control |
Main account can assign sub-account permissions for job viewing, submission, download, etc. |
Job Cost |
Job costs submitted by sub-accounts are deducted from the main account |
Job Synchronization |
After enabling "Multi-client job synchronization", the main account can view sub-account submitted job progress and download results |
Project Name |
Main account and sub-accounts can share Project Names; the main account can Edit Project Names created by sub-accounts |
14.2 Project Management
Flexible and controlled project management modes are designed for enterprise main accounts, covering Project Name CRUD and Render Preset CRUD functions, while distinguishing main and sub-account operation permissions, which can be used as needed.
14.2.1 User Center – Settings
Set the project management mode in the main account User Center:
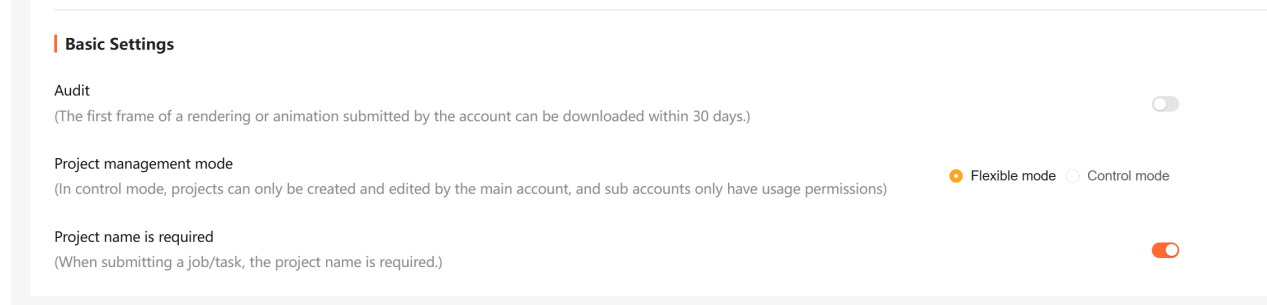
14.2.1.1 Flexible Mode (Default)
-
All team accounts can view and use all Project Names and Render Presets, and all have the permission to add new Project Names and Render presets.
-
Project Names and presets display the actual creator. All accounts can edit and delete their own created Project Names and Render presets. The main account can edit Project Names and presets created by sub-accounts, and can delete Project Names created by sub-accounts.
-
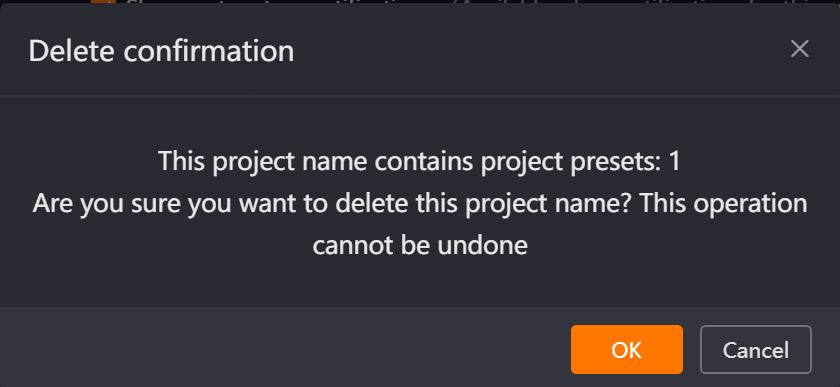
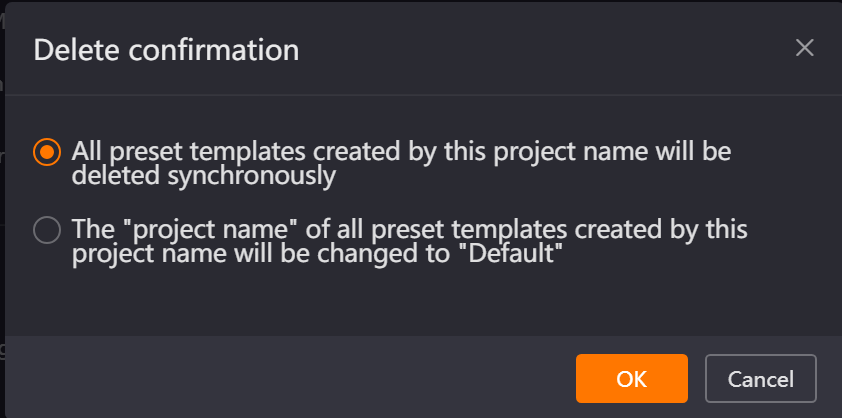
Project Names and Render Presets are strongly associated. When deleting a Project Name, you can choose to synchronously delete the corresponding Render Preset or move it to the default project.
-
Supports custom enabling or disabling of [Project Name is Required], which can be selected according to project needs whether to Must fill Project Name.
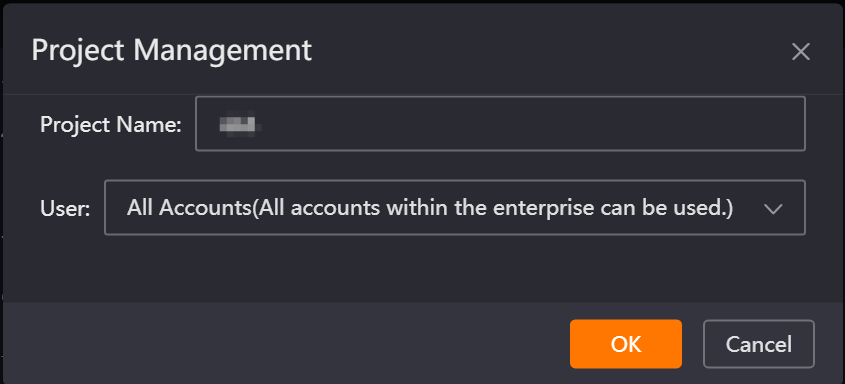
14.2.1.2 Control Mode (Strong Permission Management)
-
Only the enterprise main account has the permission to create, edit, and delete Project Names and Render presets. Project Names display the usable account range. Sub-accounts can only use Project Names and presets within their own permissions, and cannot create, edit, or delete.
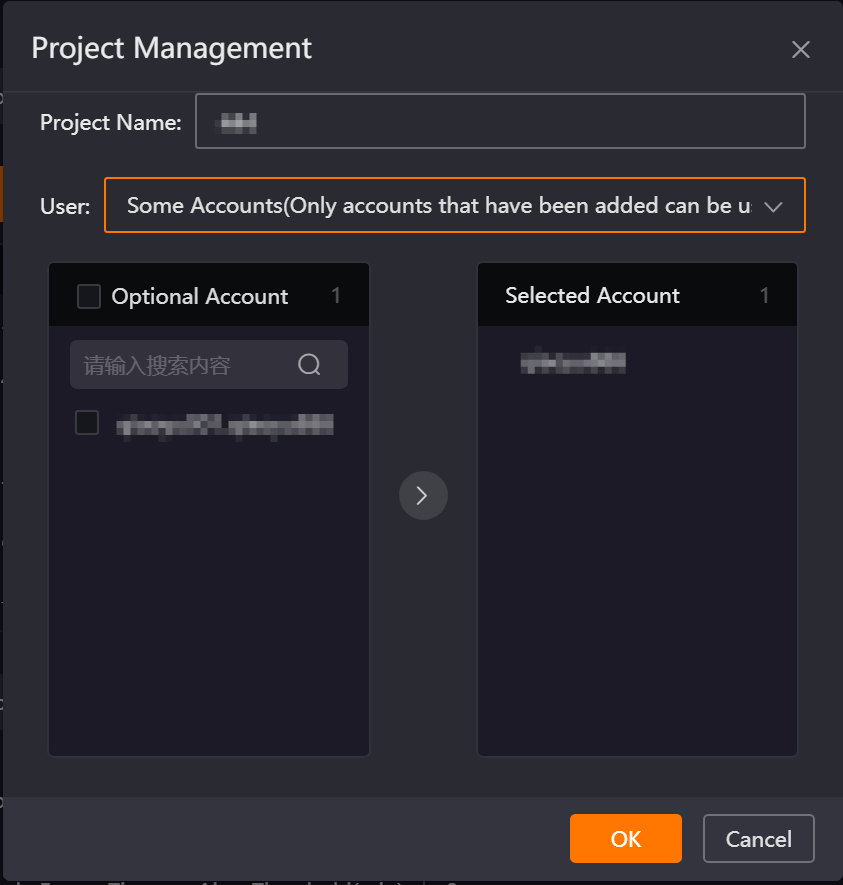
When the main account edits project name usage permissions, it can flexibly choose:
-
[All Accounts]: Automatically covers all existing and future newly added enterprise accounts, no manual maintenance of permissions needed
-
[Some Accounts]: Precisely specify accounts that can access the project , meeting refined permission control needs.
-
Project Names and Render Presets have a strong association relationship. When deleting a Project Name, you can choose to synchronously delete the corresponding Render Preset or move it to the default project.
-
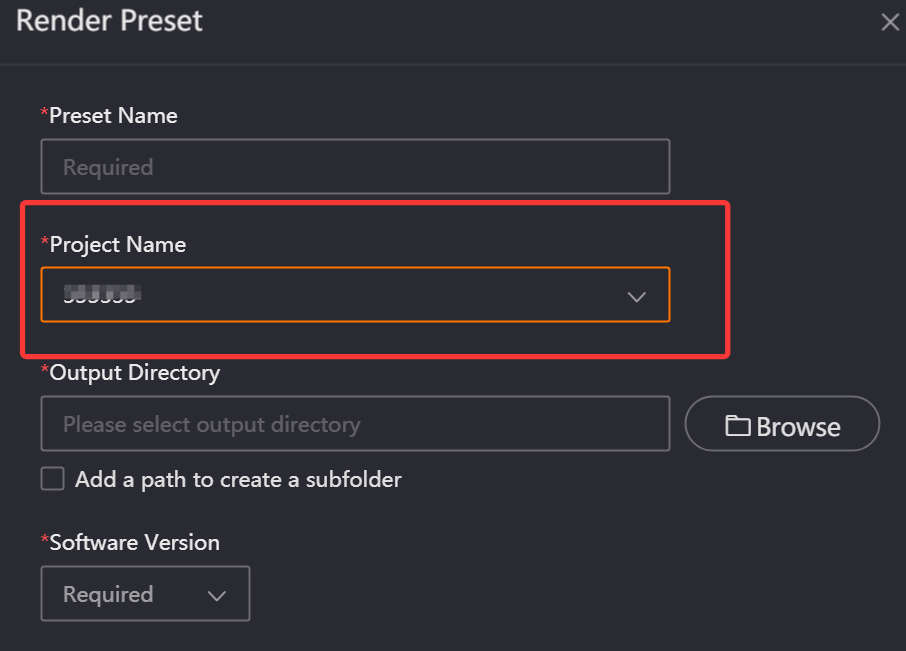
When the main account creates a Render Preset, it can select a Project Name to use but cannot create one.
-
[Project Name is Required] is forced enabled and cannot be disabled.
14.2.2 Project Name Creation and Usage Locations
14.2.2.1 Flexible Mode (Default)
-
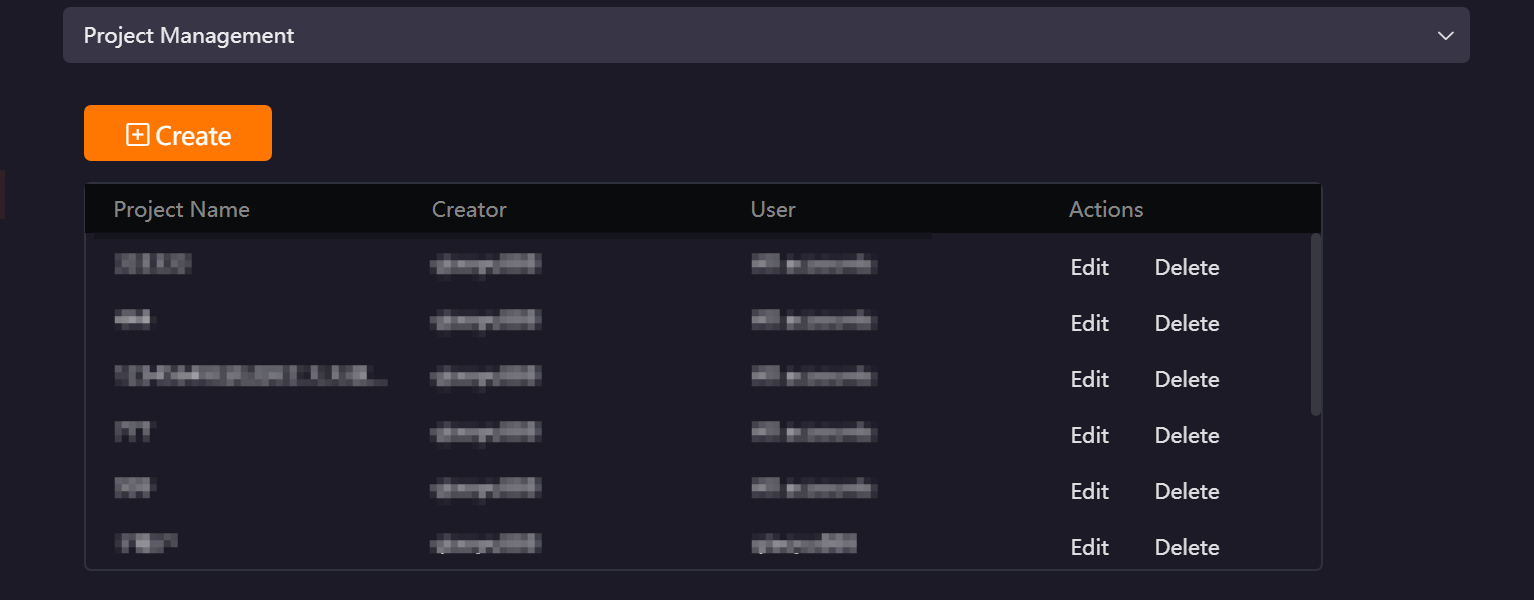
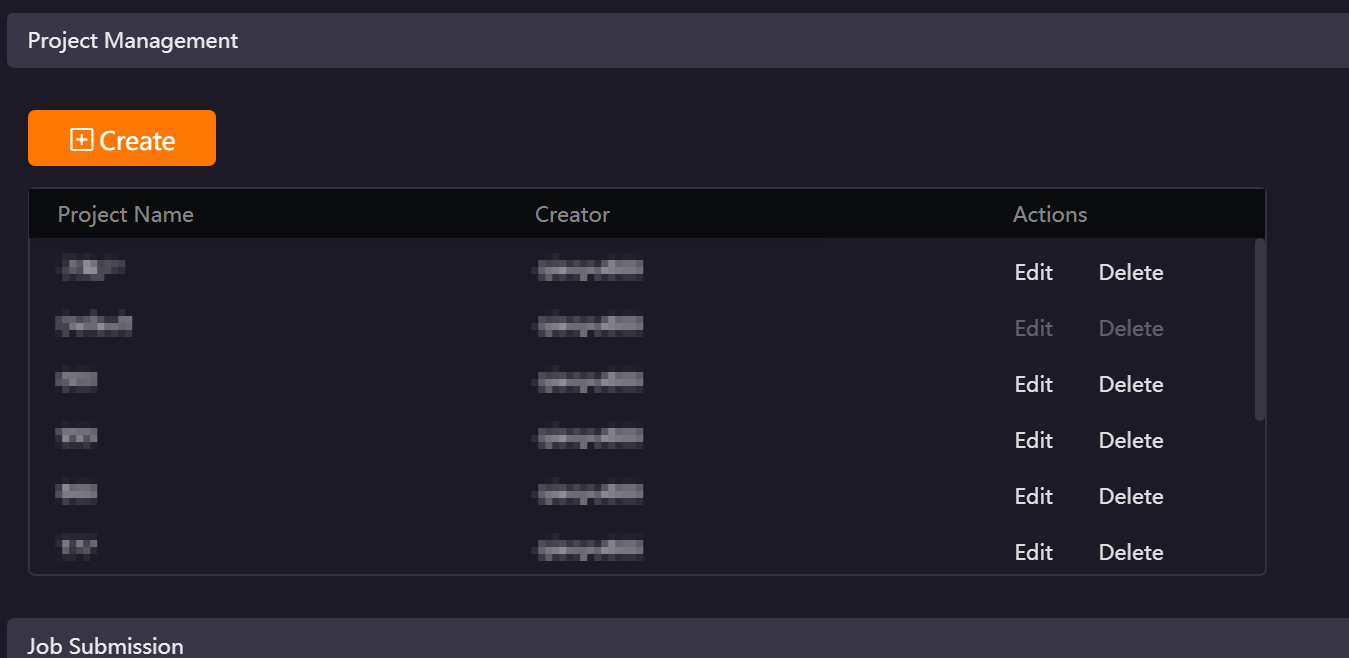
1. Client → Setting → Basic Settings → Project Management: You can create, edit, and delete Project Names here. Main accounts and sub-accounts can share Project Names, and the main account can also Edit Project Names created by sub-accounts.
-
2. Client → Setting → Submission Settings → Render Preset: Project Names can be created, deleted, and used in the Render Presets for Maya, Houdini, Clarisse, Katana, and UE.
-
3. Plug-in submission interface: Currently supports 3ds Max, Cinema 4D, and Blender submission pages to create Project Names.
14.2.2.2 Controlled Mode
-
1. Client → Setting → Basic Settings → Project Management: The main account can create, edit, and delete Project Names here.
-
2. Client → Setting → Submission Settings → Render Preset: In the Render Presets for Maya, Houdini, Clarisse, Katana, and Unreal Engine, you can only select Project Names to use.
-
3. Plug-in submission interface: 3ds Max, Cinema 4D, and Blender submission pages currently can still create Project Names.
14.3 Multi-Client Job Synchronization (Multi-Machine / Cross-Account)
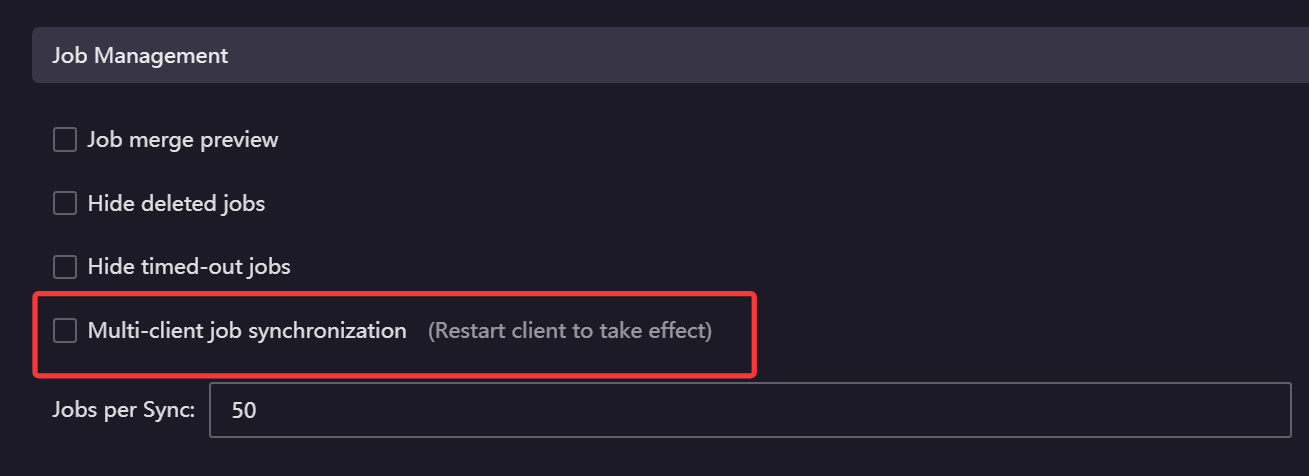
After enabling Multi-client job synchronization (Settings → Basic Settings → Multi-client job synchronization), the following can be achieved:
-
When different computers log in to the same account, synchronize and display jobs not deleted within 7×24 hours
-
View job render progress; personal account jobs can click "Start Download" to download results at any time
-
The team main account can view jobs submitted by sub-accounts and download results after job rendering is complete
Note: The Multi-client job synchronization function requires restarting the client after modification to take effect. After enabling, the Hide deleted jobs and Hide timed-out jobs functions can be used in coordination to keep the job list tidy.
14.4 Producer Marking
When multiple people share an account, you can set the current submitter information in "Settings → Basic Settings → Producer". The "Producer" column in the client job list can quickly retrieve jobs by the corresponding Producer for easy job ownership tracking.

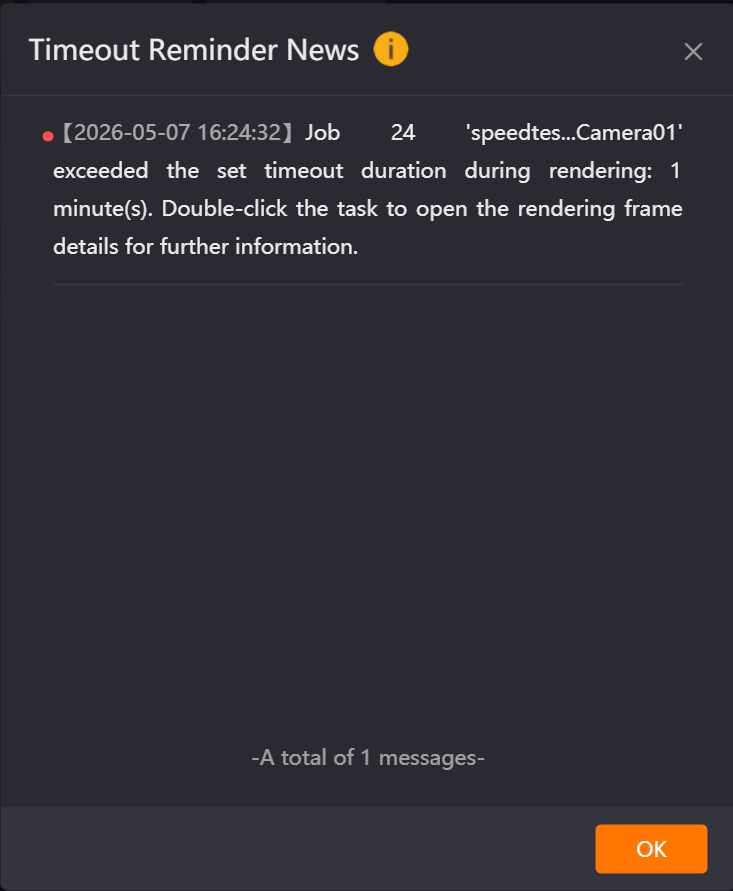
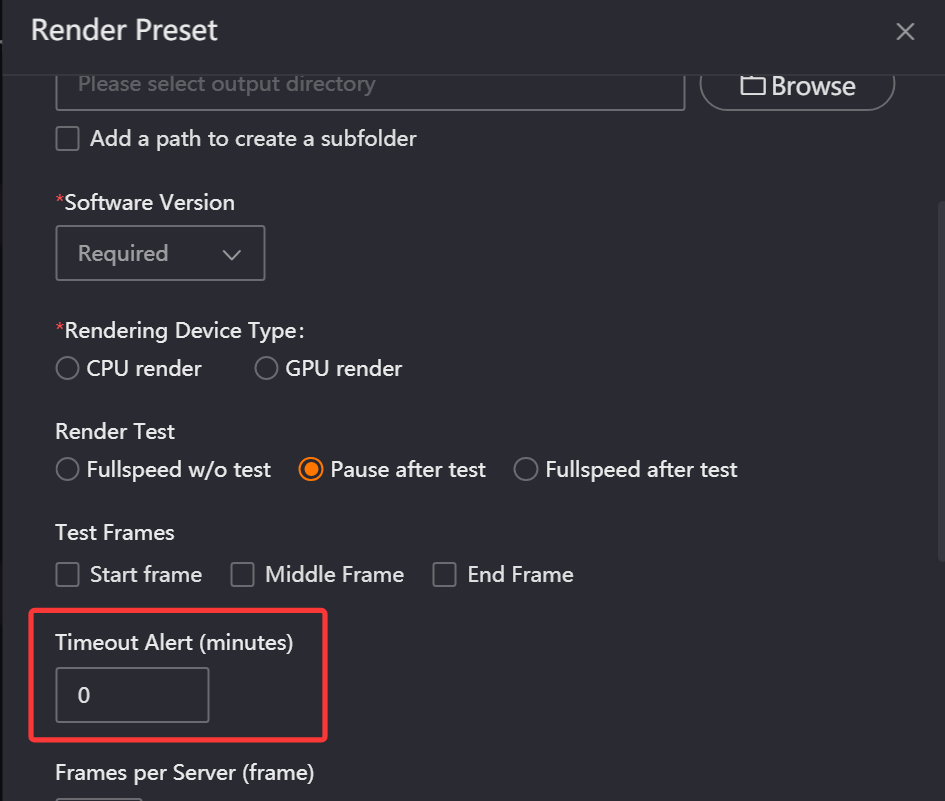
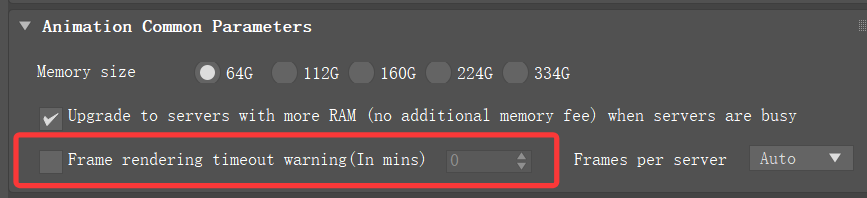
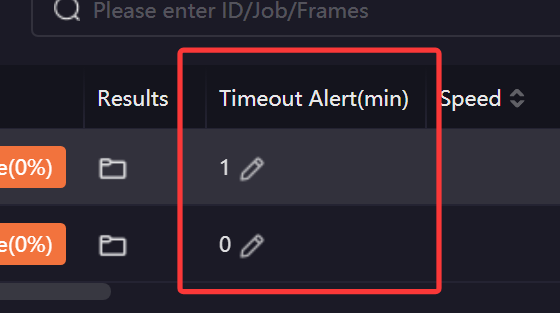
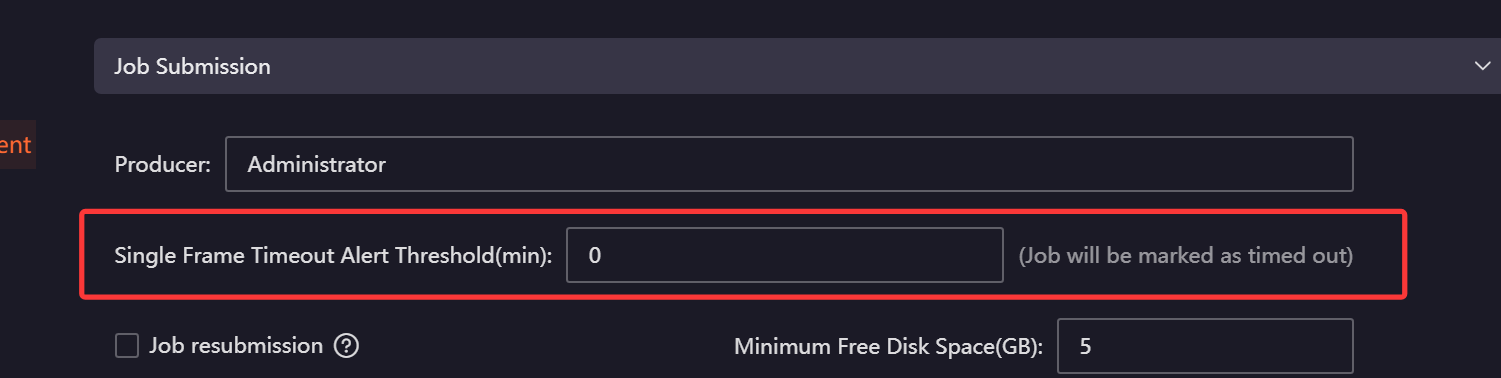
14.5 Timeout Alert
Use this function to monitor job render duration. After a frame’s render duration exceeds the set time, the job and corresponding sub-job will highlight and flash with an exclamation mark. You can modify the timeout time in the job list. After modification, the new modified time will be used to determine whether the job is timed out.

The pop-up message page displays the job ID.
Usage method:
-
(1) Set in the Render preset template of the Submission Settings interface. When submitting the corresponding drag-and-drop job, the preset template time shall prevail.
-
(2) Set in the job submission interface, such as the 3ds Max submission interface. When submitting the job, the setting in the submission interface shall prevail.
-
(3) Click the pencil icon in the client job list to set and modify the timeout time. After setting modification, the modified value shall prevail.
-
(4) Set the global timeout alert time in the client Basic Settings interface. If not set in the submission page or Render preset page when submitting the job, the global timeout time will be used (global variable time has the lowest priority).
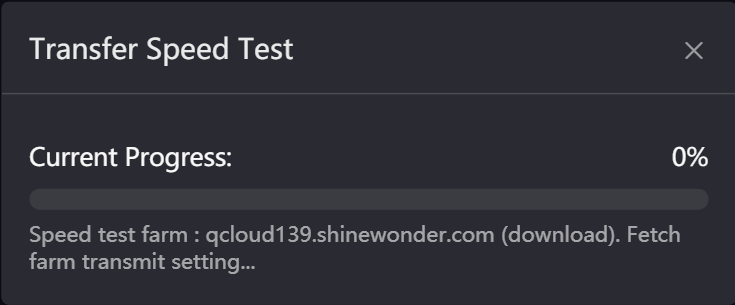
14.6 Speed Test
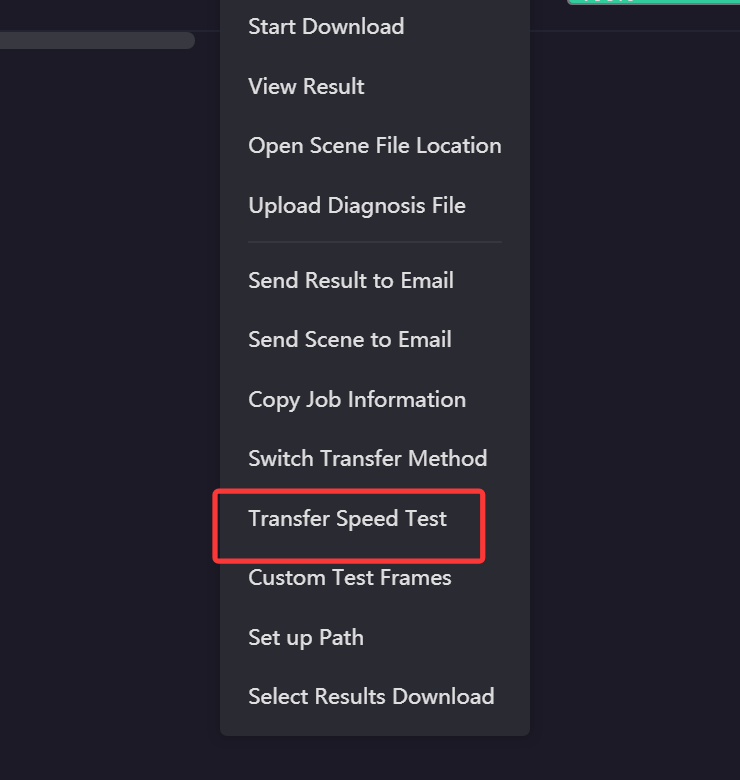
When job upload or download speed is abnormal, select the job and right-click [Transfer Speed Test] to test the speed of different transfer strategies to the target farm, and automatically recommend the optimal solution.
Note: Use this function when the job has completed packaging and upload progress is less than 100% to test upload speed only; use this function when the job has rendered at least one frame to test download speed only. In other job states, this function is not available in the right-click list.
-
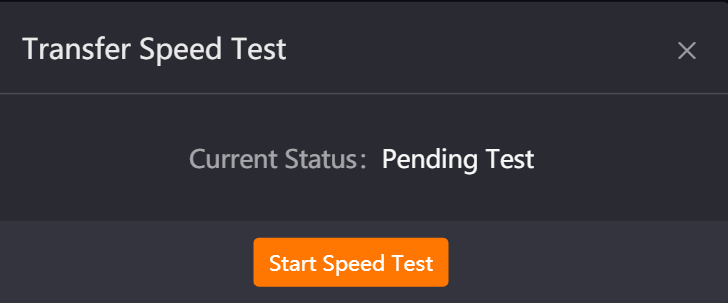
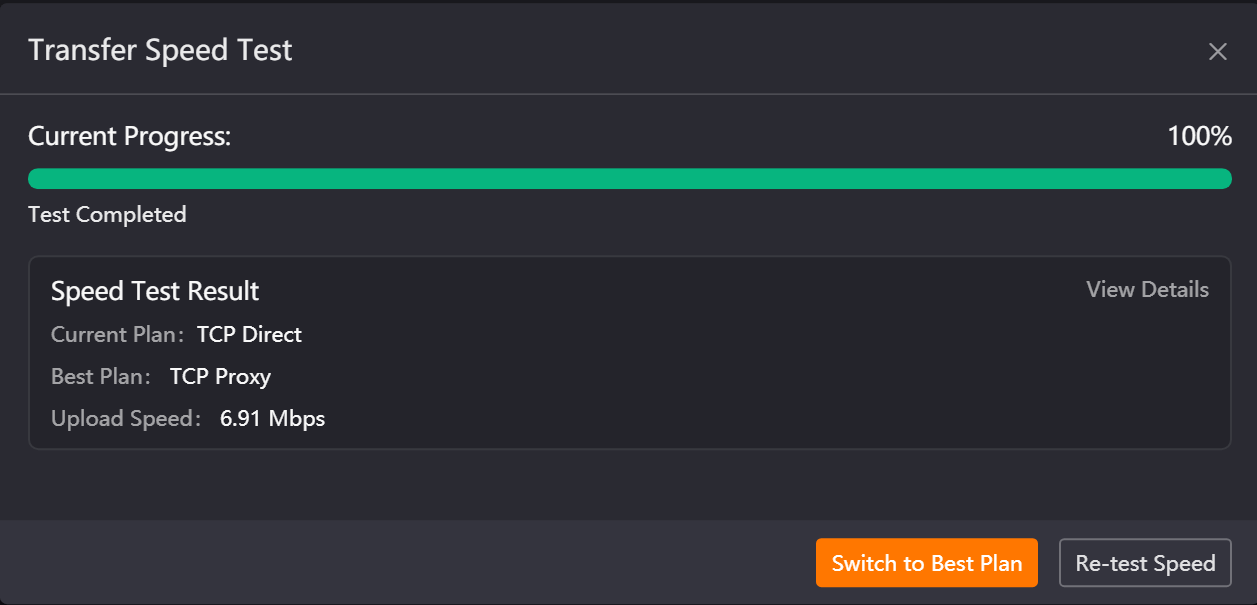
Recent Same Farm Not Speed Tested: Displays the pending test status. After clicking [Start Speed Test], it directly displays the speed test progress bar. After ending, it displays the speed test results. View Details displays the speed report of each transfer method and recommends the optimal transfer method. You can choose [Switch to Best Plan] to directly switch to the optimal transfer strategy.
-

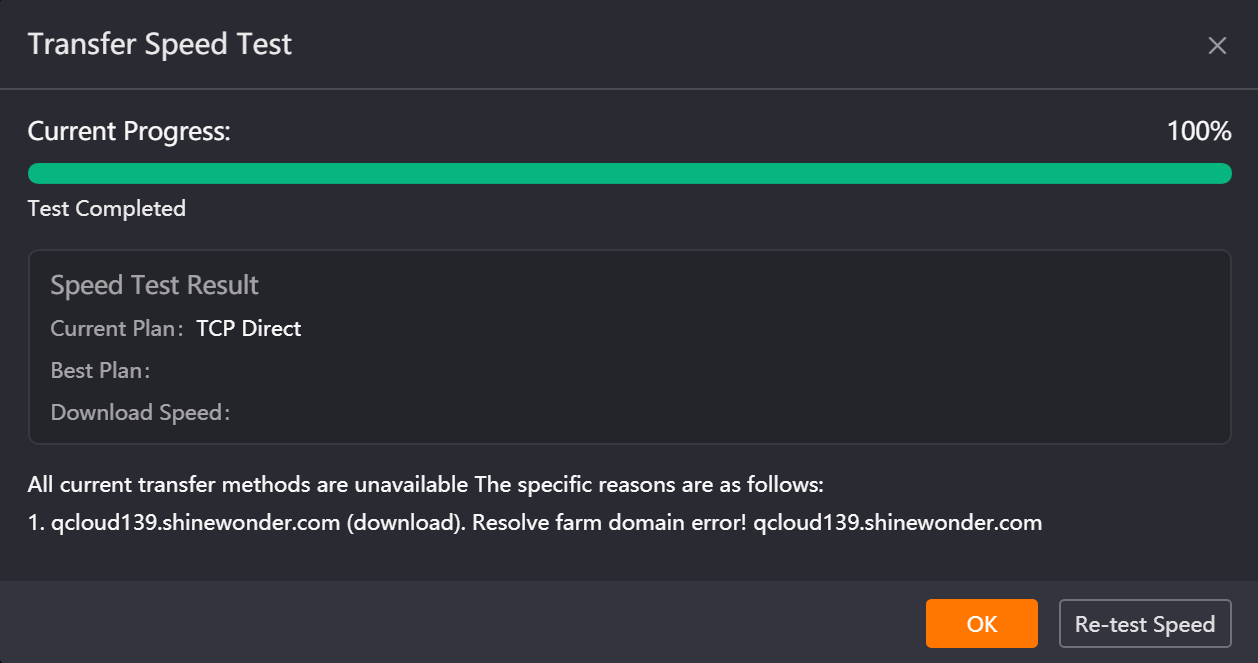
If an exception occurs during the speed test, it will display the specific reason for easy problem diagnosis.
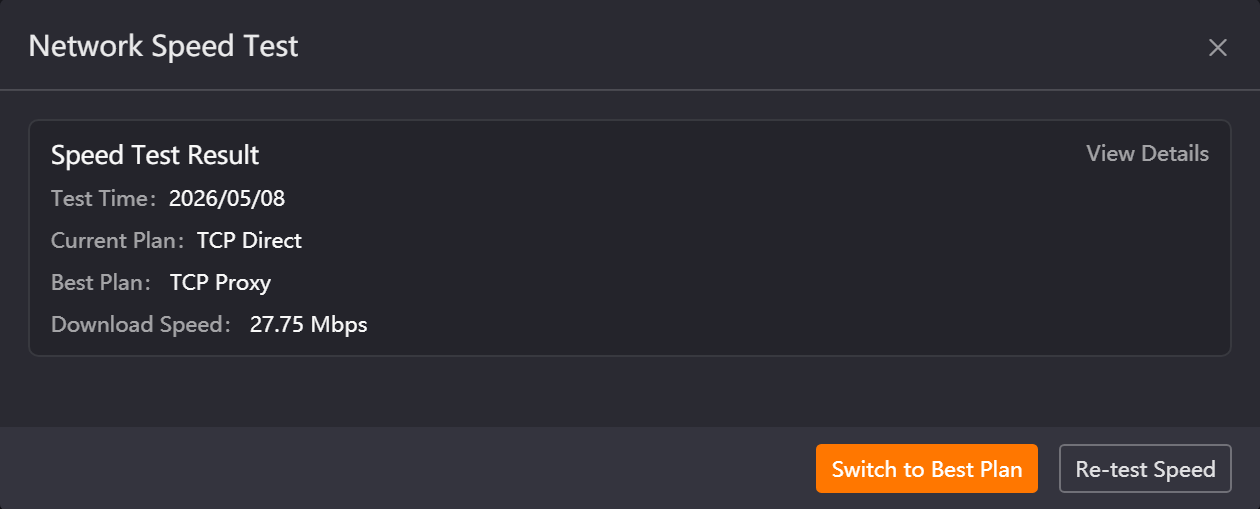
-
Recent Same Farm Already Speed Tested: Displays the last speed test result. You can choose [Switch to Best Plan] to directly switch to the optimal transfer strategy, or retest. (Speed test results are retained for 10 days.)
Note: Upload and download speed records are displayed independently: If only the upload speed of the same farm has been tested before, when using the speed test function in the download scenario this time, historical upload results will not be displayed, and you need to restart the speed test.
14.7 Auto Shutdown
The Auto Shutdown function is suitable for scenarios where large batches of jobs are submitted at night. Automatic shutdown after jobs completion lowers manual operation workload.
You can set "Automatic shutdown when upload completes" (suitable for setting before leaving) or "Automatic shutdown when download completes" (suitable for scenarios where the machine is no longer needed after results are downloaded).
Click the Auto Shutdown button in the upper right corner of the client to set automatic shutdown after upload completion or download completion.

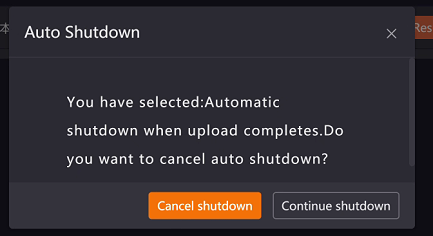
Automatic shutdown when upload completes:
The Renderwow client will detect the status of all jobs. When no jobs are in preparing, analyzing assets, packaging, package finished, uploading, upload finished, unpackaging, or unpackage finished states, a 30-second shutdown countdown will be triggered. You can choose Shut down now to execute shutdown immediately, or click Cancel / × to terminate the shutdown process.
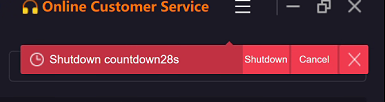
If there are jobs pending upload or currently uploading, you can click Auto Shutdown again and select Cancel shutdown to terminate the shutdown process.
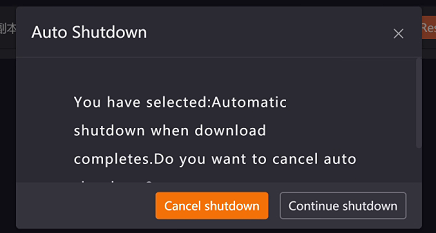
Automatic shutdown when download completes:
The Renderwow client will detect the status of all jobs. When there are no jobs with un-stopped downloads and incomplete downloads, a 30-second shutdown countdown will be triggered. You can choose Shut down now to execute shutdown immediately, or click Cancel / × to terminate the shutdown process.
If there are ongoing or incomplete download jobs, you can click Auto Shutdown again and select Cancel shutdown to terminate the shutdown process.
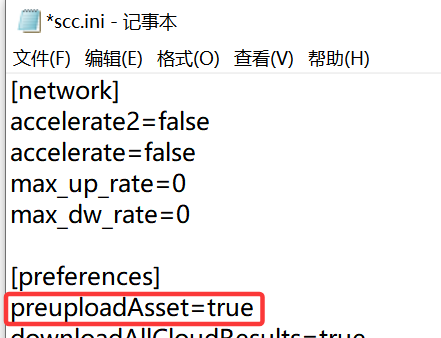
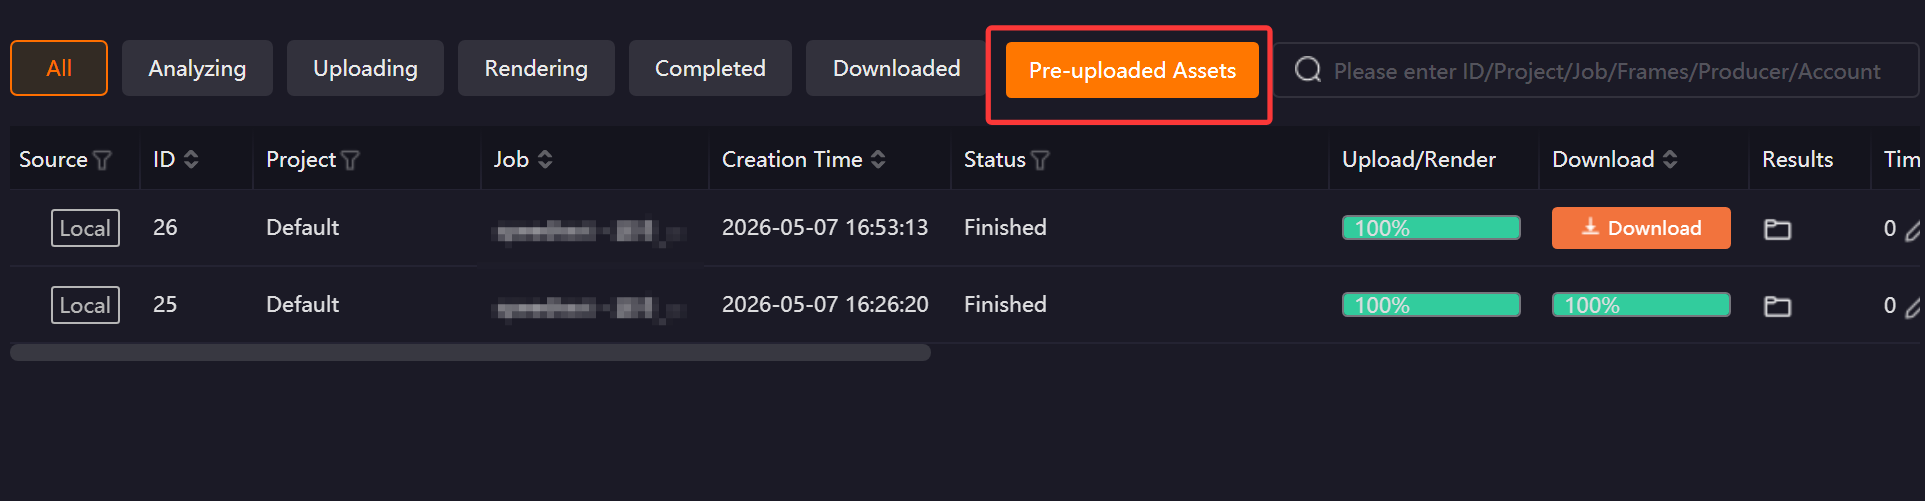
14.8 Pre-uploaded Assets (Custom Feature)
Applicable to users whose scene asset files are very large and numerous. Asset files can be uploaded to the cloud in advance. Subsequent scene submission only requires uploading the scene file, greatly shortening job submission time. This is a custom feature; please contact Renderwow customer service for assistance in enabling and configuring.
Usage method:
-
(1) Close the client, add the configuration item preuploadAsset=true in the [preferences] section of the C:\Users\Username\SCC\scc.ini file, save and restart the client. A "Pre-uploaded Assets" button will appear in the upper right corner of the client. Click to open.
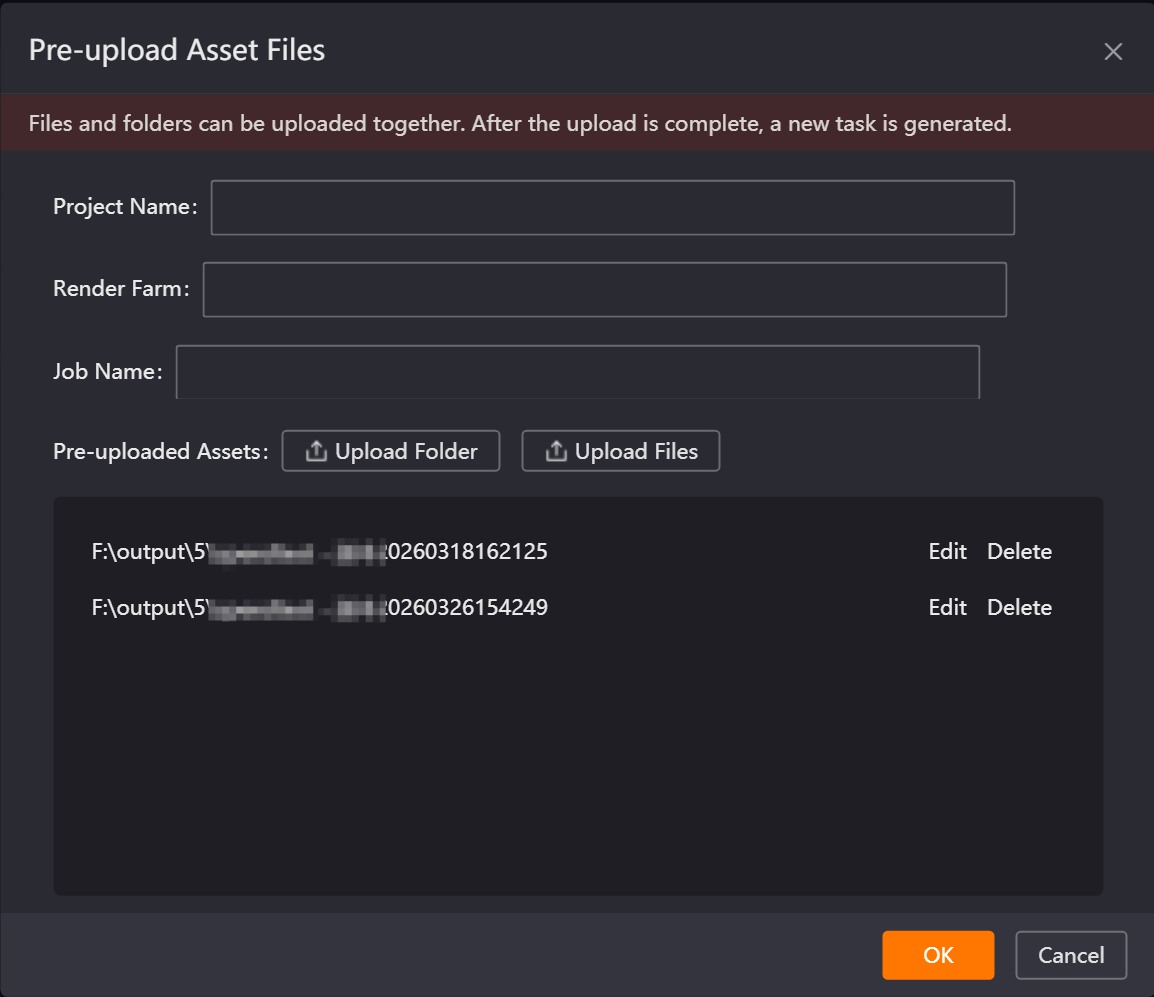
-
(2) Contact customer service to obtain render farm information, correctly fill in the corresponding content, upload assets, and click the "OK" button to submit.