Job Submission Tutorial
4.1 3ds Max Submission Tutorial
4.1.1 Overview
Renderwow supports all versions of 3ds Max 2009–2026, compatible with built-in renderer, V-Ray, Corona, FStorm, Redshift, Octane, and commonly used plug-ins.
There are two submission methods:
-
Submit directly via the Renderwow menu within 3ds Max (supports stills and animation). This is the simplest and most commonly used method. When using it, you must first open the scene. Note: submitting unsaved scenes is not supported.
-
Drag and drop the scene file into the Renderwow client for submission. Supports all versions of 3ds Max for drag-and-drop submission. The workflow differs slightly between 2016 and above versus below 2016, and both support single-scene and multi-scene file submission.
Key Version Differences:
-
3ds Max 2016 and above: After dragging the scene to the client and completing analysis, clicking Submit directly opens the full parameter configuration page. Set the parameters and then submit the render job. (Only supports animation job submission.)
-
3ds Max below 2016: After dragging the scene to the client, 3ds Max software will automatically open. You need to complete the configuration in the [Renderwow] menu window within the software before continuing to submit the job. (Supports both animation and still job submission.)
4.1.2 Submission Preparation
-
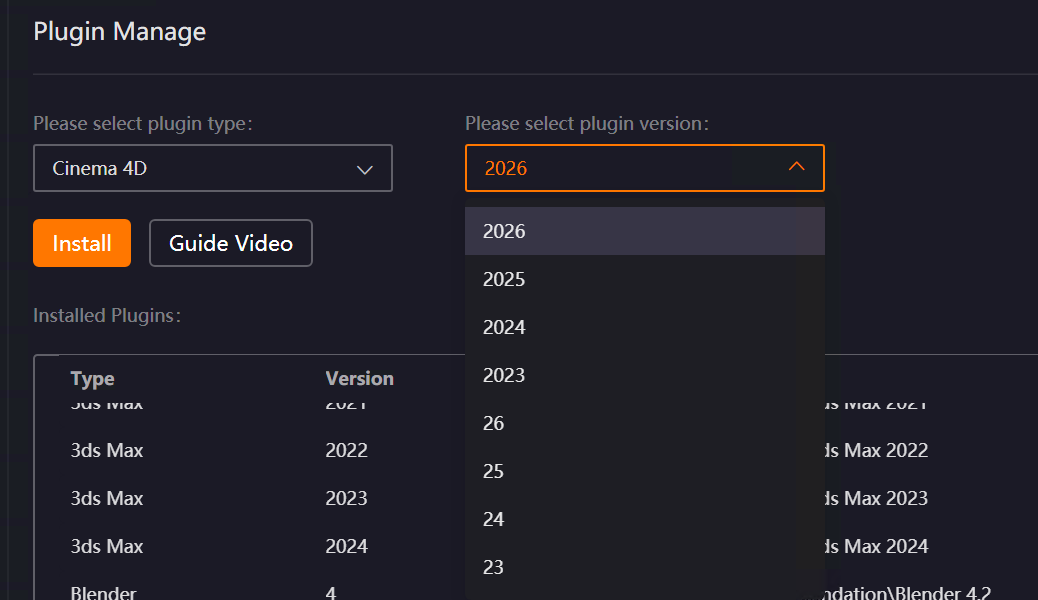
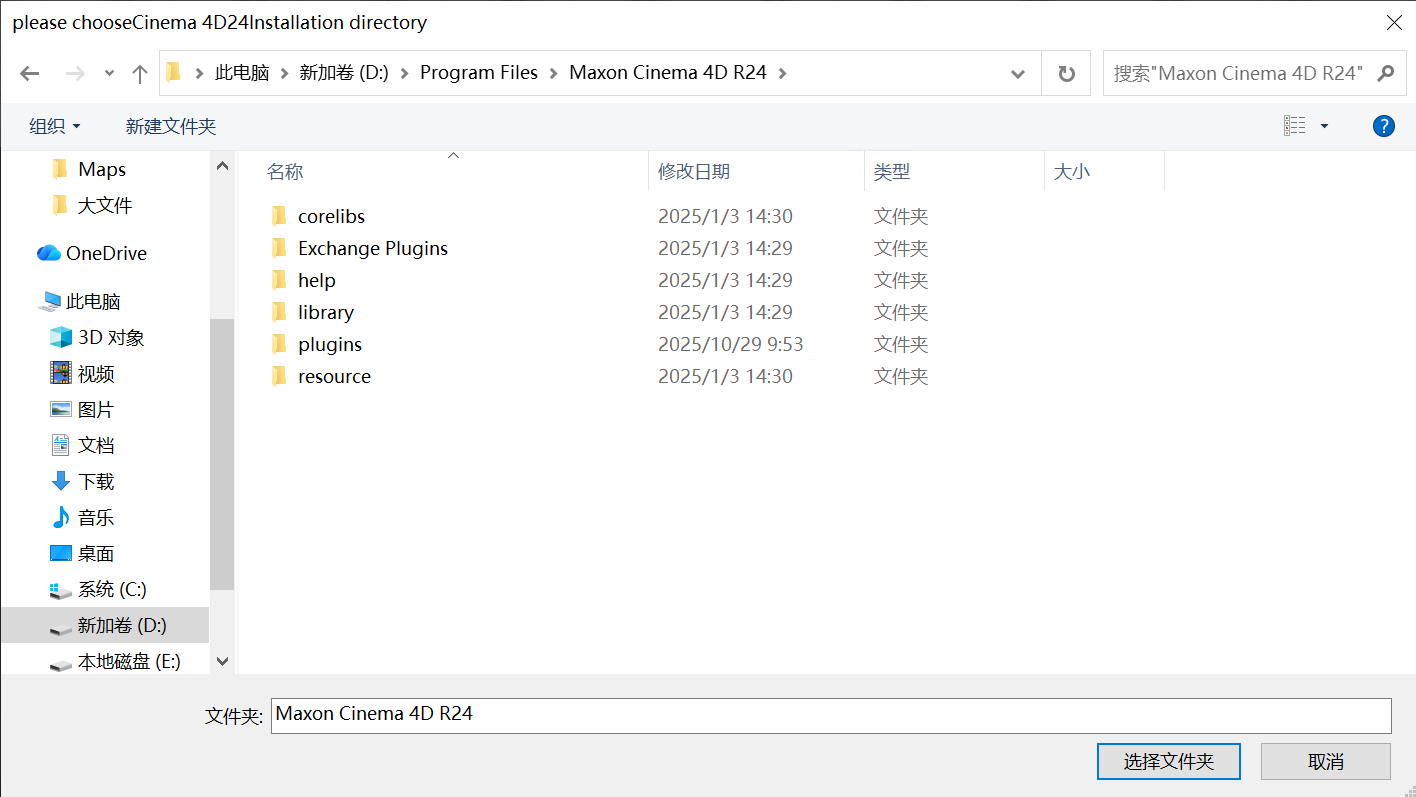
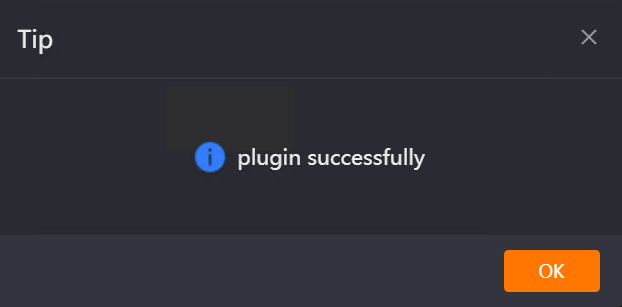
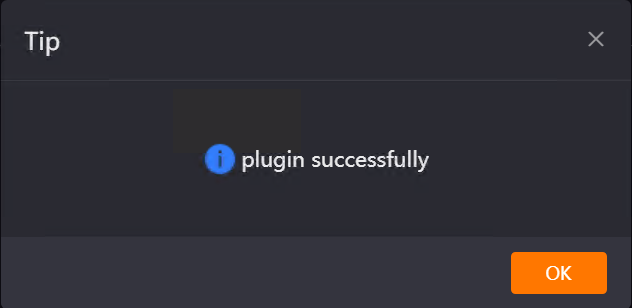
Open the Renderwow client, navigate to the [Plug-in Manage] page, select [3ds Max] from the plugin type list, and choose the version corresponding to your local 3ds Max installation from the version list. Click the [Install] button. Then manually select the local 3ds Max installation path (if 3ds Max is installed in the default path, Renderwow can automatically detect it without manual selection). After the plugin installation is complete, Renderwow will display an [Installation Successful] prompt, and the corresponding 3ds Max version and installation path information can be viewed in the [Installed Plugins] list.
4.1.3 Renderwow Menu – Still Submission Workflow
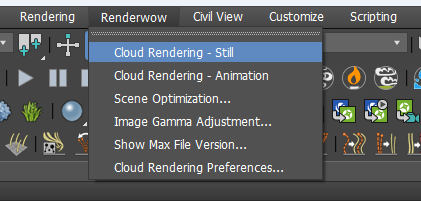
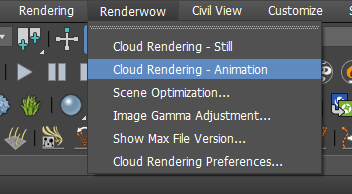
1. Click ||Renderwow Menu|| → Cloud Rendering – Still.
For still jobs, you must use Cloud Rendering – Still to submit. If the current scene’s time output setting is not a single frame, selecting rendering will automatically change the current scene’s time output mode to single frame mode.
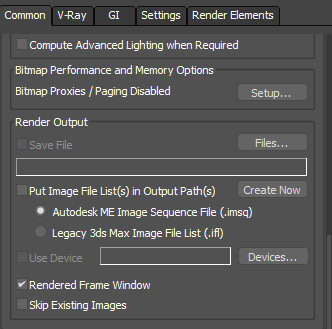
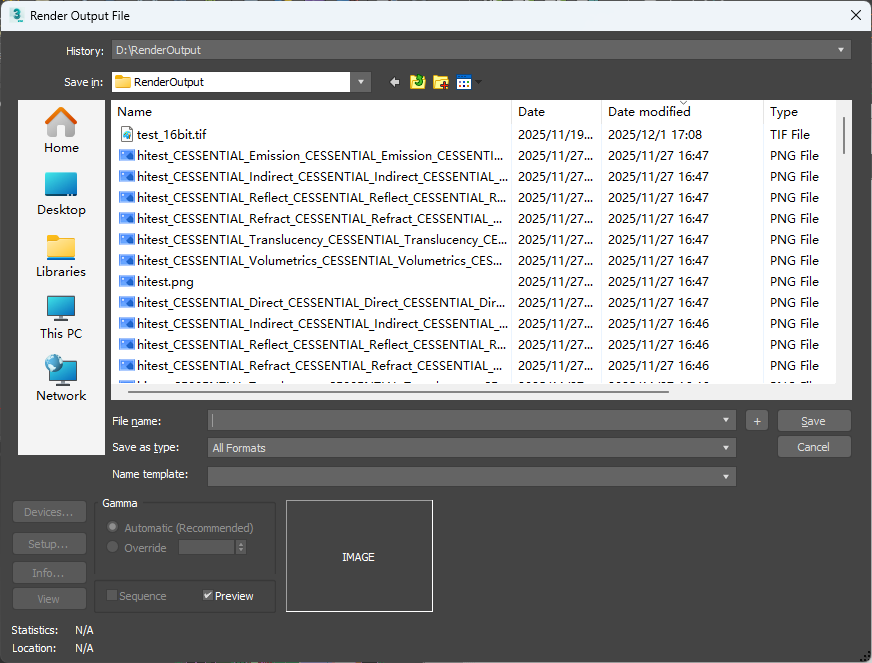
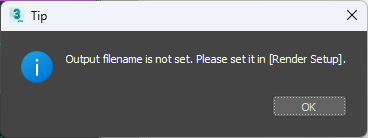
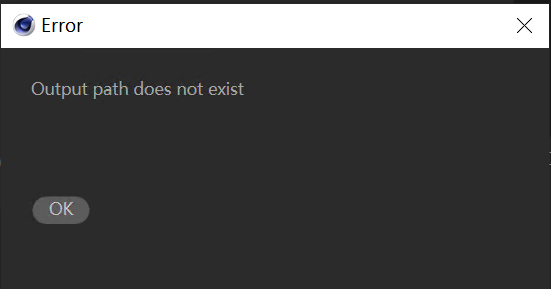
2. Output Path Detection and Setting.
Renderwow will detect whether the render output path is correctly set. If not, it will automatically pop up the output path setting window. You must set it correctly before proceeding with job submission; otherwise, an error will be reported.
3. Scene Parameter Detection.
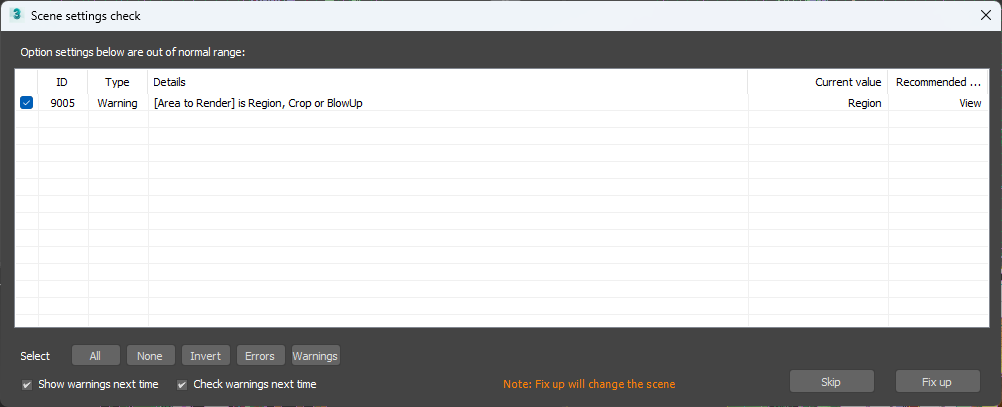
After the previous step, Renderwow will perform scene parameter detection. If there are warnings or errors after detection, a "Scene Setting Detection" pop-up will appear, displaying all warning and error items. Errors must be fixed before continuing submission. If there are only warnings and no errors, you can click the "Skip" button to ignore the warnings and continue submission. Most warning and error items can be automatically fixed by clicking the " Fix up" button in this pop-up. Error items that cannot be automatically fixed must be manually repaired before clicking Submit again.
4. Parameter Setting.
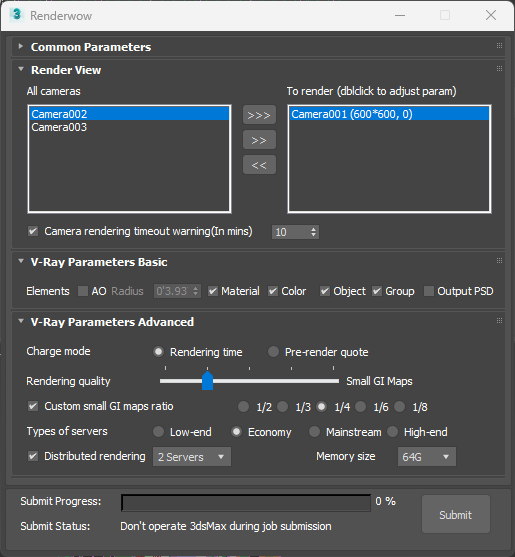
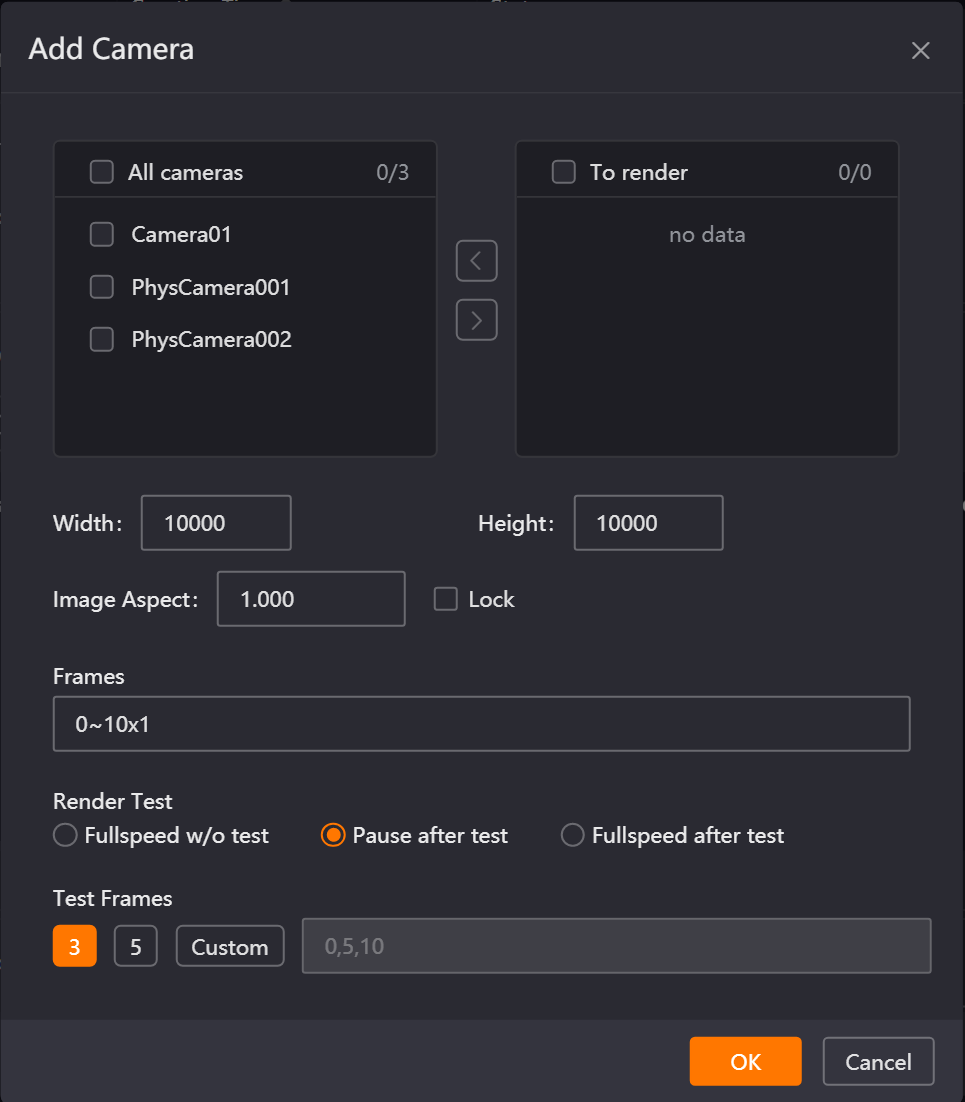
After the previous step, the job submission window appears. Select the camera to render and submit with default parameters, or set relevant parameters as needed before submitting.
5. job Submission.
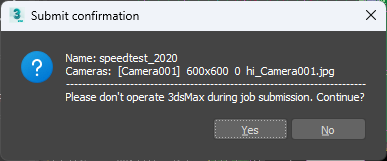
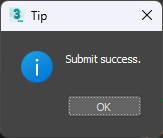
Click the "Submit" button in the lower right corner of the submission window to start submitting the job. First, Renderwow will temporarily save the scene, then perform antivirus operations, and a job submission confirmation pop-up will appear. Click "Yes" to continue submission. After submission is complete, the scene will be restored, and a submission completion pop-up will appear.
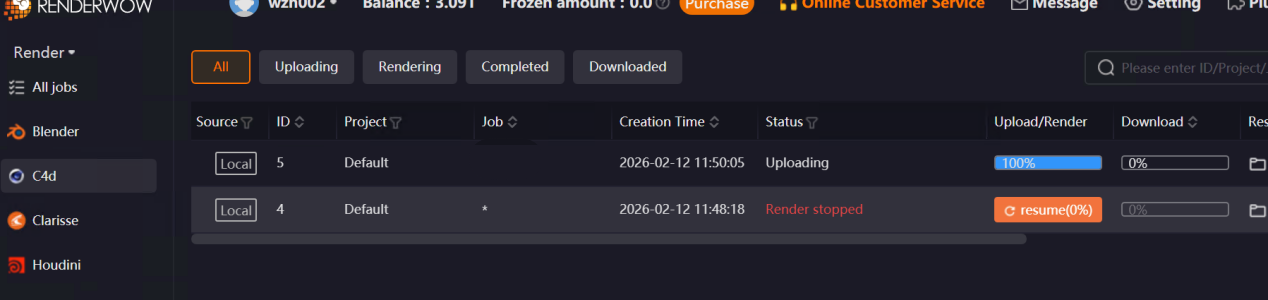
6. Progress Tracking.
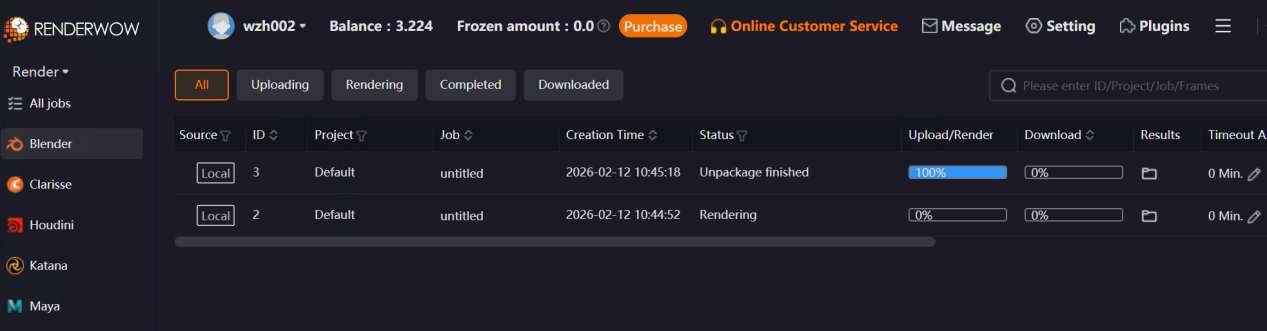
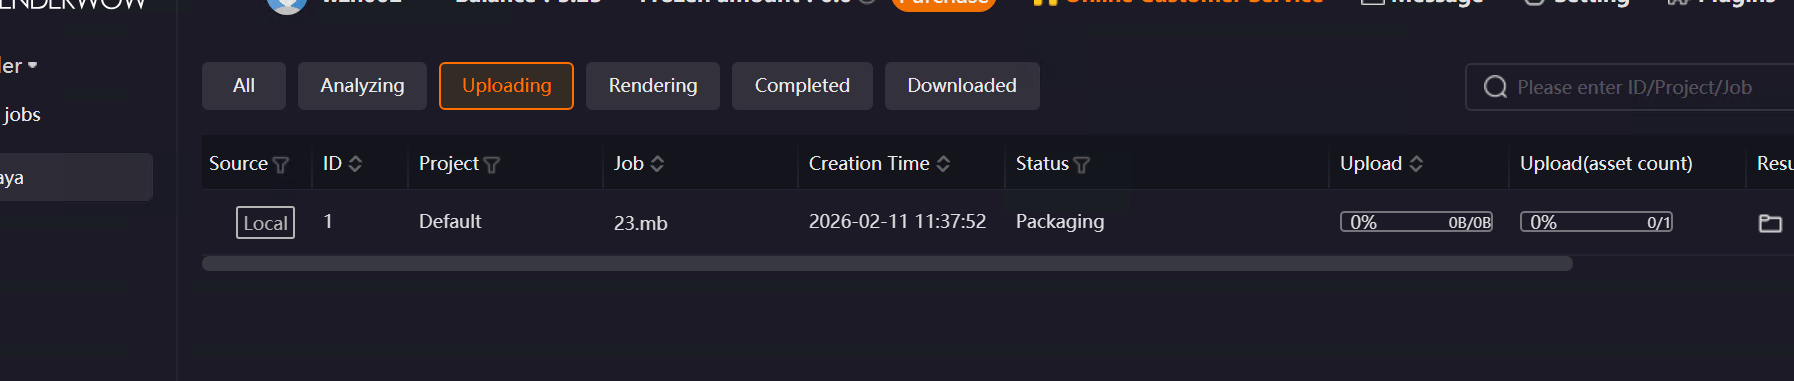
In the Renderwow client, you can see the just-submitted job. The job will go through packaging, uploading, rendering, and download stages before the results are automatically saved to the previously set render output path.
4.1.4 Renderwow Menu – Animation Submission Workflow
1. Click ||Renderwow Menu|| → Cloud Rendering – Animation.
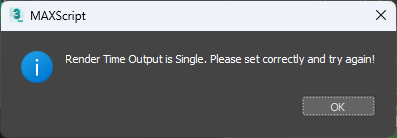
For animation jobs, you must use Cloud Rendering – Animation to submit. If the current scene is set to single frame mode, submitting an animation job will result in an error.
2. Output Path Detection and Setting.
Renderwow will detect whether the render output path is correctly set. If not, it will automatically pop up the output path setting window. You must set it correctly before proceeding with job submission; otherwise, an error will be reported.
3. Scene Parameter Detection.
After the previous step, Renderwow will perform scene parameter detection. If there are warnings or errors after detection, a "Scene Settings Check" pop-up will appear, displaying all warning and error items. Errors must be fixed before continuing submission. If there are only warnings and no errors, you can click the "Skip" button to ignore the warnings and continue submission. Most warning and error items can be automatically fixed by clicking the "Fix up" button in this pop-up. Error items that cannot be automatically fixed must be manually repaired before clicking Submit again.
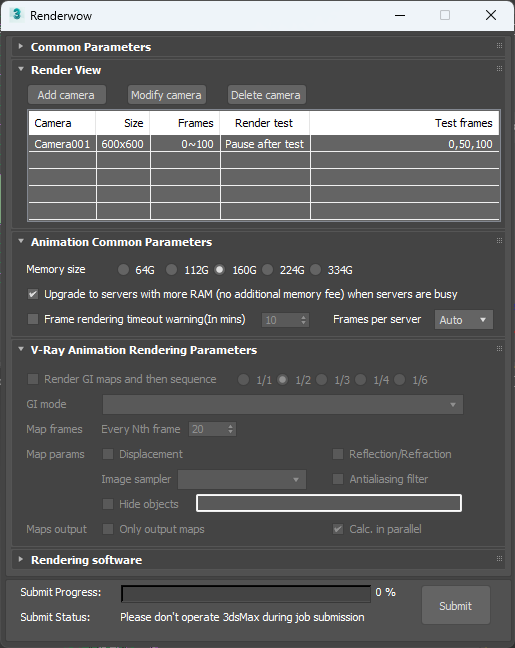
4. Parameter Setting.
After the previous step, the job submission window appears. Select the camera to render and submit with default parameters, or set relevant parameters as needed before submitting.
5. job Submission.
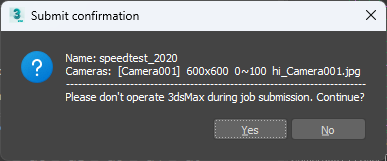
Click the "Submit" button in the lower right corner of the submission window to start submitting the job. First, Renderwow will temporarily save the scene, then perform antivirus operations, and a job submission confirmation pop-up will appear. Click Yes to continue submission. After submission is complete, the scene will be restored, and a submission completion pop-up will appear.
6. Progress Tracking.
In the Renderwow client, you can see the just-submitted job. The job will go through packaging, uploading, rendering, and download stages before the results are automatically saved to the previously set render output path.
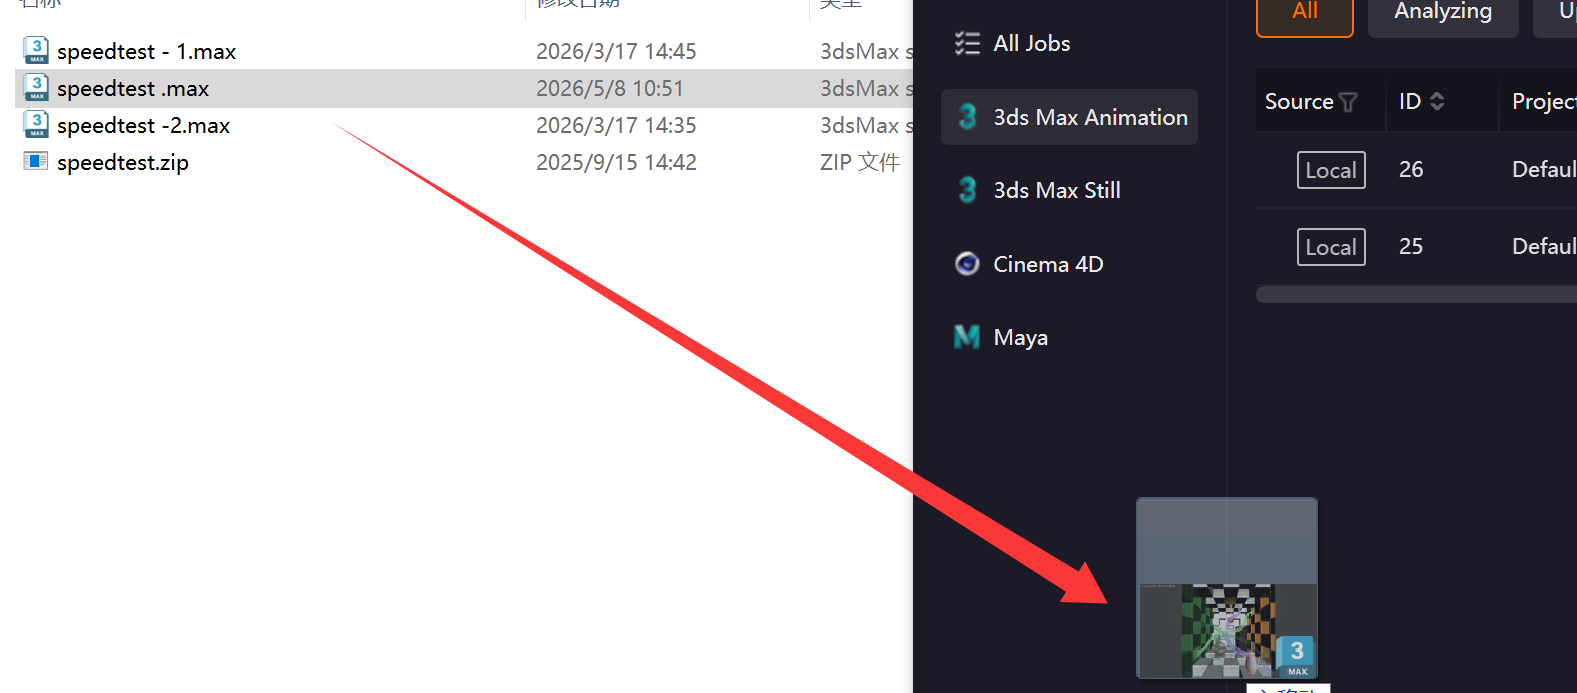
4.1.5 Drag-and-Drop – Single job Submission (Max 2016 and Above)
1. Drag Scene to Client
Set the scene to animation mode and drag the .Max scene file to the client.
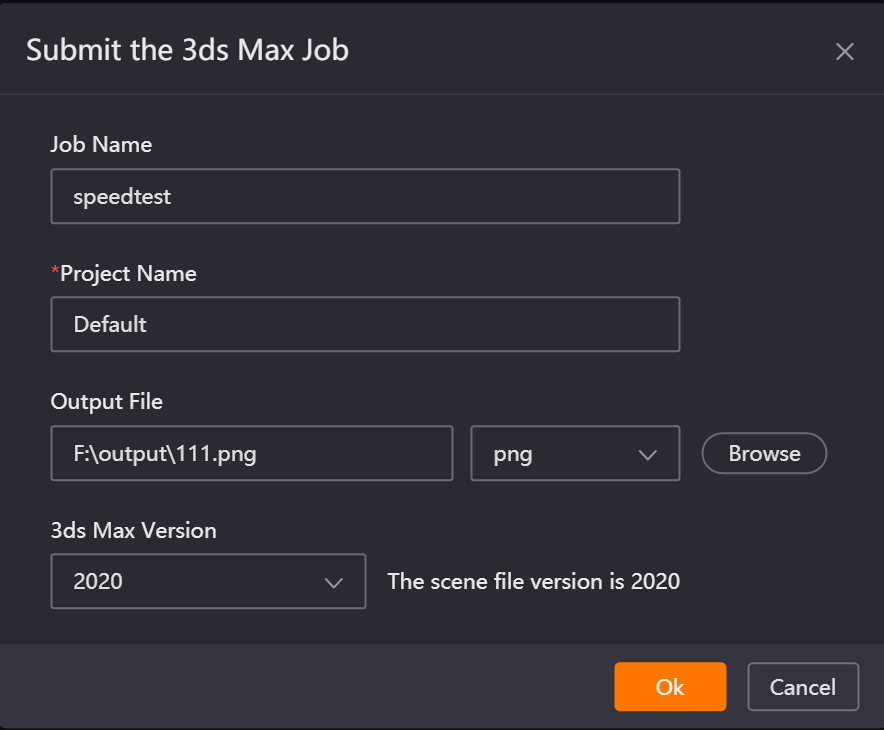
2. Configure Parameters and Analyze Scene
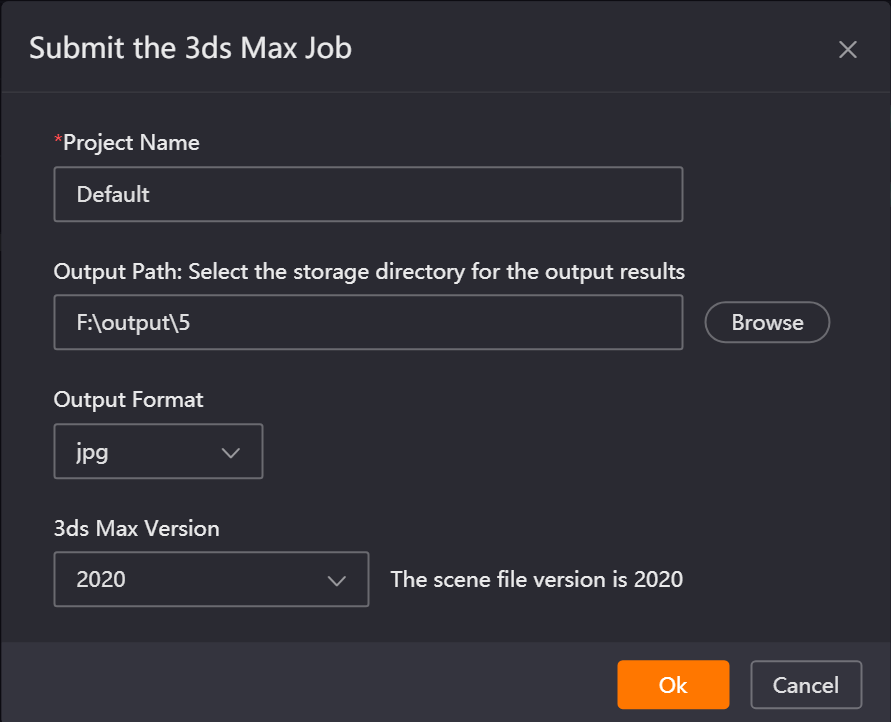
In the submission job page, configure the job name, Project Name, output file path and format, and 3ds Max version number, then click OK to enter the job analysis phase and launch 3ds Max.

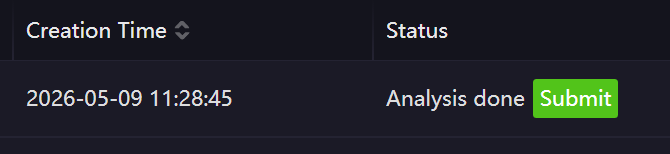
3. Configure Render Parameters
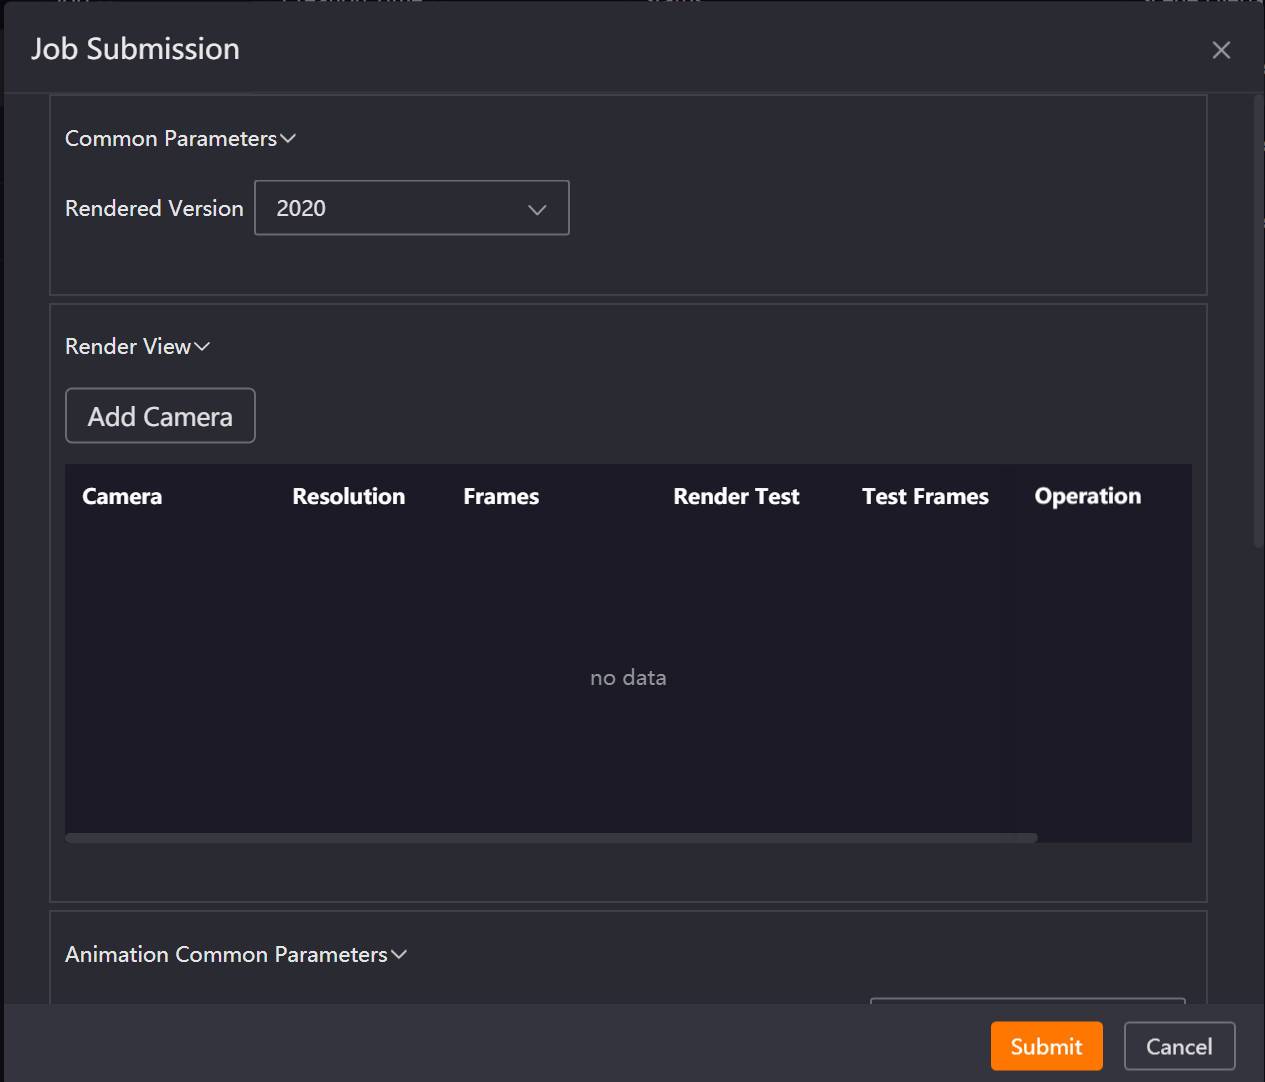
After analysis is complete, click the "Submit" button to open the submission window. In the submission window, add the camera to render and configure the corresponding parameters, then click the Submit button to enter the submission state.
4. job Submission
When submitting the job, 3ds Max will be launched again, the scene file will be opened, and after the job is generated, the job will no longer be displayed on the analyzing page. The job will be submitted to the client and sequentially enter the upload, unpack, render, and download results stages.
4.1.6 Drag-and-Drop – Single job Submission (Max Below 2016)
1. Drag Scene File to Client
Drag the .Max scene file to the client.
2. Configure Parameters and Open Scene
In the submission job page, configure the output file path and format and 3ds Max version number, then click OK to launch 3ds Max and wait patiently.
3. Configure Parameters and Submit job in Renderwow Submission Page
In the Renderwow submission interface within the scene, configure the corresponding parameters and click "OK" to submit the job.
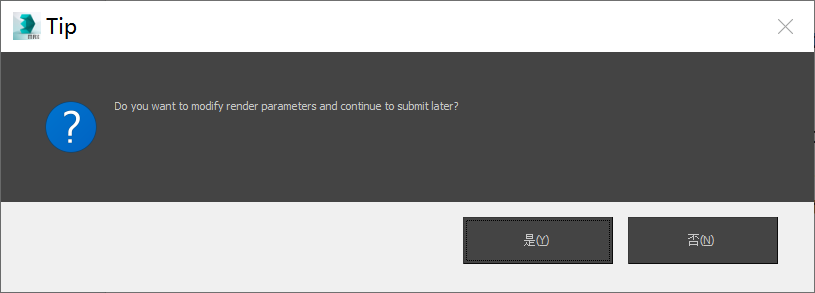
If you need to re-adjust render settings parameters, you can first close the Renderwow submission page. In the confirmation prompt that pops up, click "OK", and the system will automatically open the render settings page. After completing the parameter modification, closing the render settings page will automatically reopen the Renderwow submission interface, allowing you to continue submitting the job.
The job will be submitted to the client and sequentially enter the upload, unpack, render, and download results stages.
4.1.7 Drag-and-Drop – Multi-job Submission (Max 2016 and Above)
1. Drag Scene to Client
Set the scene to animation mode, select multiple .Max scene files, and drag them to the client at once. The multi-scene submission interface will pop up.
2. Configure Parameters and Analyze Scene
In the submission job page, configure the Project Name, output file path and format, and 3ds Max version number, then click OK to enter the job analysis phase and launch 3ds Max.
3. Configure Render Parameters
After each scene analysis is complete, click the "Submit" button respectively to open the job submission window. In the window, select the camera to render and configure the relevant parameters, then click Submit again for the job to enter the submission state.
4. Submit job
When submitting the job, 3ds Max will be relaunched and the scene file will be opened. After the job is generated, it will be removed from the analyzing page and subsequently enter the upload, unpack, render, and download results stages.
4.1.8 Drag-and-Drop – Multi-job Submission (Max Below 2016)
1. Drag Scene to Client
Set the scene to animation mode, select multiple .Max scene files, and drag them to the client at once. The multi-scene submission interface will pop up.
2. Configure Parameters and Open Scene
In the submission job page, configure the output file path and format and 3ds Max version number, then click OK to launch 3ds Max. (The number of 3ds Max instances launched simultaneously equals the number of scenes submitted.)
3. Configure Parameters and Submit job in Renderwow Submission Page
In the submission interfaces opened in multiple 3ds Max scenes, check and configure the corresponding parameters and click the OK button to submit the jobs respectively. If you need to reconfigure parameters in the render settings, you can close the Renderwow submission page. In the prompt, click the OK button, and Renderwow will automatically open the render settings page. After reconfiguration, closing the render settings page will automatically reopen the Renderwow submission page, allowing you to continue submitting the job.
Multiple jobs will be submitted to the client and normally go through the upload, unpack, render, and download results stages.
Note:
-
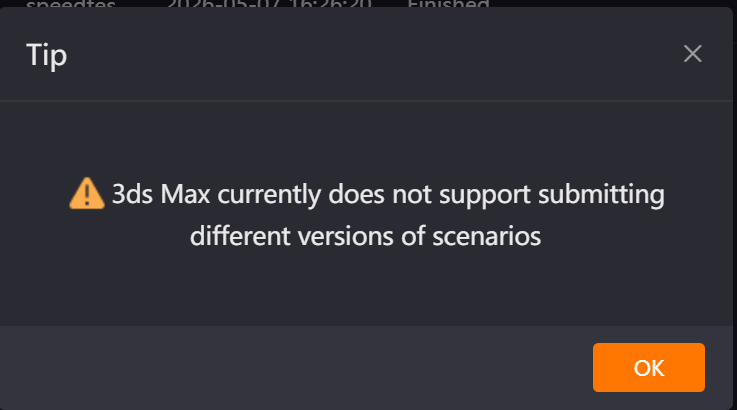
(1) When submitting multiple scenes via drag-and-drop, you can only drag scene files of the same 3ds Max version; otherwise, submission will fail.
-
(2) When submitting multiple scenes via drag-and-drop, if you want multiple scenes to be analyzed simultaneously (3ds Max 2016 and above), you can modify the "Number of Parallel Analyses for Drag-and-Drop Jobs" value in Settings → Basic Settings. This configuration requires restarting the client to take effect.
For parameter configuration in the submission interface, refer to the Rendering and Animation Parameter Details in the 3ds Max Renderwow Plug-in Feature Introduction.
4.2 Blender Submission Tutorial
4.2.1 Overview
The Renderwow platform supports Blender versions 2 to 5 and commonly used cache files. Still and animation jobs are submitted via the Renderwow plug-in panel within Blender.
4.2.2 Submission Workflow
1. Install Renderwow Plug-in
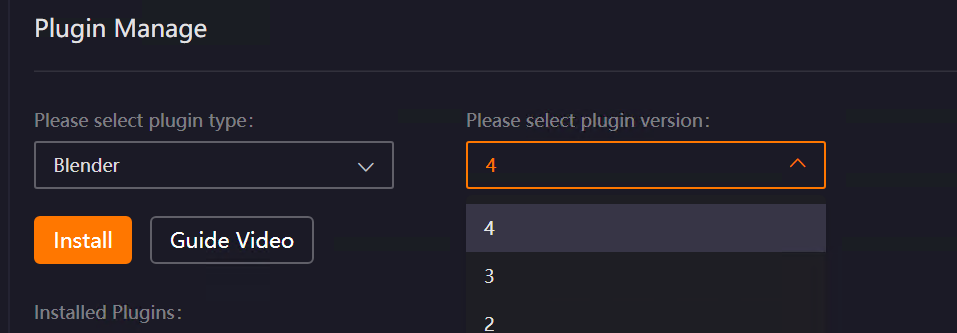
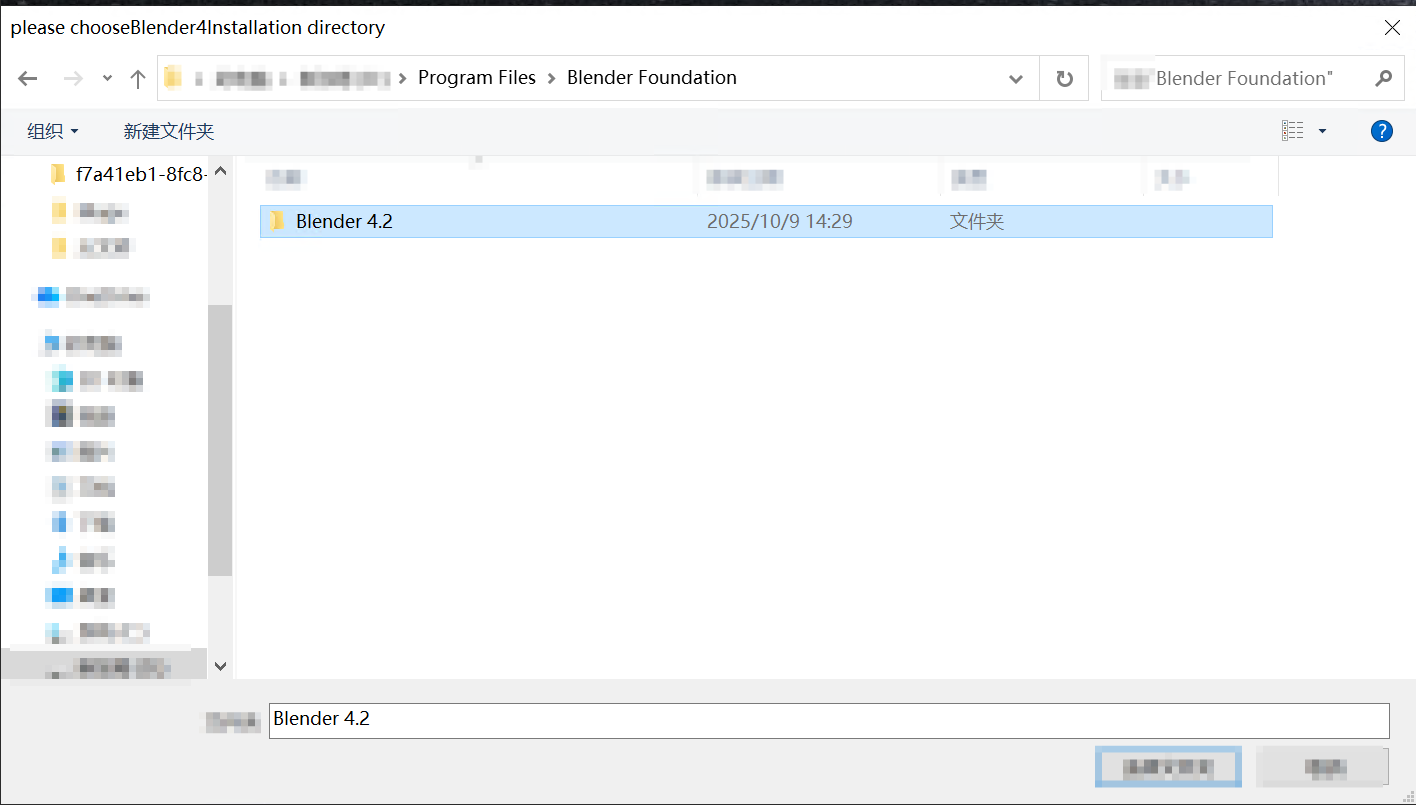
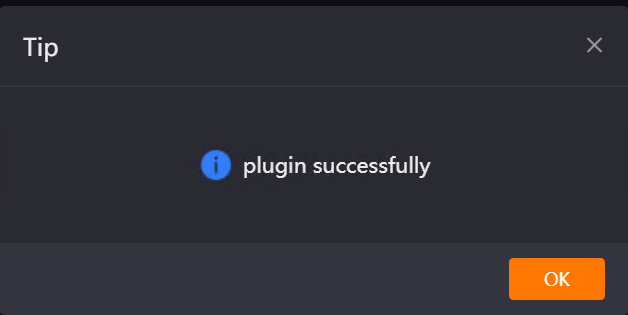
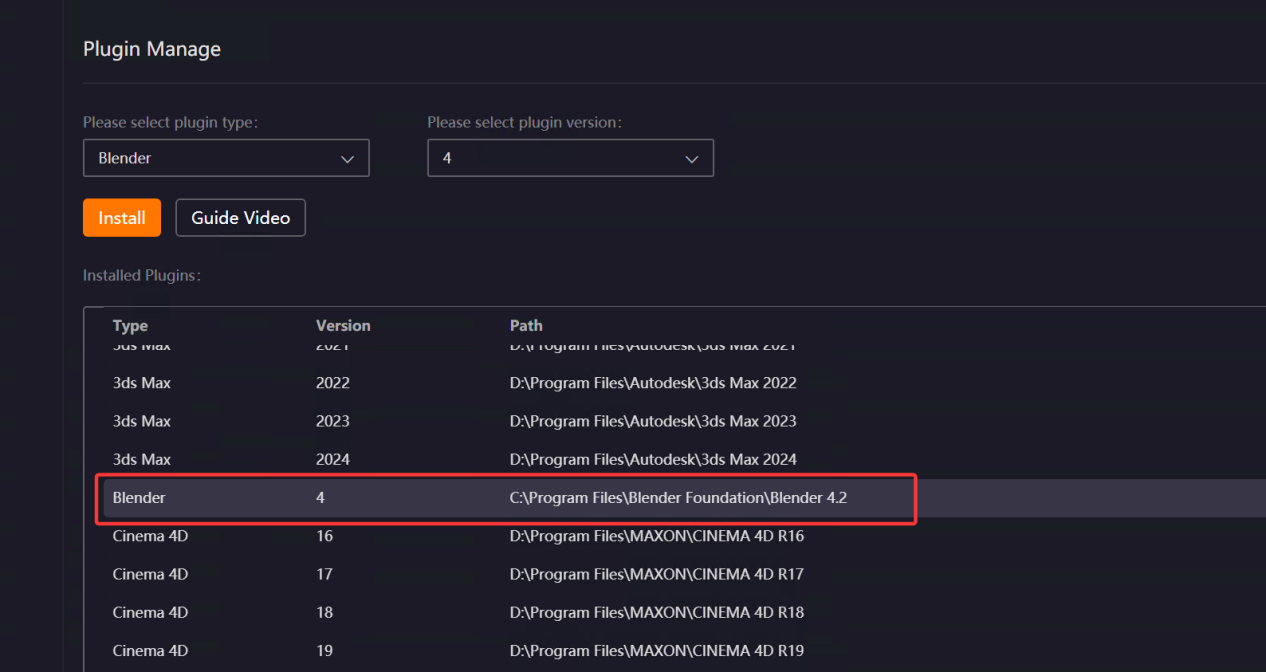
Open the Renderwow client, go to the Plug-in Manager page, select [Blender] in the plug-in type, choose the version corresponding to your local Blender from the version list, and click the [Install] button. Then manually select the local Blender installation path (if Blender is installed in the default path, Renderwow can automatically recognize the installation without manual selection). After the plug-in installation is complete, Renderwow will pop up an [Installation Successful] prompt, and you can view the corresponding Blender version and installation path information in the [Installed Plug-ins] list.
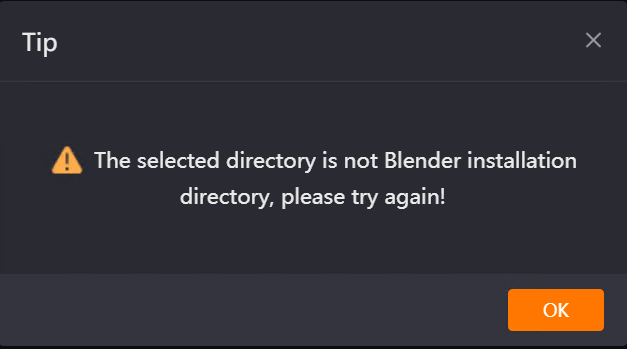
If the installation path is selected incorrectly, an error will be reported.
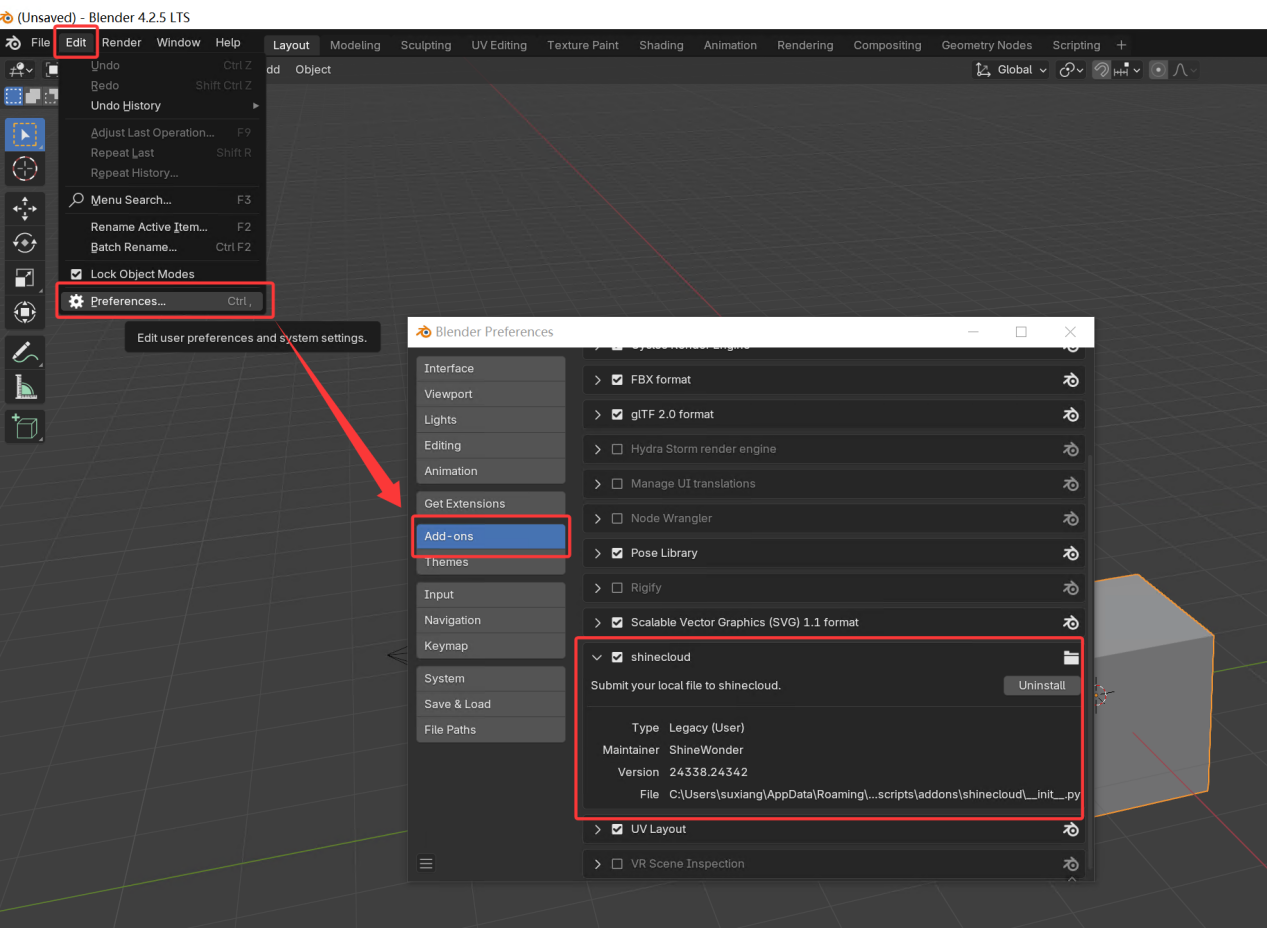
2. Load Renderwow Plug-in
Open Blender software, click [Edit] → [Preferences] in the top menu bar, find and check "Renderwow Plug-in (shinecloud)" in the [Plug-ins] list on the left, and complete the plug-in loading.
3. Open Renderwow Submission Interface
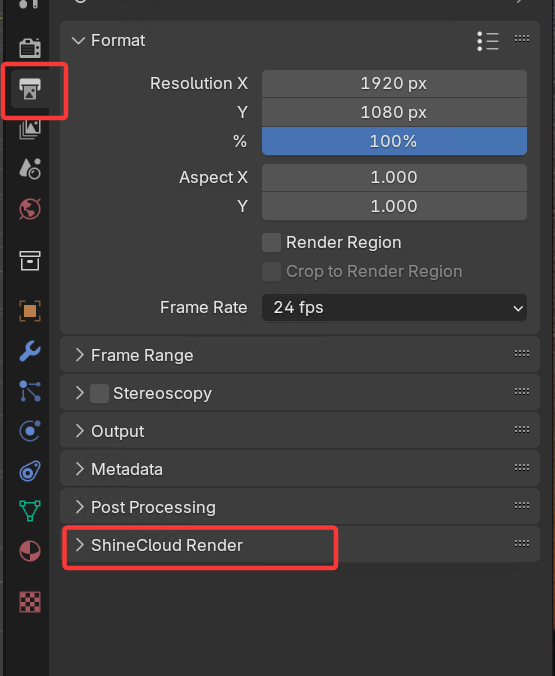
After the previous step, complete the render-related parameter settings for the scene file (such as output path, render Resolution, and other necessary information). After confirming all parameters are correct, find "ShineCloud Render" in the [Output] column of the right navigation bar in Blender and click to display the plug-in submission interface.
4. Select Submission Type and Configure Parameters
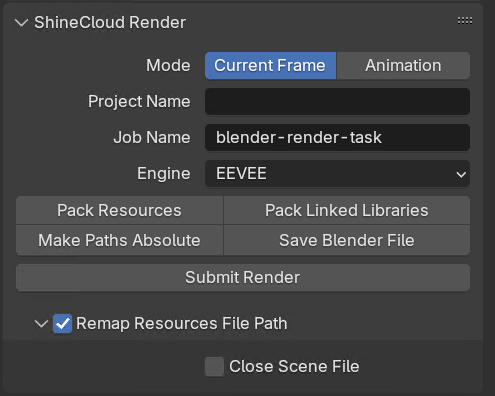
If submitting a rendering (single frame): In the Renderwow plug-in submission interface, switch [Mode] to "Current Frame", fill in or modify each configuration item as needed, and click "Save Blender File" to prepare for submission.
If submitting an animation (multi-frame): In the Renderwow plug-in submission interface, switch [Mode] to "Animation", fill in or modify each configuration item as needed, and click "Save Blender File" to prepare for submission.
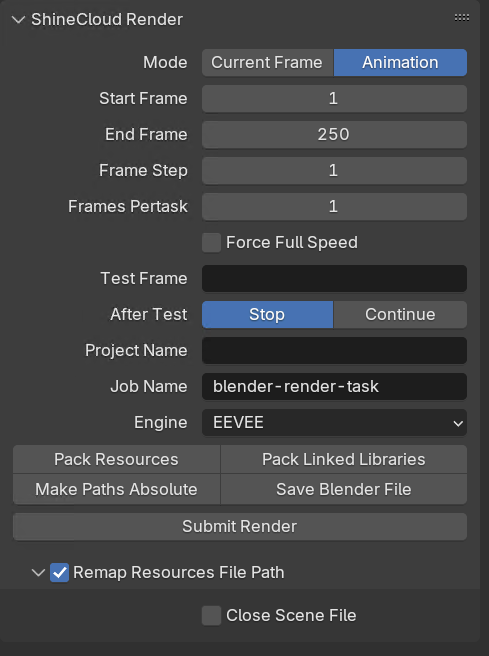
Note: If the scene has unsaved modifications and you have not clicked "Save Blender File", submission will fail with a prompt.
![]()
5. Submit job and Track Render Progress
After confirming all basic configurations and detailed parameters are correct, click the [Submit Render] button in the plug-in interface. A success prompt will appear, and the job will be automatically submitted to the Renderwow client. After submission, you can return to the Renderwow client and view the "Package → Upload → Render → Download" full process progress of this job in the job list. After rendering is complete, the results will be automatically saved to the client’s default path.
![]()
4.3 Cinema 4D Submission Tutorial
4.3.1 Overview
The Renderwow platform supports Cinema 4D versions R16–R23, S24, R25–R26, 2023–2026, compatible with commonly used renderers (such as Redshift, Octane Render, V-Ray, Corona, etc.) for job submission. Currently, submission is done via the Renderwow plug-in within Cinema 4D software.
4.3.2 Submission Workflow
1. Submission Preparation
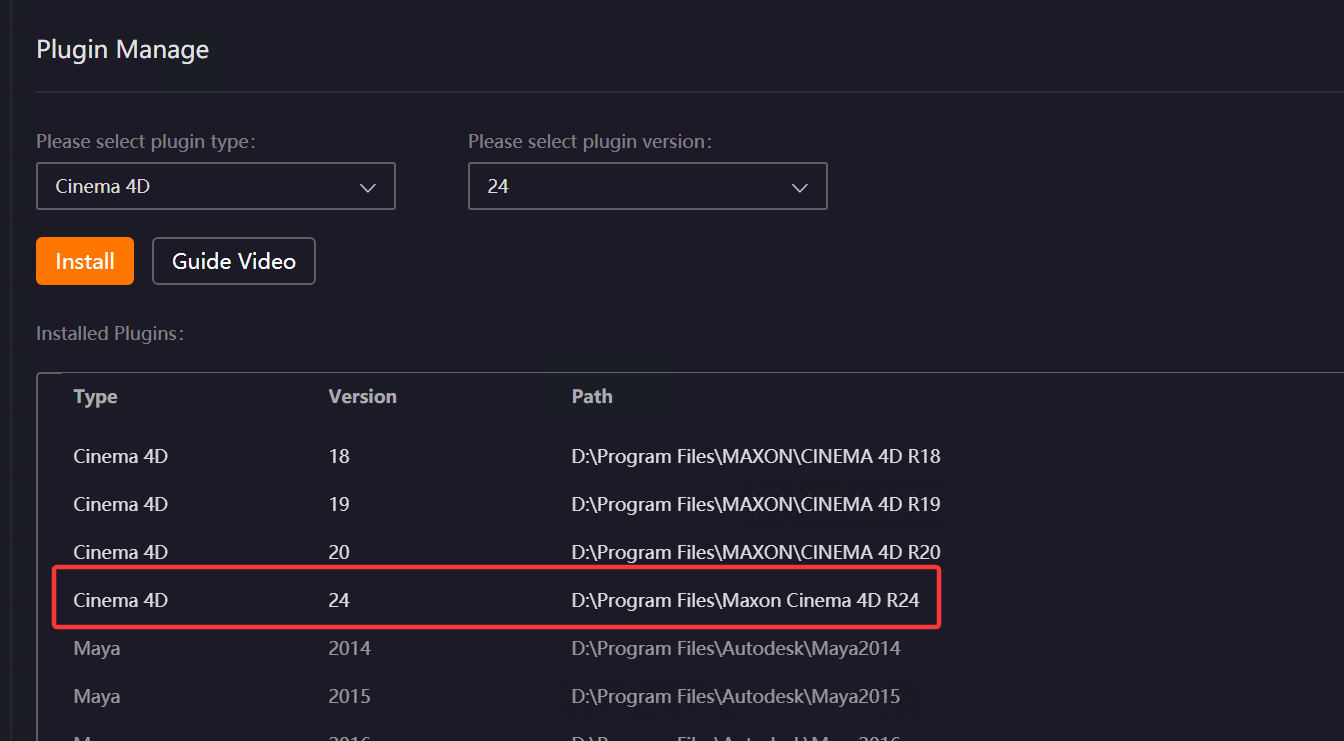
Open the Renderwow client, go to the Plug-in Manager page, select [Cinema 4D] in the plug-in type, choose the version corresponding to your local Cinema 4D from the version list, and click the [Install] button. Then manually select the local Cinema 4D installation path (if Cinema 4D is installed in the default path, Renderwow can automatically recognize the installation without manual selection). After the plug-in installation is complete, Renderwow will pop up an [Installation Successful] prompt, and you can view the corresponding Cinema 4D version and installation path information in the [Installed Plug-ins] list.
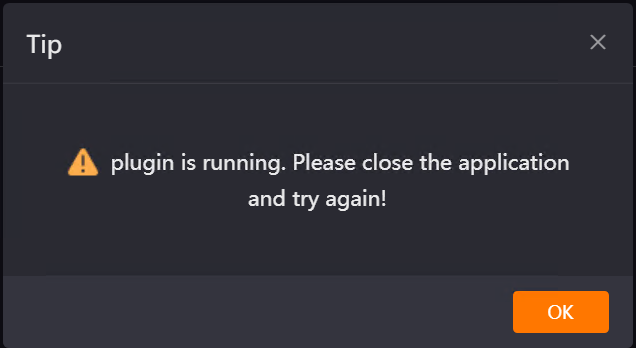
Note: If Cinema 4D software is running when installing the plug-in, installation will fail and an error will be reported.
2. Open Renderwow Cinema 4D Plug-in
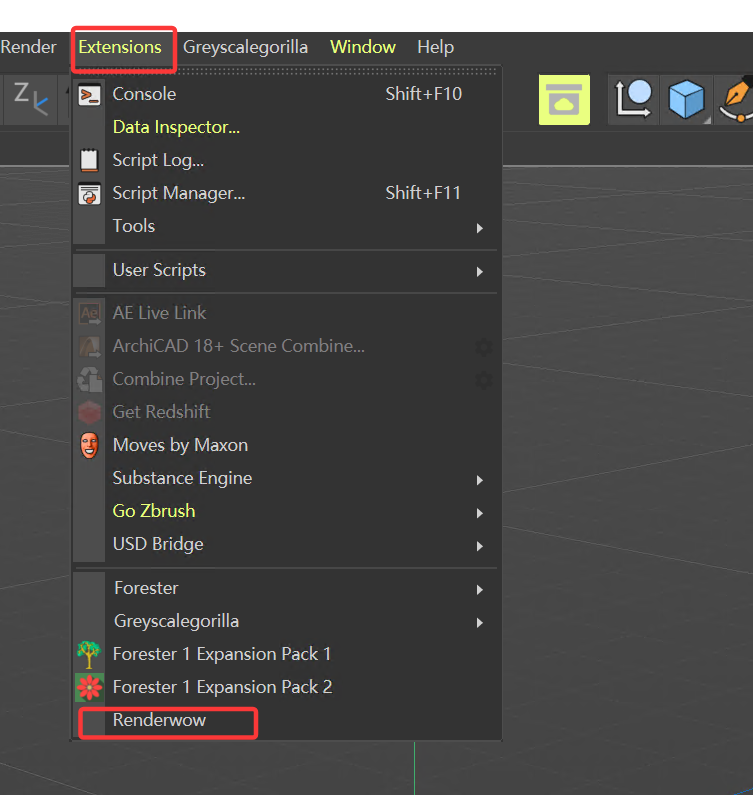
After plug-in installation is complete, launch the local Cinema 4D software. After configuring the render scene-related parameters (such as output path, render Resolution, and other necessary information), find the [Extensions] option in the top menu bar, click the dropdown menu, and select [Renderwow] from the list to open the Renderwow submission interface.
3. Configure Submission Parameters
In the plug-in submission interface, configure the job name, Project Name, frames per machine, version selection, GPU rendering, and other parameters according to your scene requirements. If the scene uses sequence frame textures or additional resources not recognized by the plug-in, you need to manually add the resource path in the corresponding input box to ensure resources can be uploaded normally before preparing to submit the job.
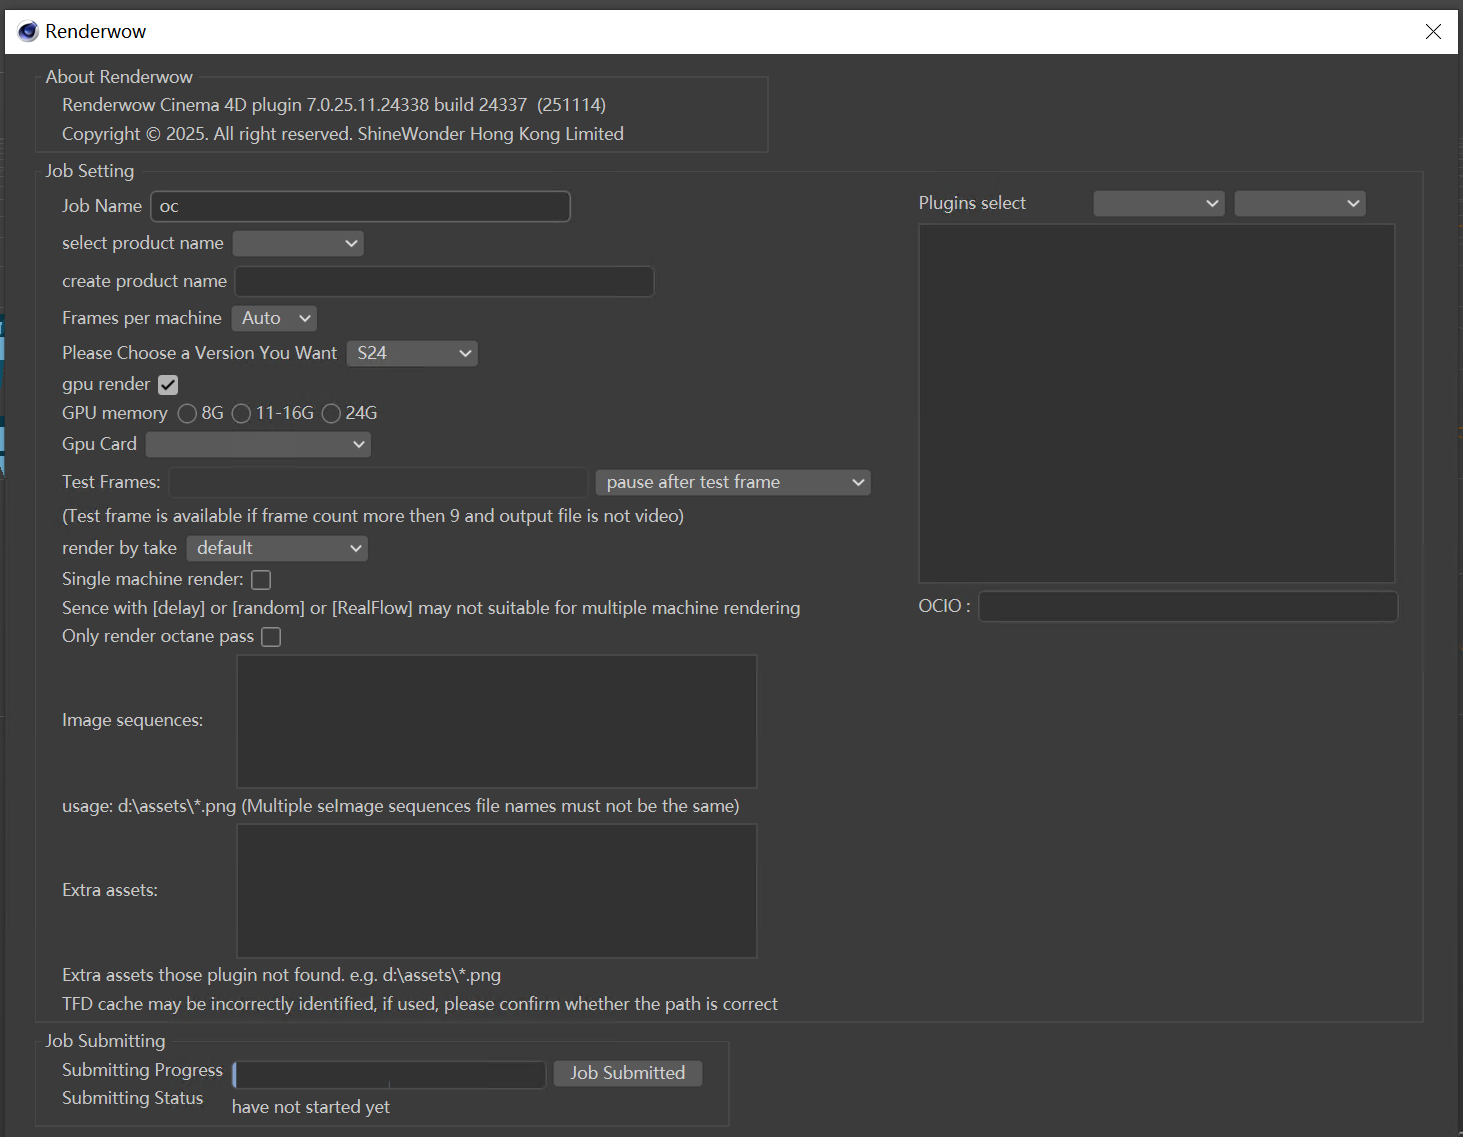
4. Submit job to Renderwow Client
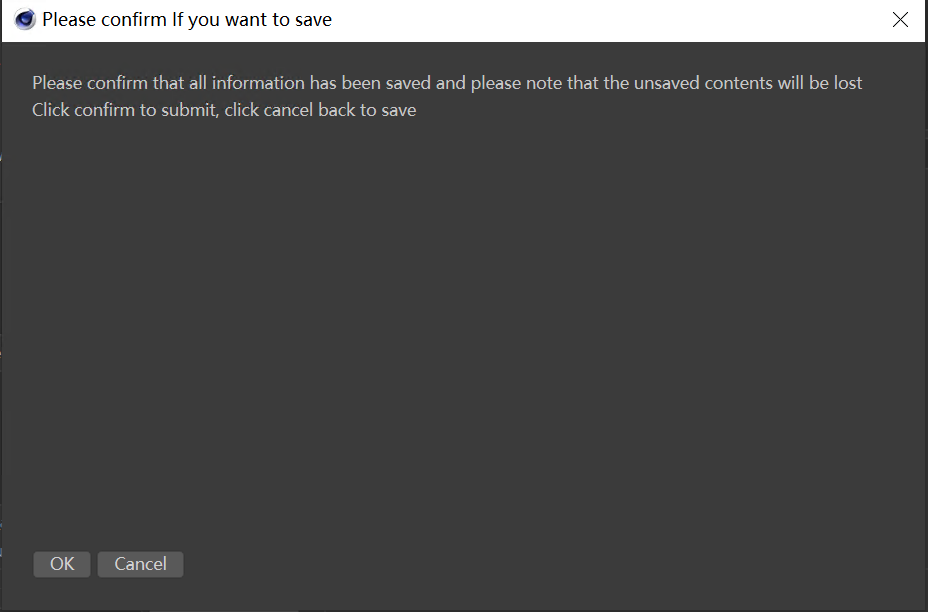
After the previous step, click the "Job Submitted" button in the plug-in submission interface. The first confirmation pop-up will appear, prompting "Please confirm that all information has been saved and please note that the unsaved contents will be lost." Click "OK" to continue submission; click "Cancel" to return and modify the scene or parameters.
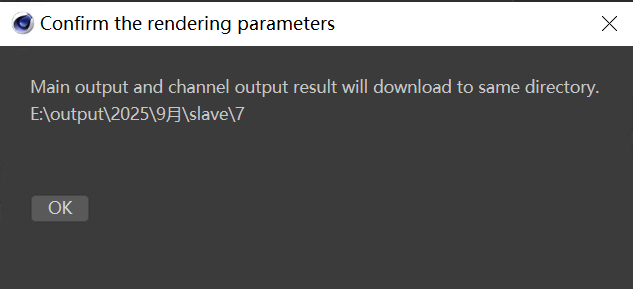
After clicking "OK", the second confirmation pop-up will appear, prompting "Main output and channel output result will download to same directory." Click "OK" to proceed to the next step.
The submission status displays "Renaming all resource files in the project." Renderwow automatically renames all resource files associated with the scene for easy upload and render recognition.

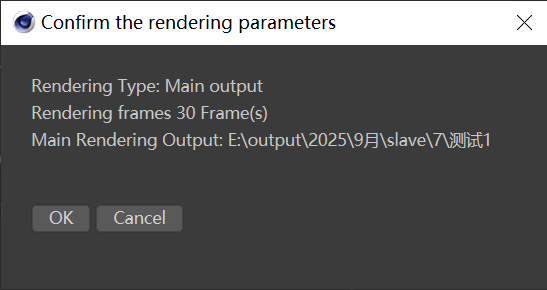
After resource renaming is complete, the submission status changes to "Getting render settings." Renderwow automatically reads the scene’s render settings and pops up a new render parameter confirmation window, marking the render type, render frame count, main render output path, and other information. Click "OK" to continue submission; click "Cancel" to reconfigure parameters.

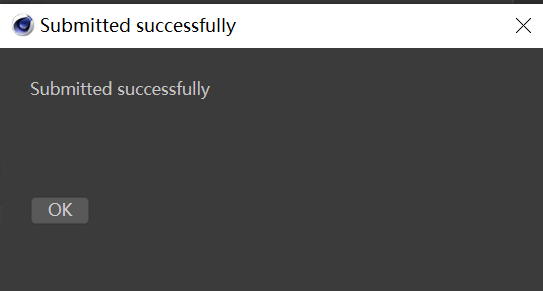
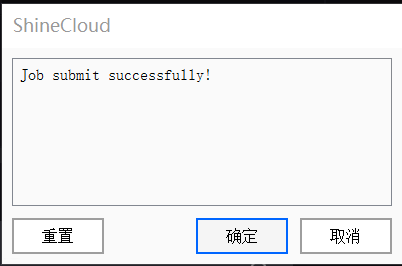
After confirmation, Renderwow starts uploading resources and submitting the job. When the submission status displays "Completed", a "Submitted successfully!" prompt pop-up will appear. Click "OK".

Note: If the output path is not set in the scene or the output path is incorrect, an error will be reported during submission.
5. View job Status and Download Results
After the job is successfully submitted, you can view the job in the Renderwow client. The job will automatically go through the [Package → Upload → Render → Download] complete process. After the job is complete, the render results will be automatically saved to the previously set output path.
4.4 SketchUp Submission Tutorial
4.4.1 Overview
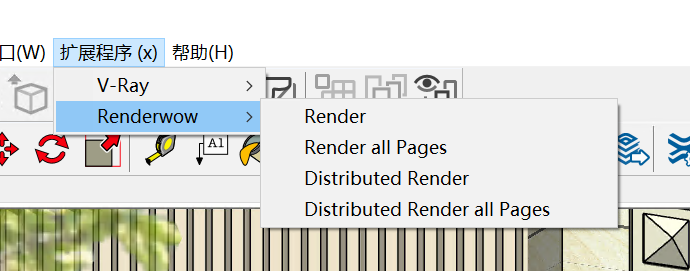
Renderwow supports SketchUp 2015–2026 and requires V-Ray for SketchUp. Access the submission interface via SketchUp’s top menu "Extensions" → "Renderwow". Supports four submission types: Render, Render All Pages, Distributed Render, and Distributed Render All Pages.
4.4.2 Submission Workflow
1. Install Renderwow Plug-in
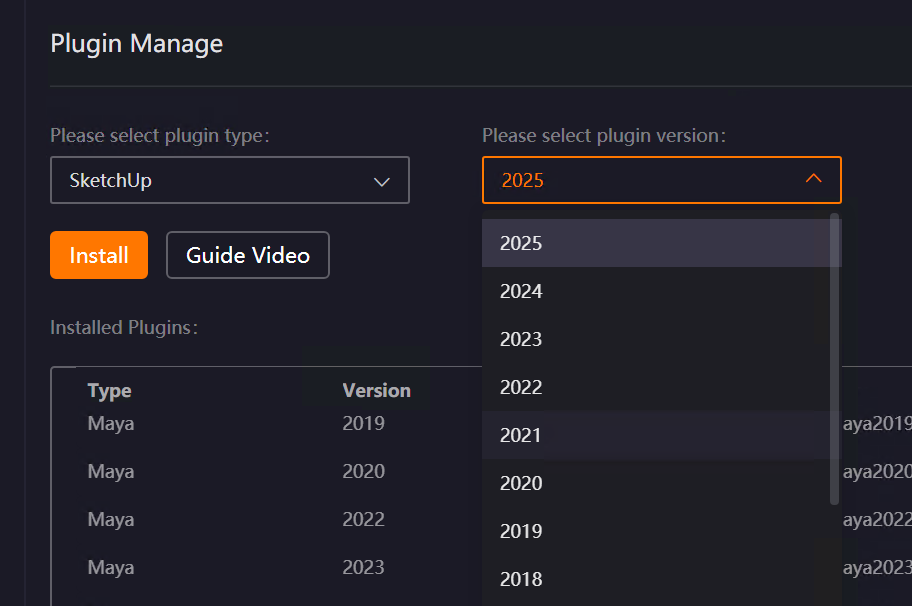
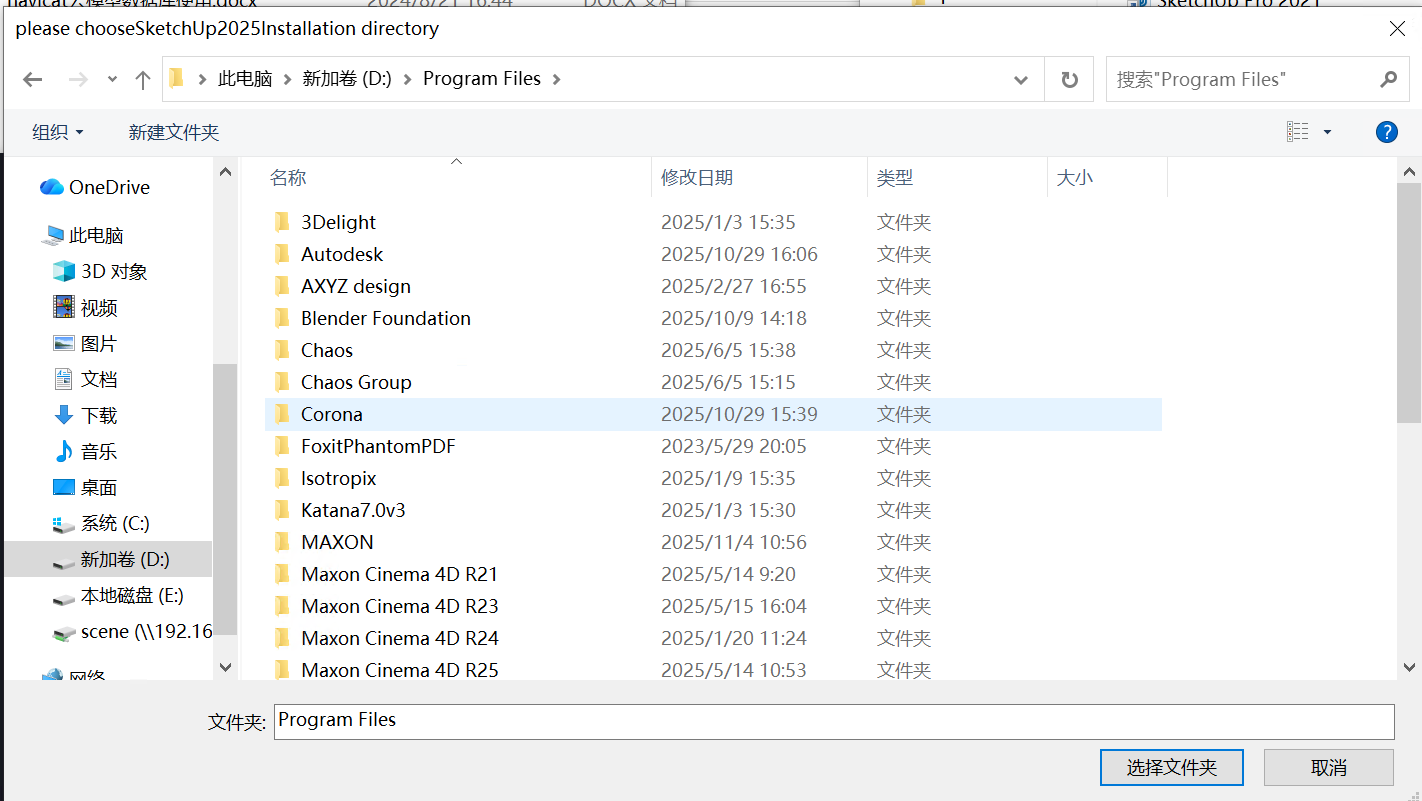
Open the Renderwow client, go to the Plug-in Manager page, select [SketchUp] in the plug-in type, choose the version corresponding to your local SketchUp from the version list, and click the [Install] button. Then manually select the local SketchUp installation path (if SketchUp is installed in the default path, Renderwow can automatically recognize the installation without manual selection). After the plug-in installation is complete, Renderwow will pop up an [Installation Successful] prompt, and you can view the corresponding SketchUp version and installation path information in the [Installed Plug-ins] list.

2. Open Renderwow Plug-in
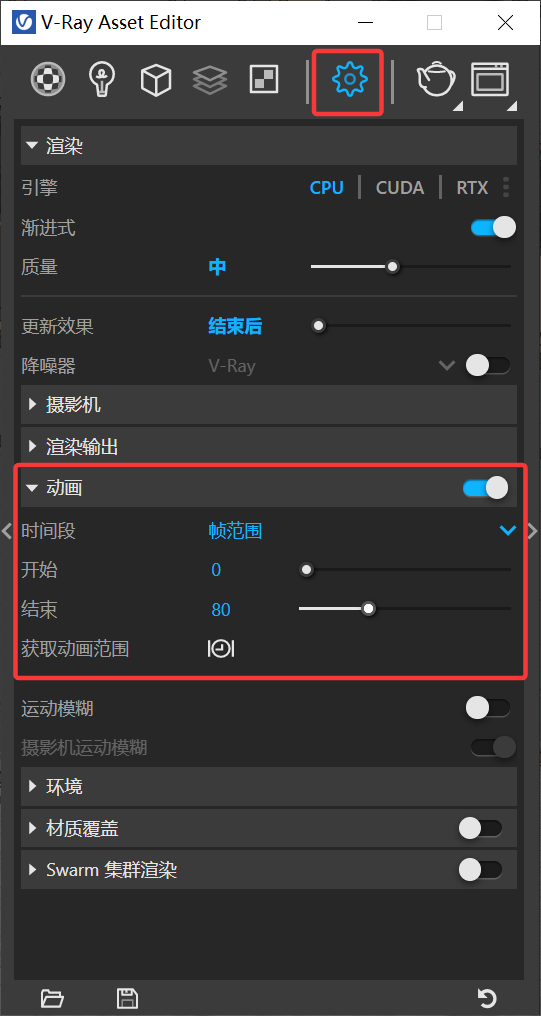
After plug-in installation is complete, launch the local SketchUp software. After configuring the render scene-related parameters (such as output path, render Resolution, and other necessary information) and selecting the render page, if you need to submit an animation job, you must enable the animation function in [Settings] of the V-Ray Asset Editor, and set animation parameters such as frame range. After confirming all parameters are correct, find the [Extensions] option in the top menu bar, click the dropdown menu, and select [Renderwow] from the list to expand all available render job submission options and prepare for subsequent submission operations.
Note:
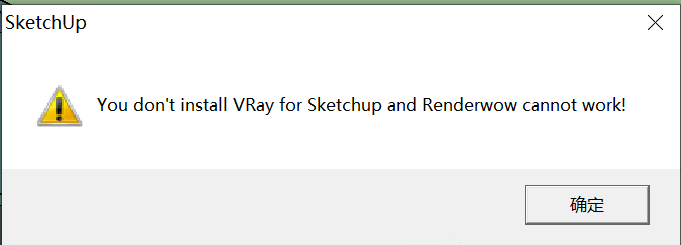
If V-Ray is not installed, or V-Ray has no license, Renderwow cannot be used, and a prompt will appear.
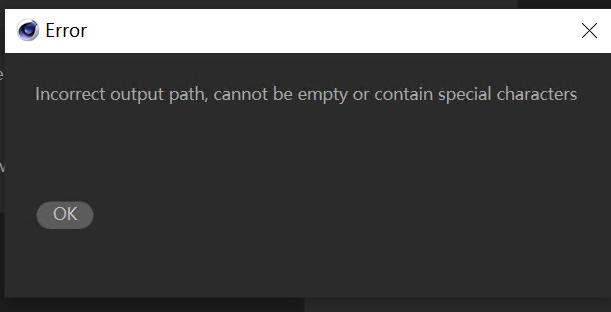
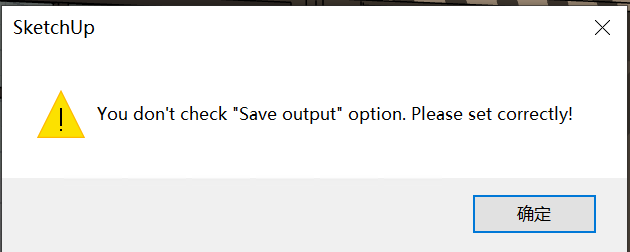
If the output path is not set or the output path does not exist, a prompt will appear, and you need to manually modify the output path before reopening the Renderwow plug-in.
3. Select Render job Submission Type and Set Parameters
After the previous step, select the corresponding submission type according to your needs. Specific operations and parameter settings are as follows:
- Render (Still and Animation)
This option can submit the current page’s still or animation job. The submission type is determined by whether animation is enabled.
Submit Animation job:
Enable animation in the V-Ray Asset Editor and set the relevant parameters, then click [Render]. The job will be directly submitted successfully.
Submit Still job (Submit only the currently selected page)
1. Select the page to render, click [Render], the job is submitted successfully.
- Render All Pages (Still)
This option can submit still jobs for all pages with one click. The client job name will display the page name suffix for easy differentiation of render results from different pages.
1. Select any page, click [Render All Pages], and a result download directory pop-up will appear.

2. Selecting [No] in the pop-up means that when outputting results, a folder for each page will be created in the output path to save the corresponding results (recommended to avoid losing render results with the same name); selecting [Yes] means all results will be output in the same directory (default is [No]).
3. After clicking [OK] in the previous step, the job is submitted successfully.
- Distributed Render (Still)
This option can only submit the still job of the currently selected page and does not support progressive render mode. Increasing the number of distributed servers can improve render speed.
1. Select the page to render and click [Distributed Render]. A distributed selection pop-up will appear.
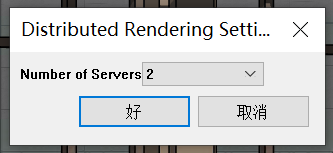
2. You can choose 2–10 different numbers of distributed servers. The cloud will enable distributed synchronous rendering according to the selected machine quantity.
3. After clicking [OK] in the distributed pop-up, the job is submitted successfully.
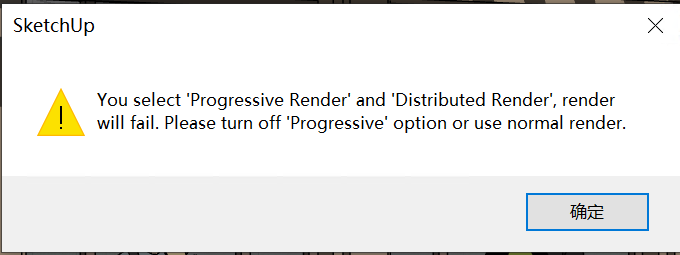
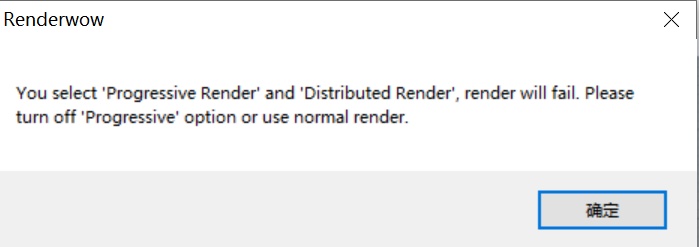
Note: Progressive render mode does not support distributed jobs. If the current scene is set to progressive rendering, selecting distributed submission will prompt you. After turning off progressive mode, you can submit normally.
- Distributed Render All Pages (Still)
This option can submit still jobs for all pages with one click. The client job name will display the page name suffix, combined with distributed rendering functionality to improve overall render efficiency.
1. Select any page, click [Distributed Render All Pages], and a result download directory pop-up will appear. The setting method is consistent with "Render All Pages".
2. After clicking [OK] in the download directory pop-up, a distributed selection pop-up will appear. The setting method is consistent with "Distributed Render".
3. After clicking [OK] in the distributed pop-up, the job is submitted successfully.
Special Cases
If there are missing files in the scene, a prompt pop-up will appear during submission, indicating that n resource files are lost. Clicking "Yes" will ignore and continue submission; clicking "No" will cancel submission, and you can reconfigure the resource files before resubmitting.
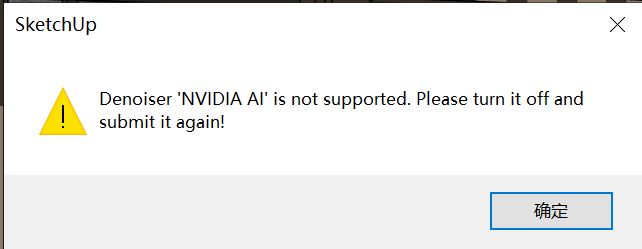
Renderwow does not support AI denoising mode for job submission. After turning it off, you can submit.
4. job Submission and Progress Tracking
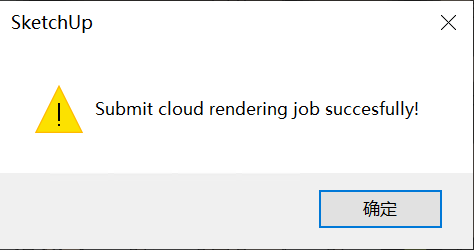
After the previous step, SketchUp will pop up a [Submit cloud rendering job succesfully!] prompt. Click [OK]. At this point, open the Renderwow client, and you can find the just-submitted job in the job list. The job will automatically go through the [Package → Upload → Render → Download] complete process. After the job is complete, the render results will be automatically saved to the previously set output path.
Note: If V-Ray is not installed or V-Ray has no license, the Renderwow SketchUp submission function cannot be used. If the output path is not set or the path does not exist, Renderwow will prompt and block submission.
4.5 Rhino Submission Tutorial
4.5.1 Overview
Renderwow supports Rhino 5–7 versions, used with V-Ray for Rhino. Open the submission page via the "Renderwow" button in the Rhino navigation bar. Supports two types: Rendering (without distributed / with distributed).
4.5.2 Submission Workflow
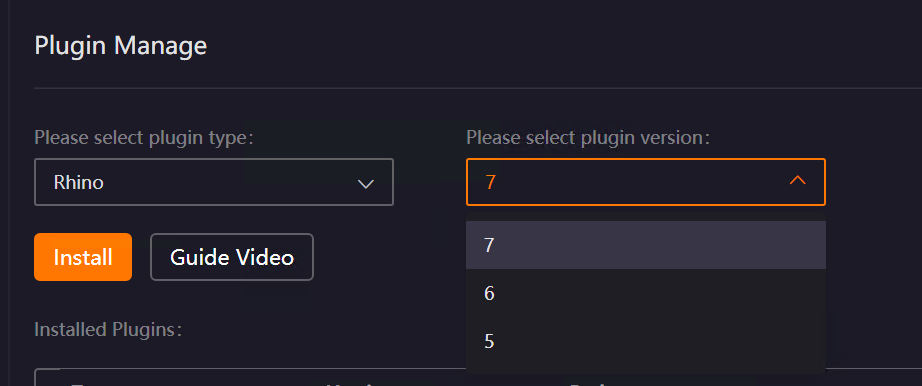
1. Install Renderwow Plug-in
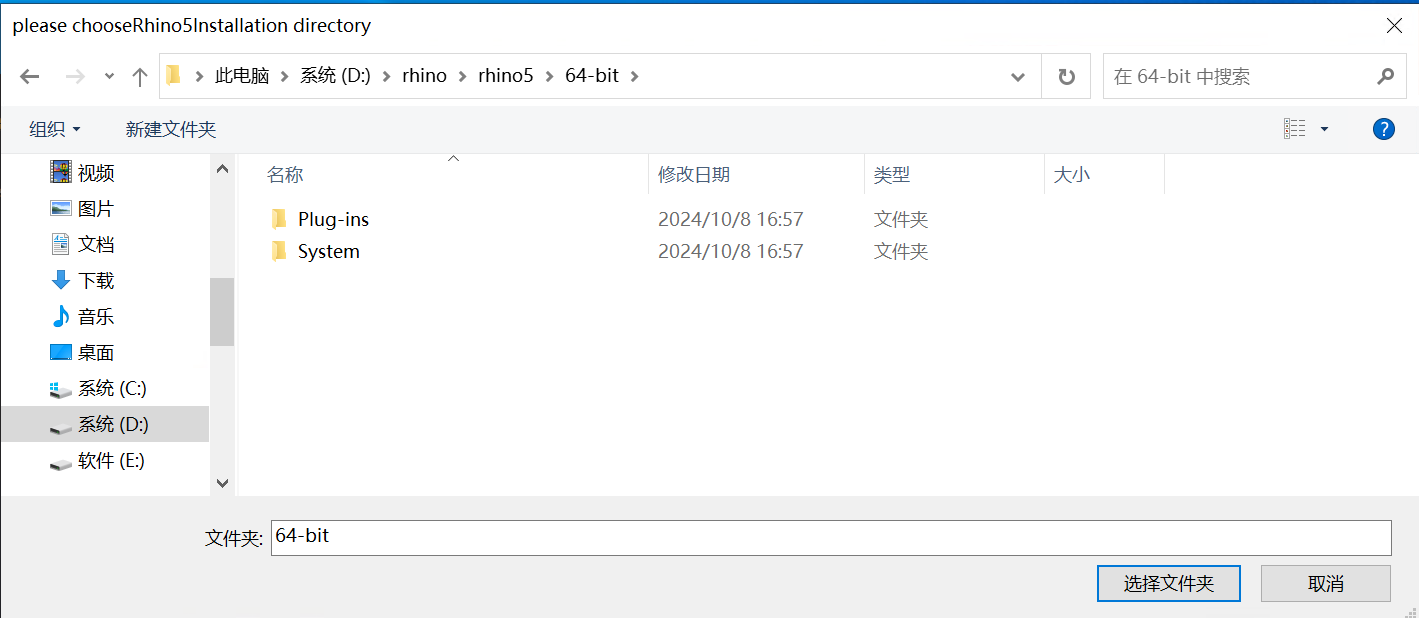
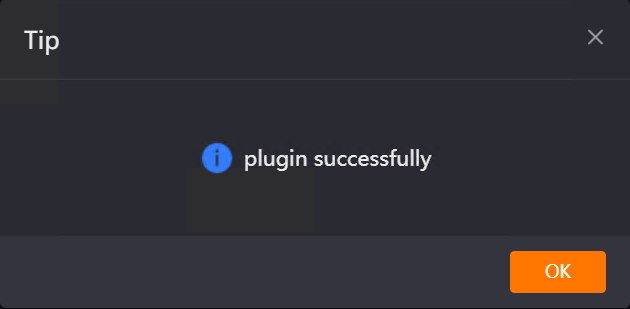
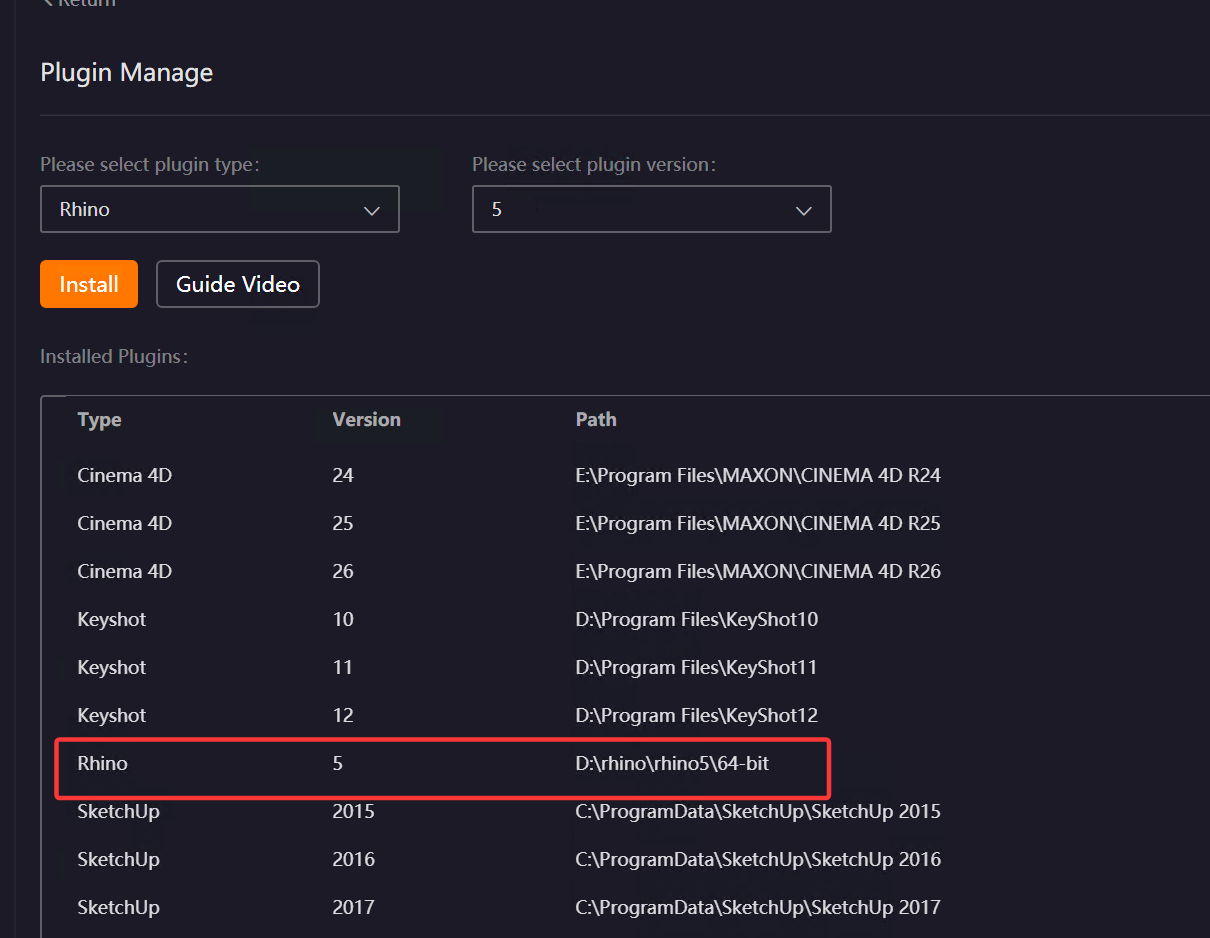
Open the Renderwow client, go to the Plug-in Manager page, select [Rhino] in the plug-in type, choose the version corresponding to your local Rhino from the version list, and click the [Install] button. Then manually select the local Rhino installation path (if Rhino is installed in the default path, Renderwow can automatically recognize the installation without manual selection). After the plug-in installation is complete, Renderwow will pop up an [Installation Successful] prompt, and you can view the corresponding Rhino version and installation path information in the [Installed Plug-ins] list.
2. Open Renderwow Submission Page
After the previous step, complete the render-related parameter settings for the scene file (such as output path, render Resolution, and other necessary information). After confirming all parameters are correct, find the [Renderwow] option in the top navigation bar of the Rhino software and click to open the Renderwow Rhino render job submission page.

Note: If the Renderwow plug-in is not displayed, you can open the menu "Tools" → "pythonScript" → "Script Editor", then close the Script Editor window, and enter the command SwCommand in the command line execution in the upper half of the Rhino interface to launch the plug-in.
3. Select Submission Type and Complete Settings
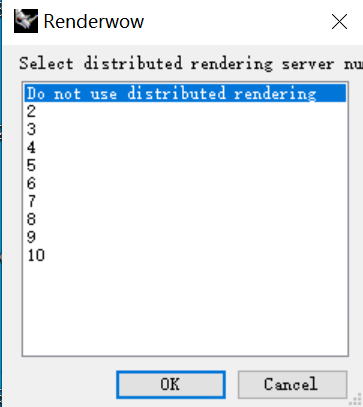
Renderwow Rhino Cloud Rendering supports two submission types (Rendering without distributed job, Rendering distributed job). Select the corresponding type according to your render needs and click [OK].
-
Select without distributed rendering: The cloud uses 1 machine to render.
-
Select 2–10: The cloud enables the corresponding number of machines to render together. No additional acceleration fee is charged.
Note:
-
Progressive render mode does not support distributed jobs. If the current scene is set to progressive rendering, selecting distributed submission will prompt: "Selecting both progressive rendering and distributed rendering will cause render failure. It is recommended to cancel progressive rendering mode or submit using non-distributed rendering."
4. Save File to Desktop
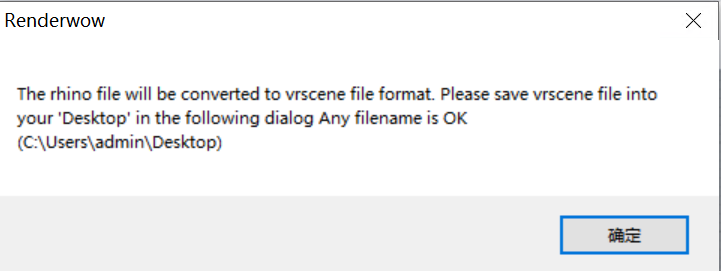
After the previous step, Renderwow will pop up a prompt indicating that the Rhino model needs to be converted to vrscene format and requires saving the file to the desktop (default path: C:\Users\Administrator\Desktop). Click the [OK] button in the pop-up, and after the file save window pops up, select the desktop as the save path, enter any file name, and complete the save operation.
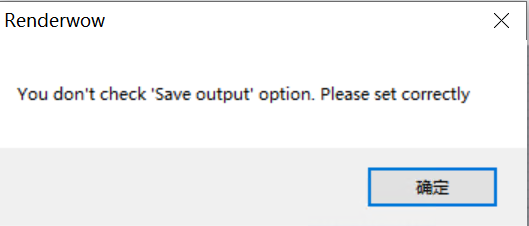
Note: If the output path is not checked, a prompt will appear and you cannot continue submission.
5. job Submission and Progress Tracking
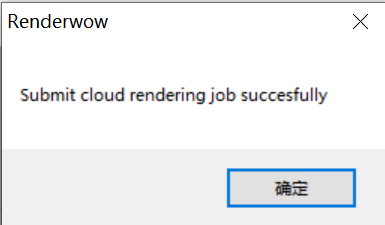
After the file is successfully saved in the previous step, Renderwow will pop up a [job Submission Complete] prompt. Click [OK]. At this point, return to the Renderwow client, and you can find the just-submitted job in the job list. The job will automatically go through [Package → Upload → Render → Download]. After the job is complete, the render results will be automatically saved to the previously set output path.

4.6 KeyShot Submission Tutorial
4.6.1 Overview
Renderwow supports render job submission for KeyShot versions 10 to 14, using the convenient drag-and-drop scene file to client submission method. During submission, the scene render settings will be automatically recognized: if the scene is set to single frame render, it will automatically jump to the still submission interface; if the scene is set to multi-frame render, it will automatically jump to the animation submission interface, without manual switching.
4.6.2 Submission Workflow
1. Install Renderwow Plug-in
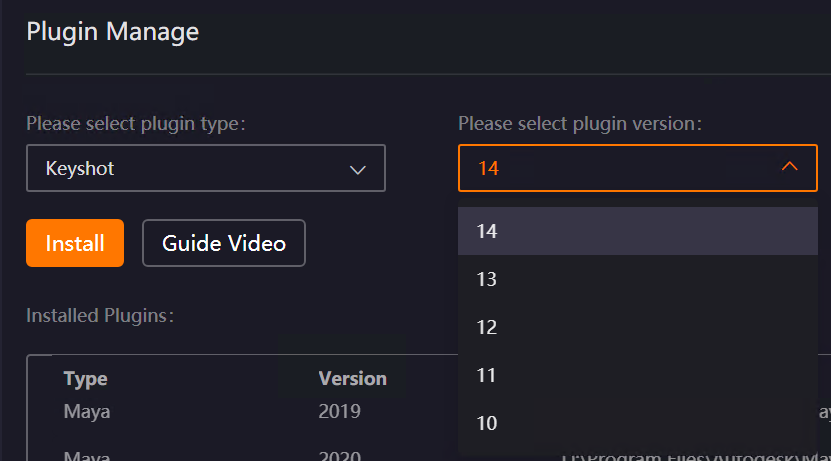
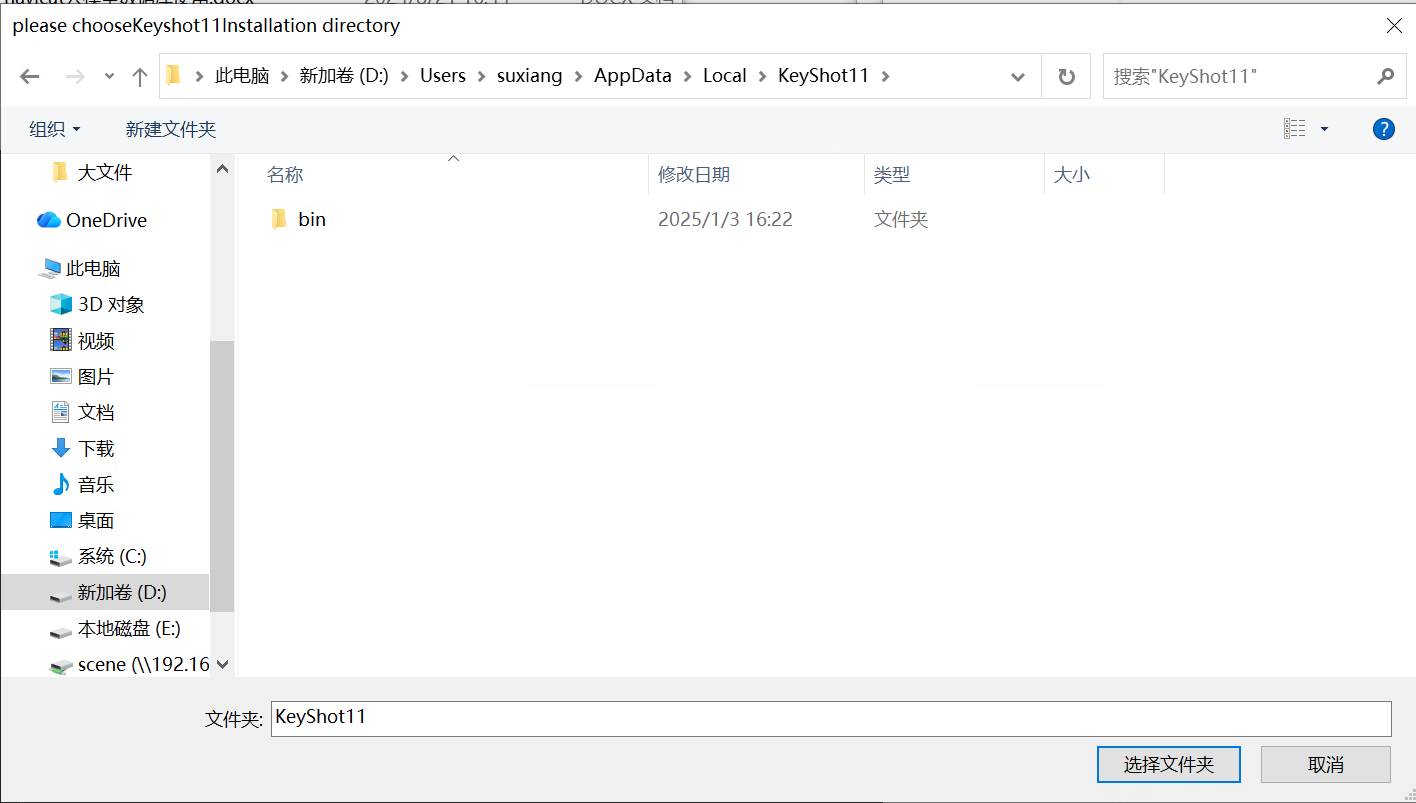
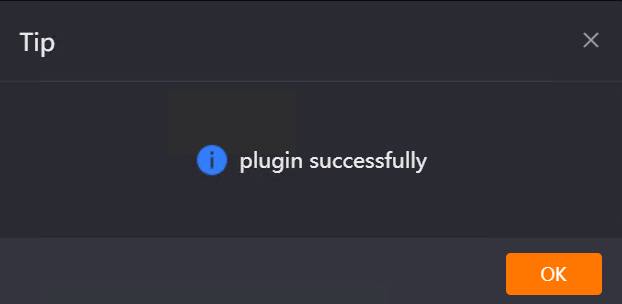
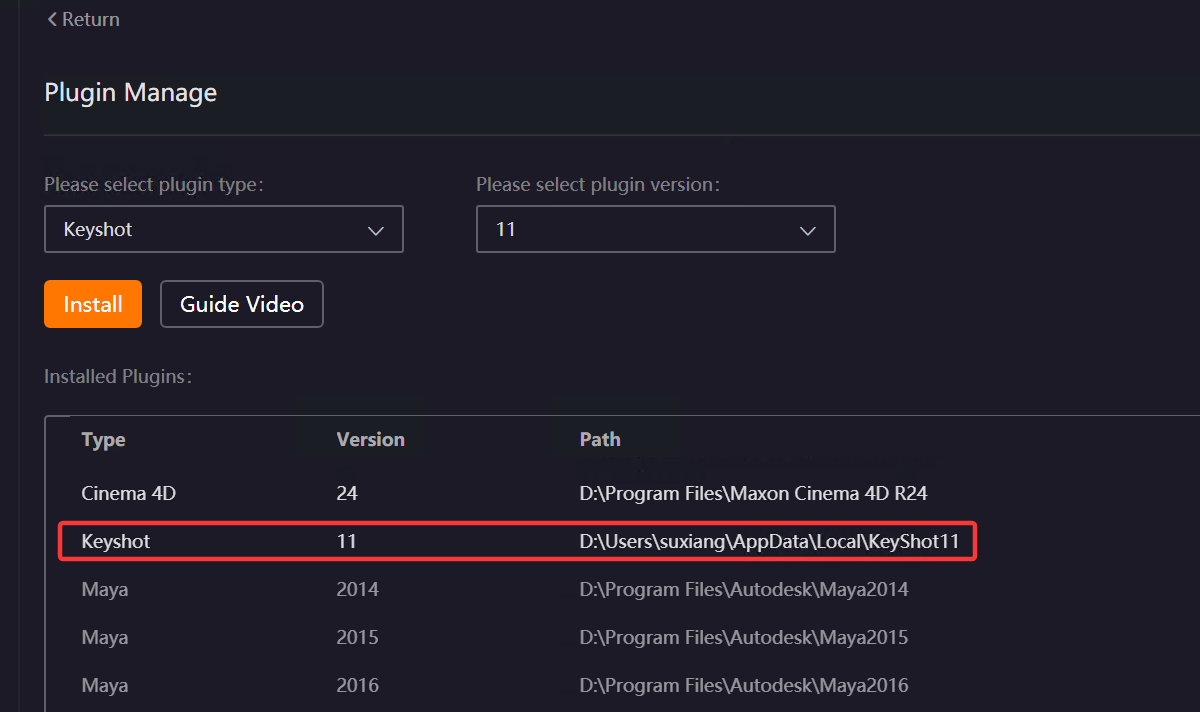
Open the Renderwow client, go to the Plug-in Manager page, select [KeyShot] in the plug-in type, choose the version corresponding to your local KeyShot from the version list, and click the [Install] button. Then manually select the local KeyShot installation path (if KeyShot is installed in the default path, Renderwow can automatically recognize the installation without manual selection). After the plug-in installation is complete, Renderwow will pop up an [Installation Successful] prompt, and you can view the corresponding KeyShot version and installation path information in the [Installed Plug-ins] list.
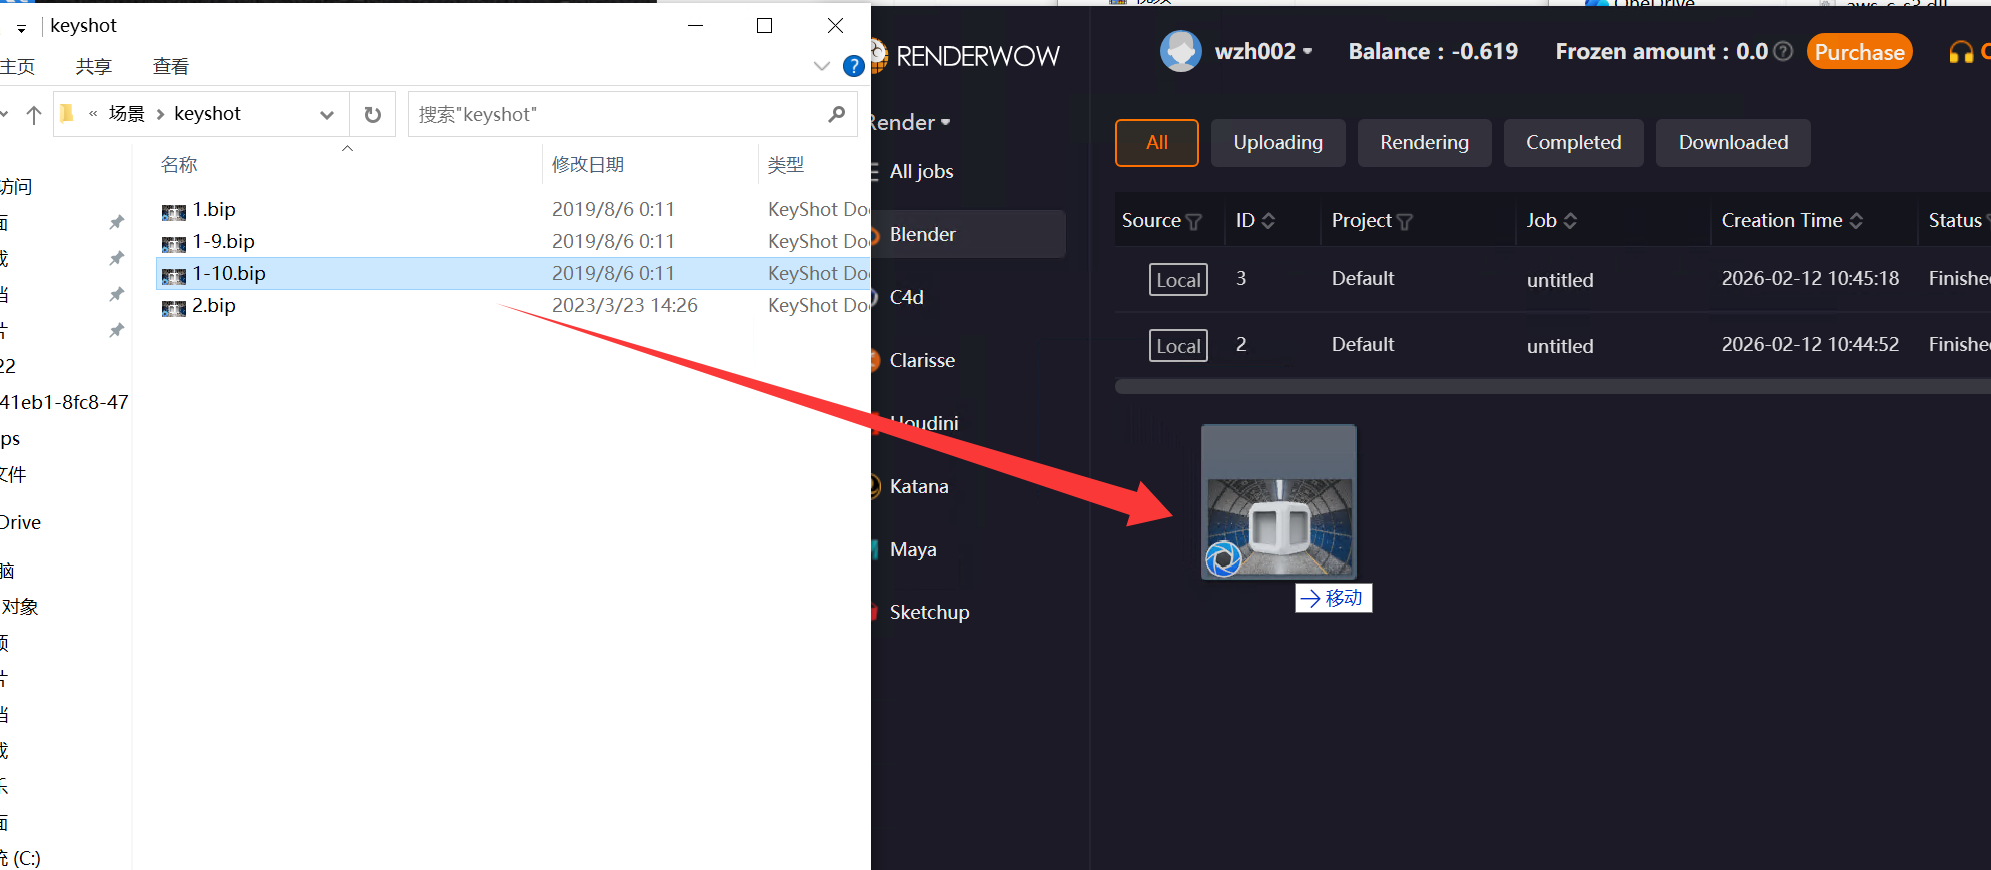
2. Drag .bip Scene File to Client
After plug-in installation is complete, first configure the render scene-related parameters in the local KeyShot software. After confirming they are correct, save as .bip format file, then drag the scene file to any blank area of the Renderwow client to trigger the job submission process.
Note:
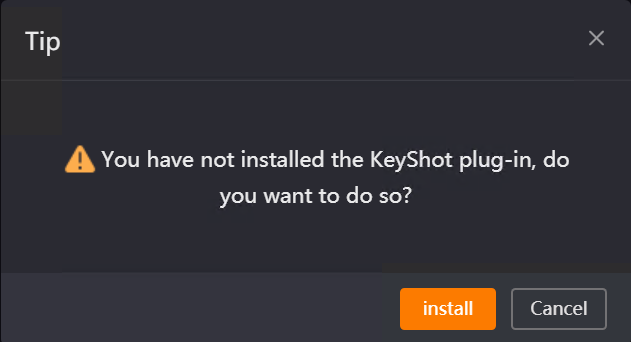
If the KeyShot Renderwow plug-in is not installed and you directly drag the scene file to the client, Renderwow will pop up a prompt. Clicking the [Install] button will automatically jump to the [Plug-in Manager] page. After completing the plug-in installation, you can submit the job.
Currently, Renderwow only supports .bip format KeyShot scene files for drag-and-drop submission. If you drag other format files, Renderwow will pop up a format not supported prompt. You need to re-export to the correct format before submitting.
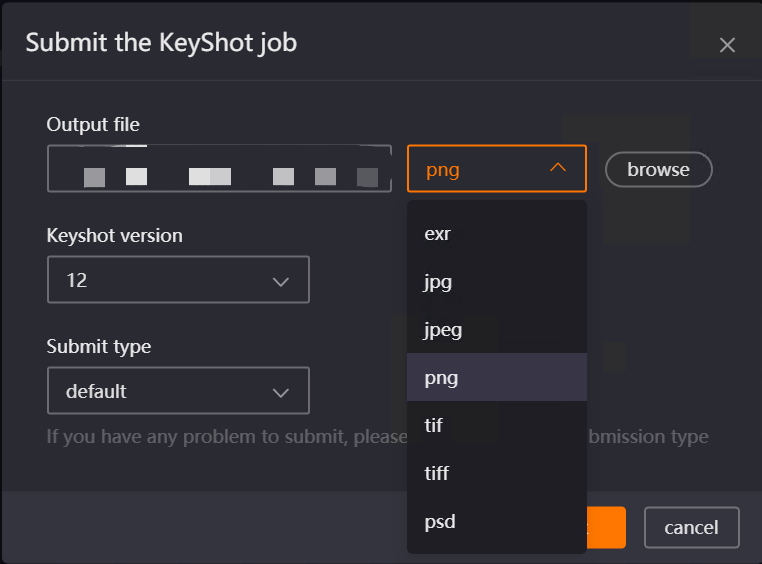
3. Set KeyShot Version and Render Output Path
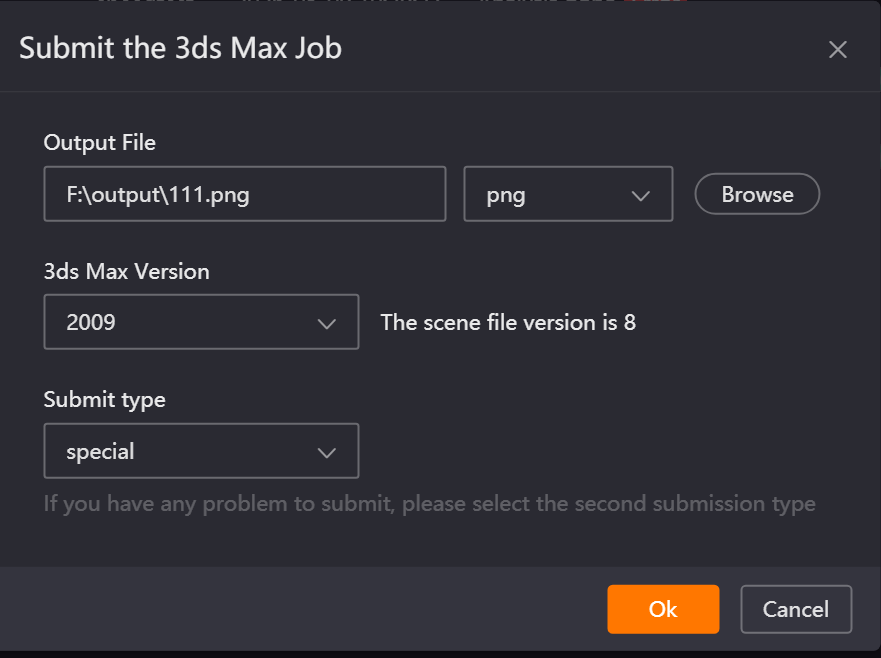
After the scene file is successfully dragged, Renderwow will automatically pop up the job submission window. Click the [Browse] button in the pop-up to open the output directory selection page, select the save path for the render results and enter the file name; then select the required output file format (such as jpg, png, exr, etc.) from the format dropdown list, and select the KeyShot version matching the local scene. After all settings are complete, click the [OK] button.
Important reminder: If the output file format is not selected, Renderwow will pop up a [Please select format] prompt after clicking [OK]. You need to select the format before submitting.
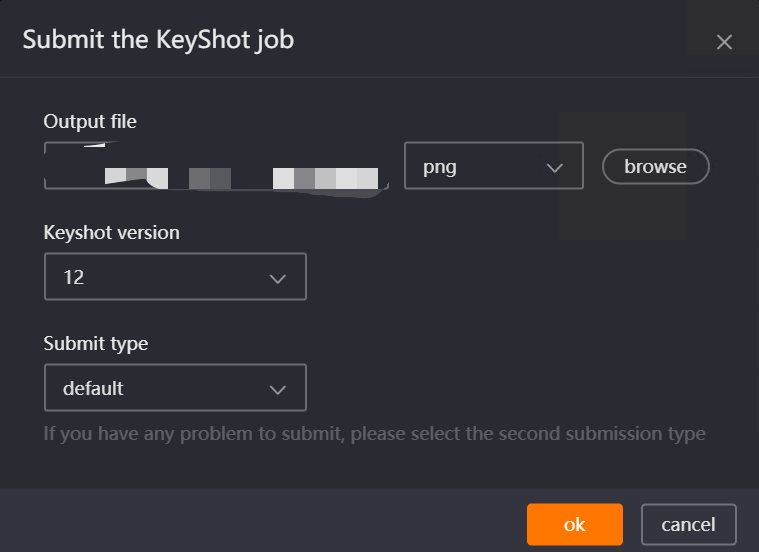
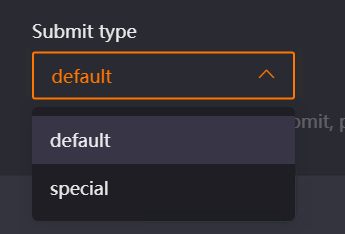
Note: If an exception occurs during job submission (such as submission failure, unable to recognize the scene, etc.), you can re-drag the scene file to the client, select [Special] in [Submit Type] in the submission pop-up, and then re-complete the settings and submit. This can effectively resolve most submission exceptions.
4. Wait for Scene to Automatically Open
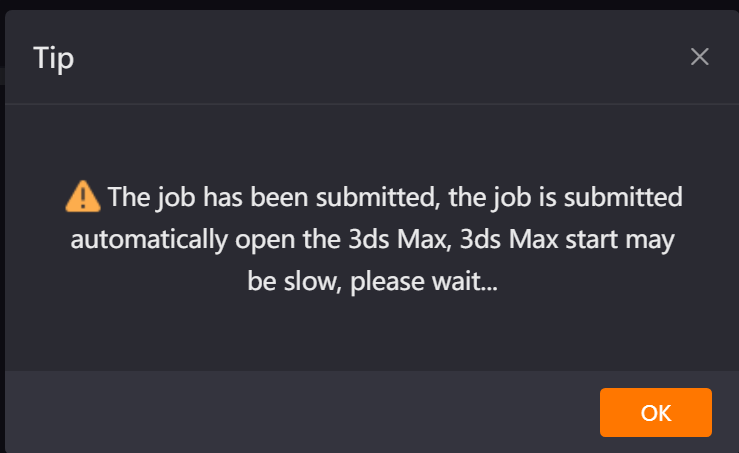
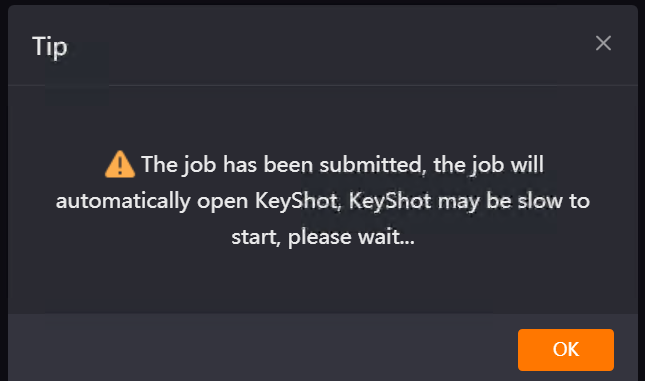
After completing the version and output path settings and clicking [OK], Renderwow will pop up a prompt indicating [job has been submitted. The job will automatically open KeyShot after submission. KeyShot startup may be slow, please wait]. At this point, no manual operation is needed. Wait patiently, and Renderwow will automatically launch KeyShot software and open the submitted render scene.
5. Confirm Render Parameters
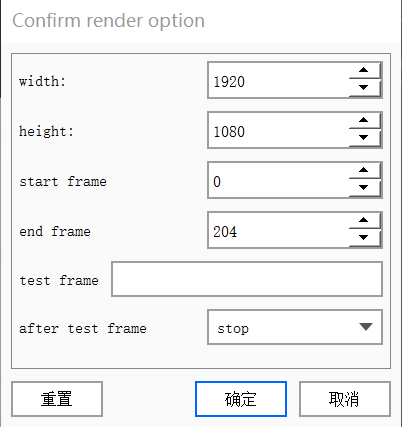
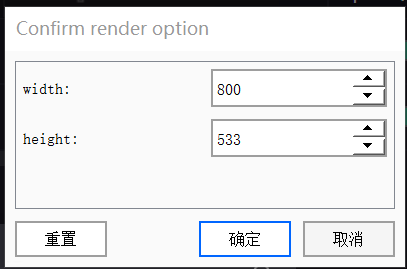
After KeyShot software launches and opens the scene, Renderwow will automatically pop up a [Confirm Render option] window. Carefully check the render parameters in the pop-up (such as width, height, frame count, etc.). After confirming they are correct, click the [OK] button. According to the scene’s render settings (single frame / multi-frame), the corresponding parameter confirmation pop-up for still or animation will appear respectively. Check as needed.
Animation Job Parameter Confirmation:
Still Job Parameter Confirmation:
6. Job Submission and Progress Tracking
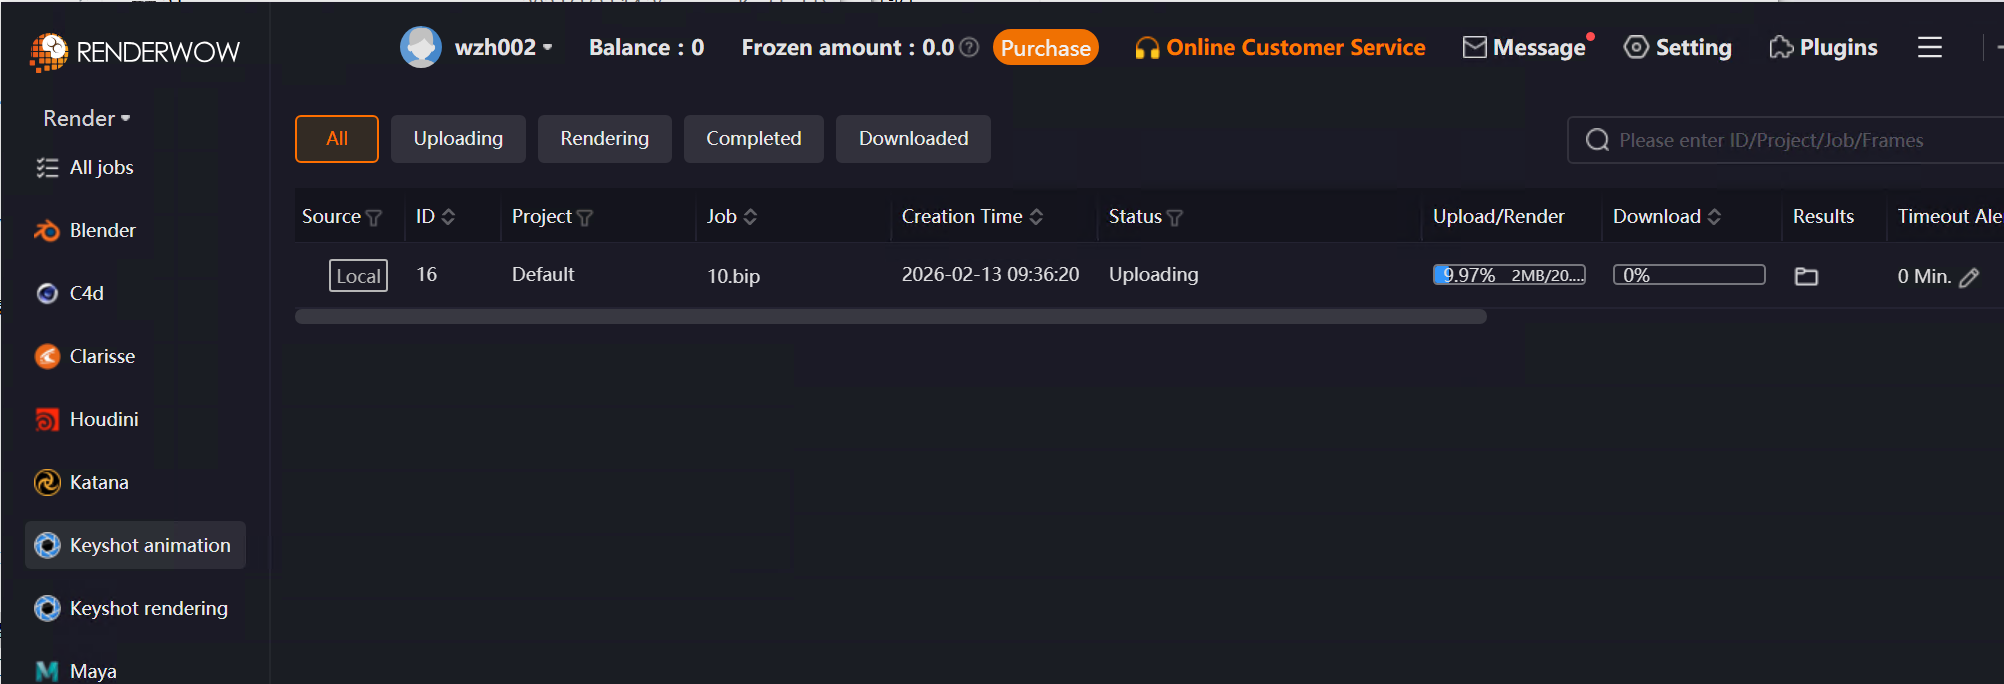
After render parameter confirmation is complete, Renderwow will pop up a [job Submission Complete] prompt. Click [OK]. At this point, return to the Renderwow client, and you can find the just-submitted job in the job list. The job will automatically go through [Package → Upload → Render → Download]. After the job is complete, the render results will be automatically saved to the previously set output path.
4.7 Maya / Houdini / Clarisse / Katana / Unreal Engine Drag-and-Drop Submission
4.7.1 Overview
The above software all use drag-and-drop submission, and the basic workflow is the same (using Maya as an example). Renderwow supports:
4.7.2 Drag-and-Drop Submission General Workflow
1. Edit or Create Render Preset
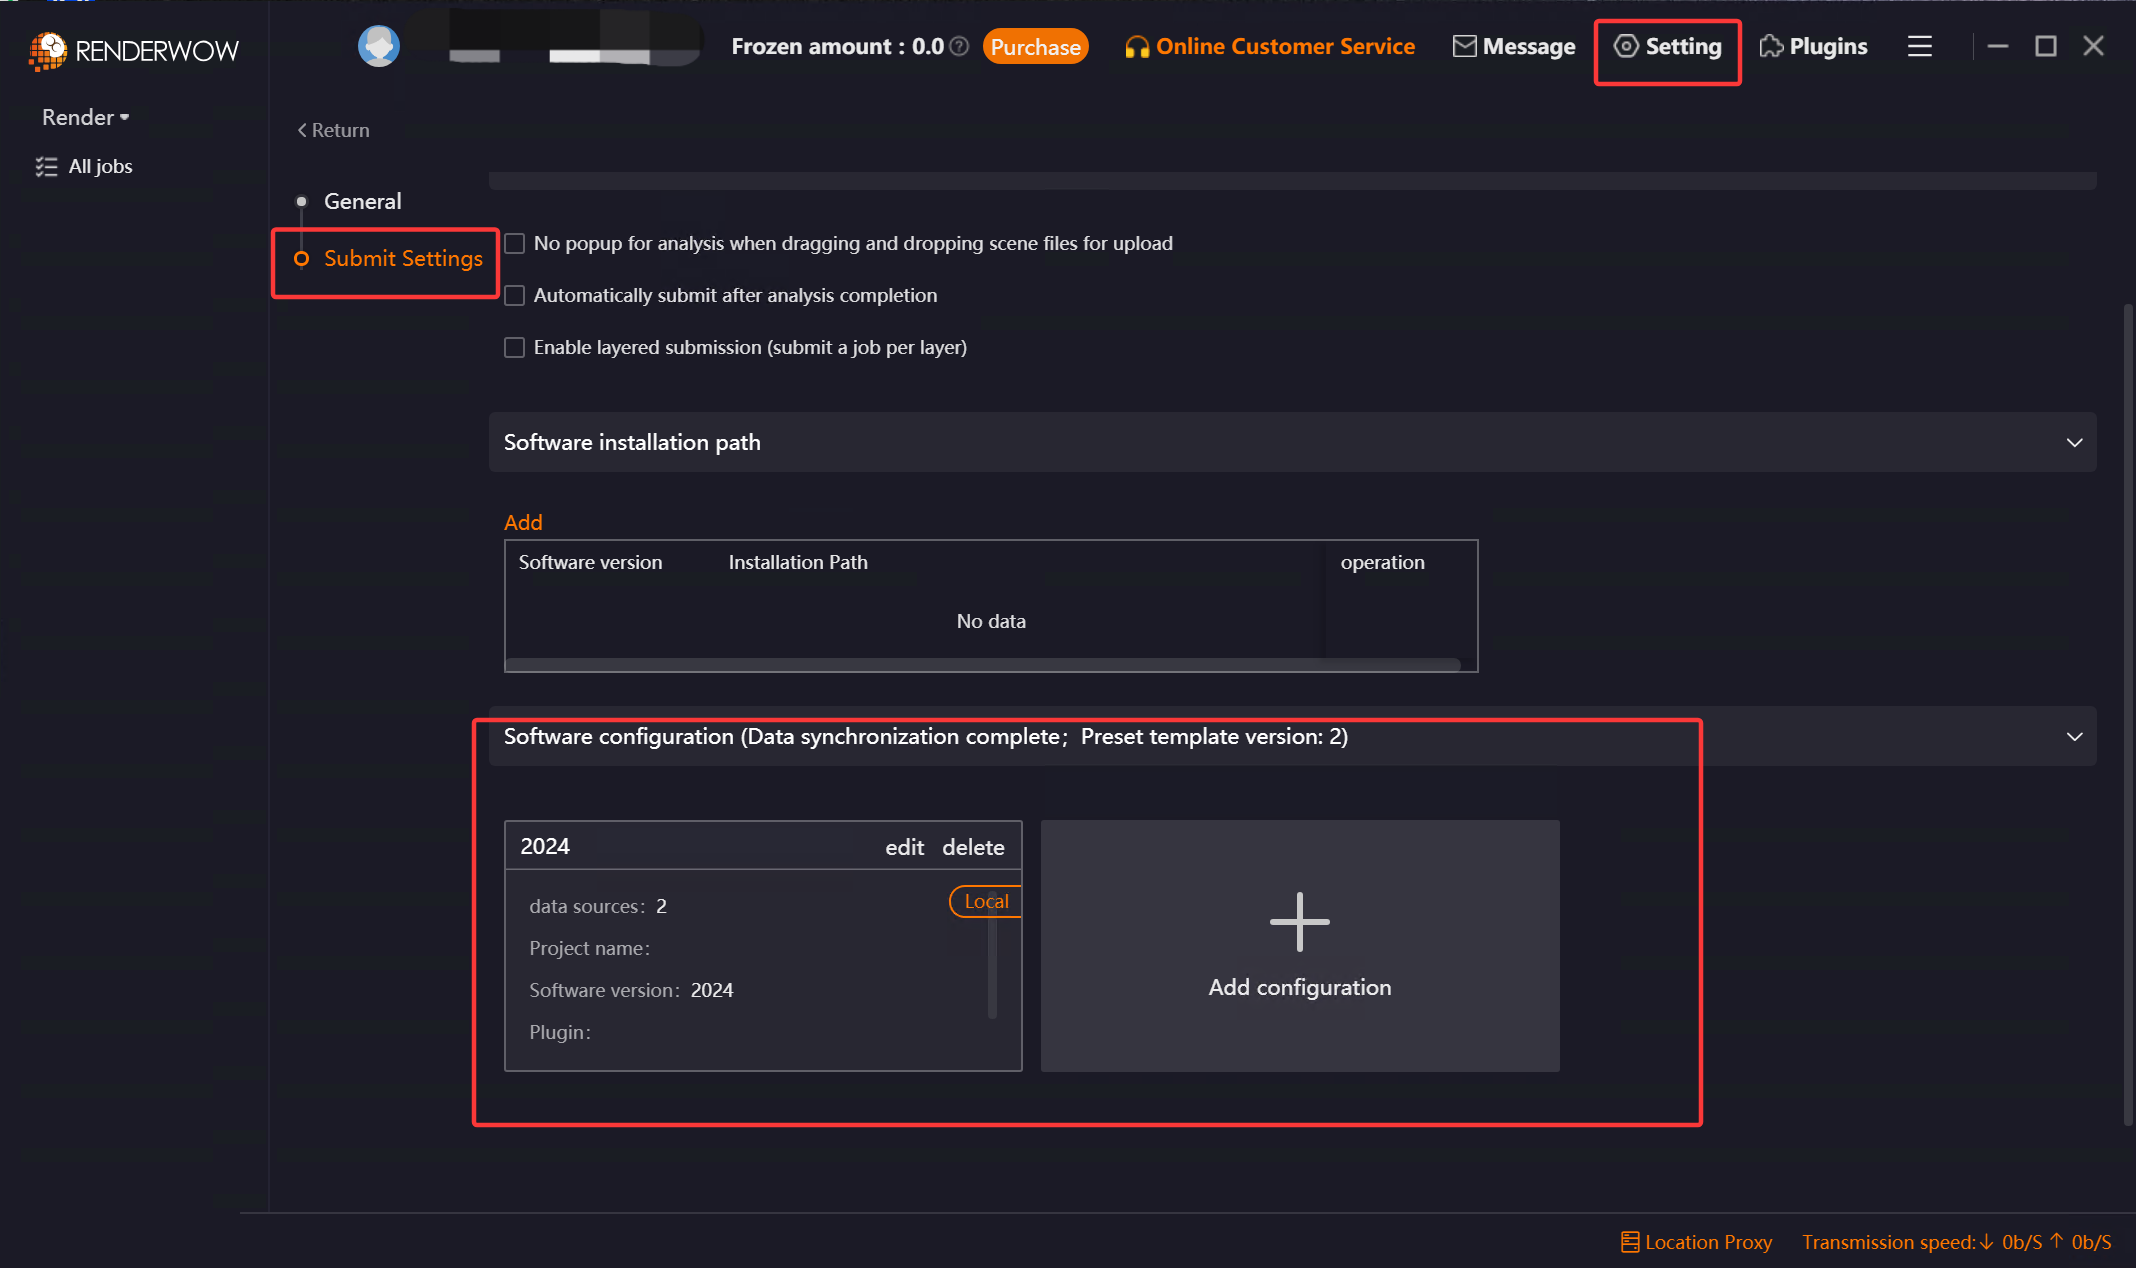
In the Renderwow client [Settings] → [Submission Settings] → [Maya] page, edit or add a Render Preset for this submission job.
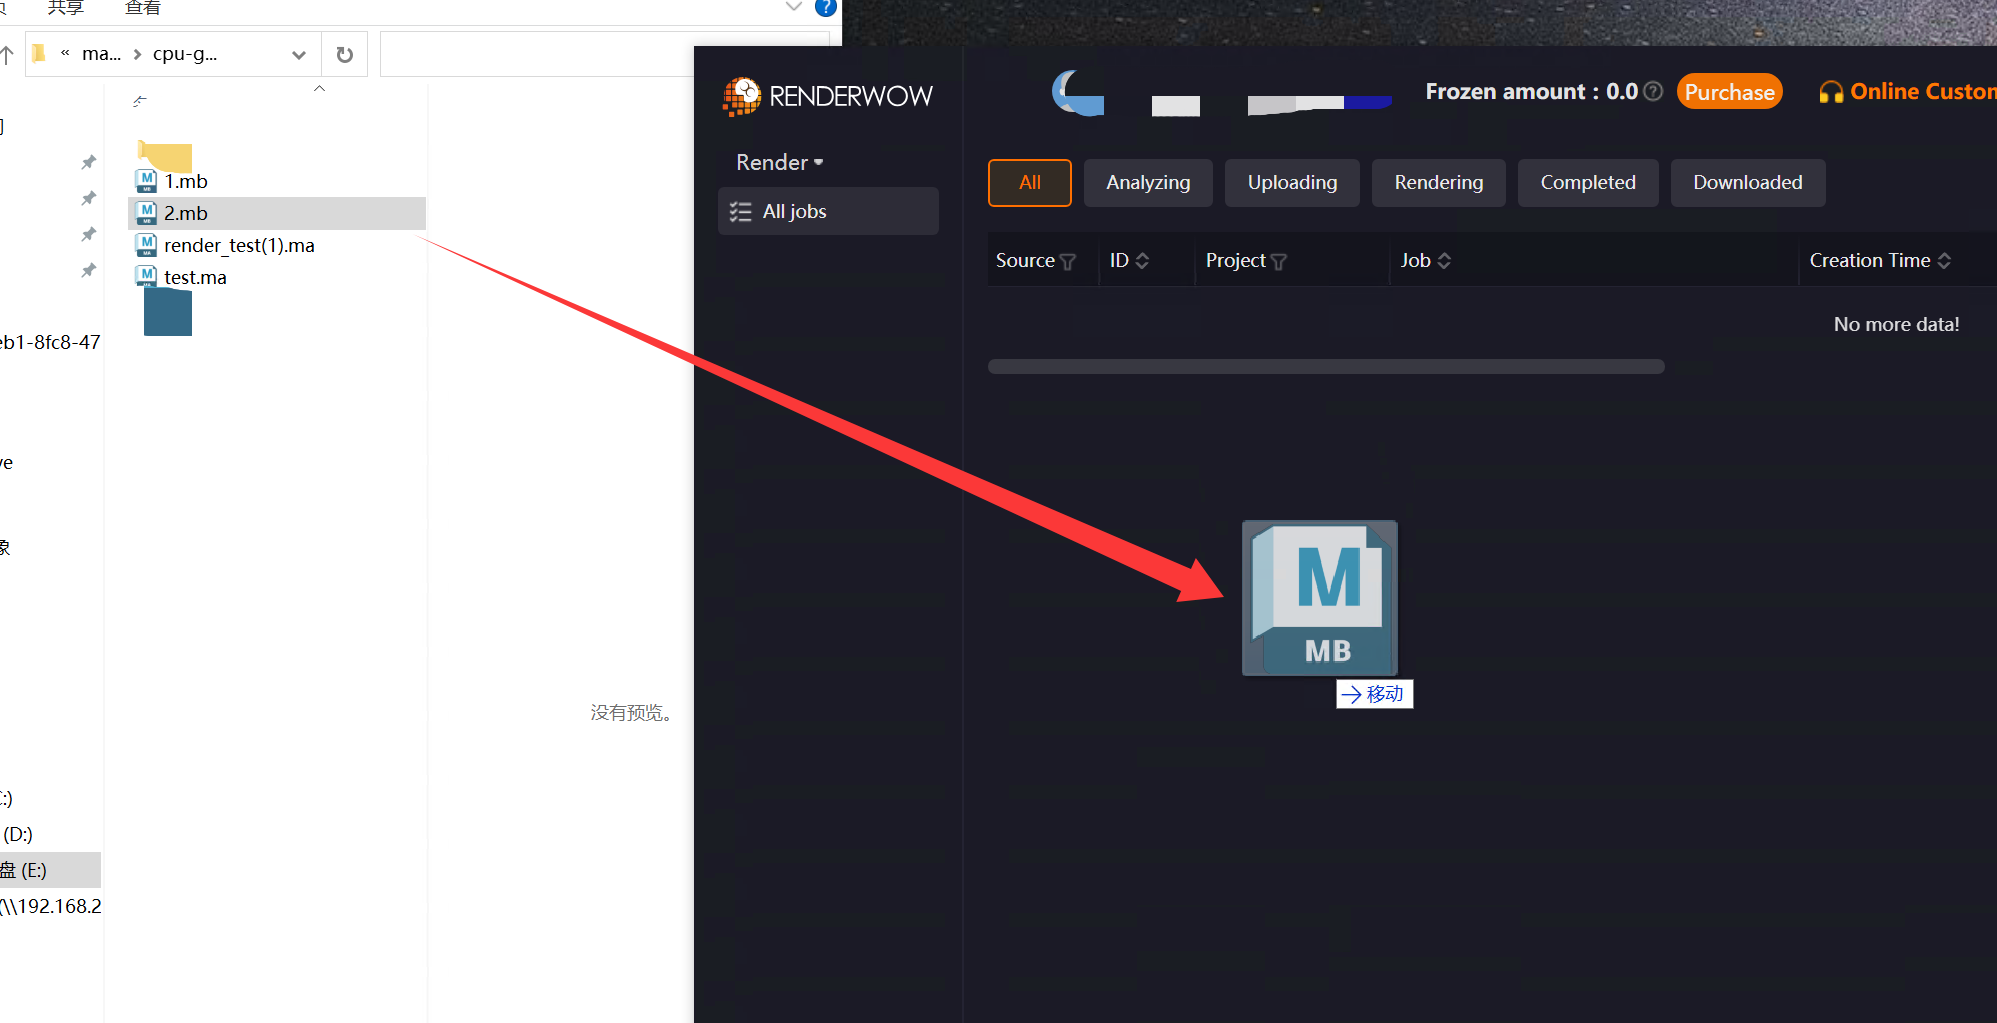
2. Drag .ma or .mb Scene File to Renderwow Client
After completing the previous step, save the scene file that needs to be rendered and drag it to any location in the client to open the "Job Analysis" page.
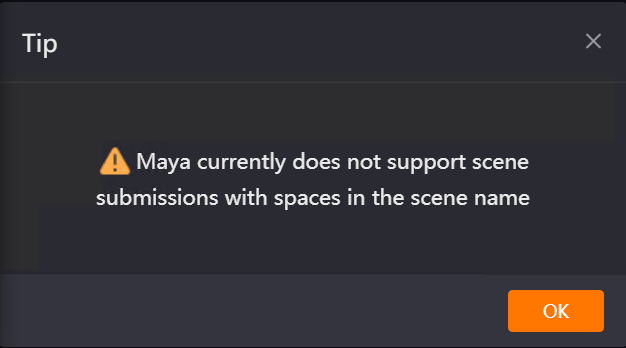
Note: Maya does not support drag-and-drop submission of scene files with spaces in the scene name.
3. Scene Analysis
After completing the previous step, select the Render Preset configured just now for scene analysis. (If you need to re-edit the Render Preset, you can also click the "Edit" button to re-edit and save.)
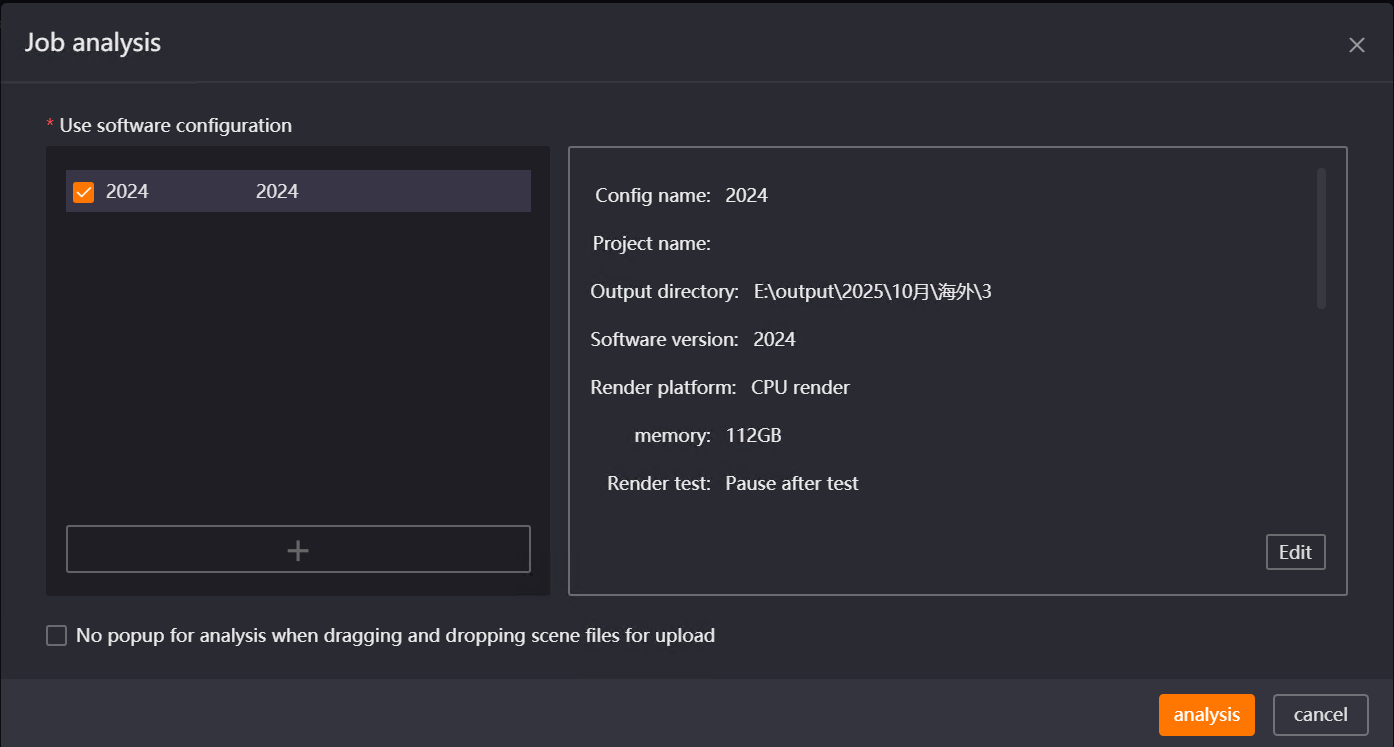
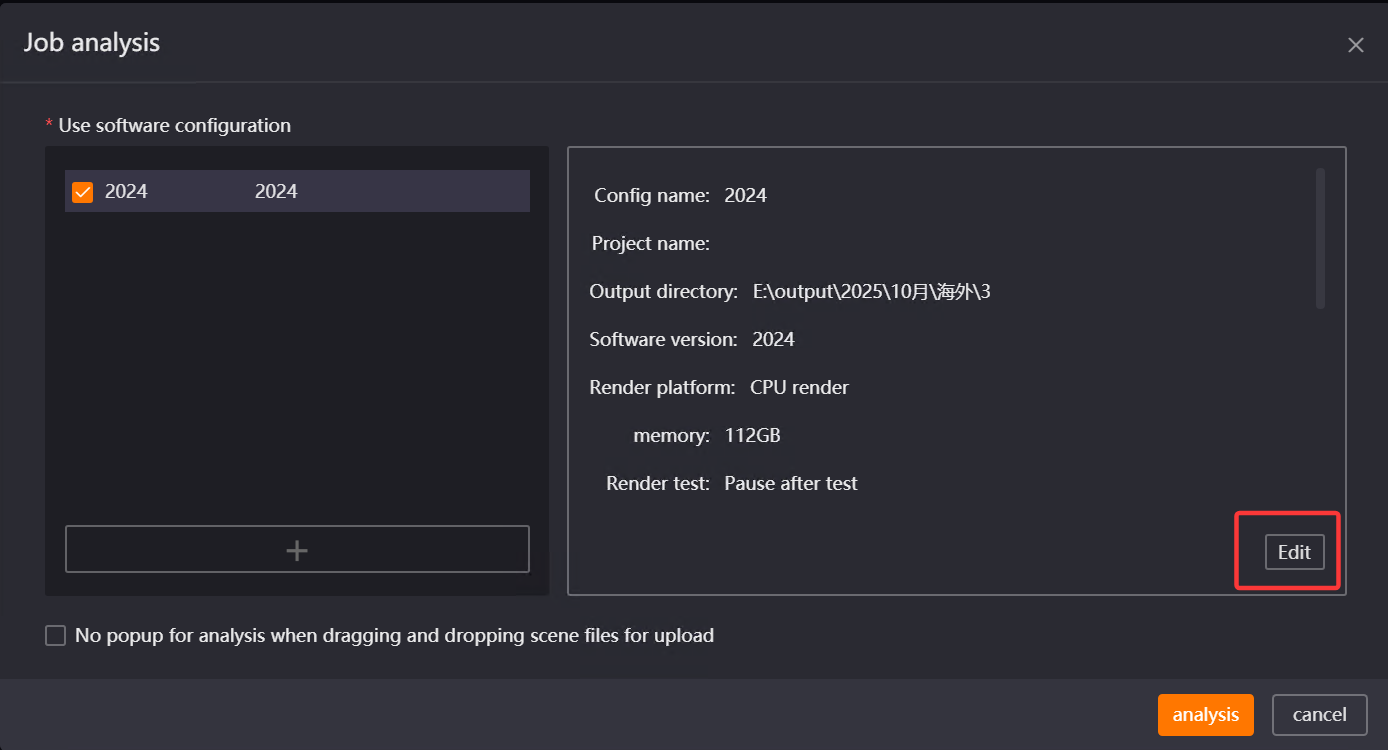
If the Renderwow Render Preset template is upgraded, you need to manually update the template content before referencing the template for analysis. Templates that need updating will be grayed out but can be checked. After checking, click the "Edit" button to edit and save, and they will no longer be grayed out and can be selected and used for job analysis. If you select a grayed-out Render Preset and click the "Analyze" button without re-editing, an error will be reported and submission will fail.
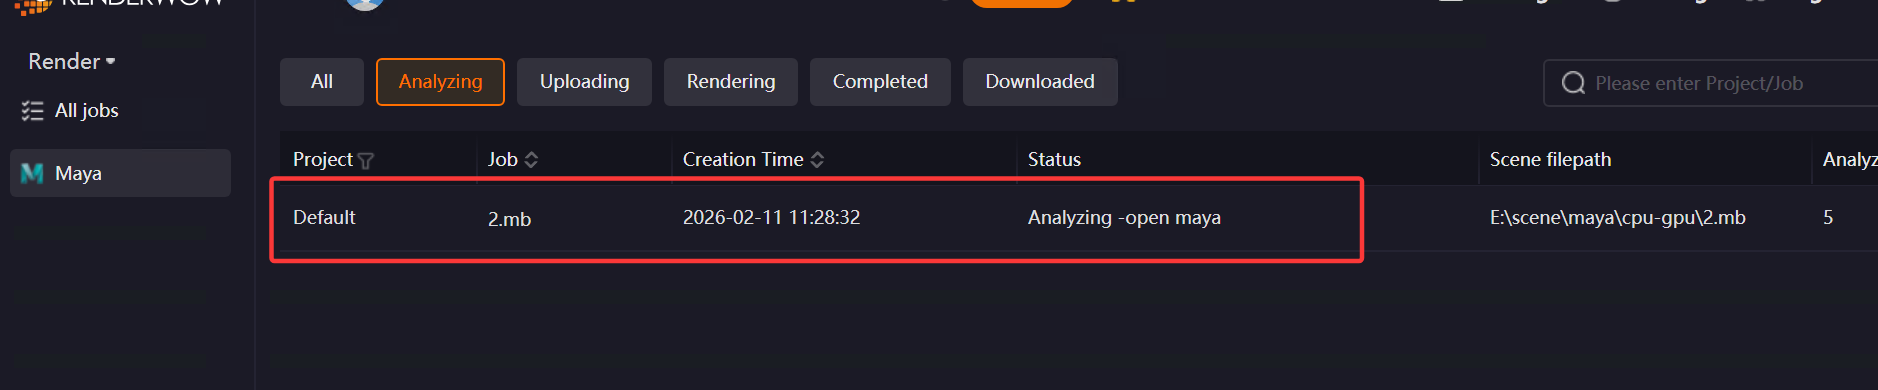
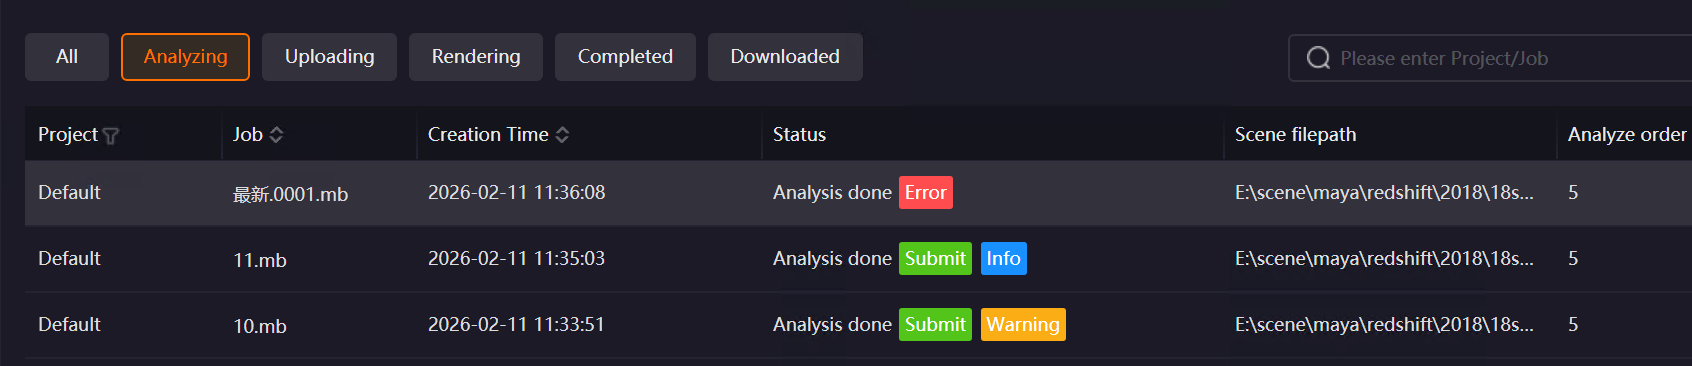
After scene analysis is complete, if there are warnings or errors, "Warning" and "Error" buttons will be displayed. Click the buttons to view the specific situation:
-
If the "Error" button appears, the job cannot be submitted. You need to modify the scene file according to the prompt and resubmit.
-
If the "Warning" button appears, and it does not affect rendering, you can continue to submit the job.
4. Render Parameter Setting and job Submission
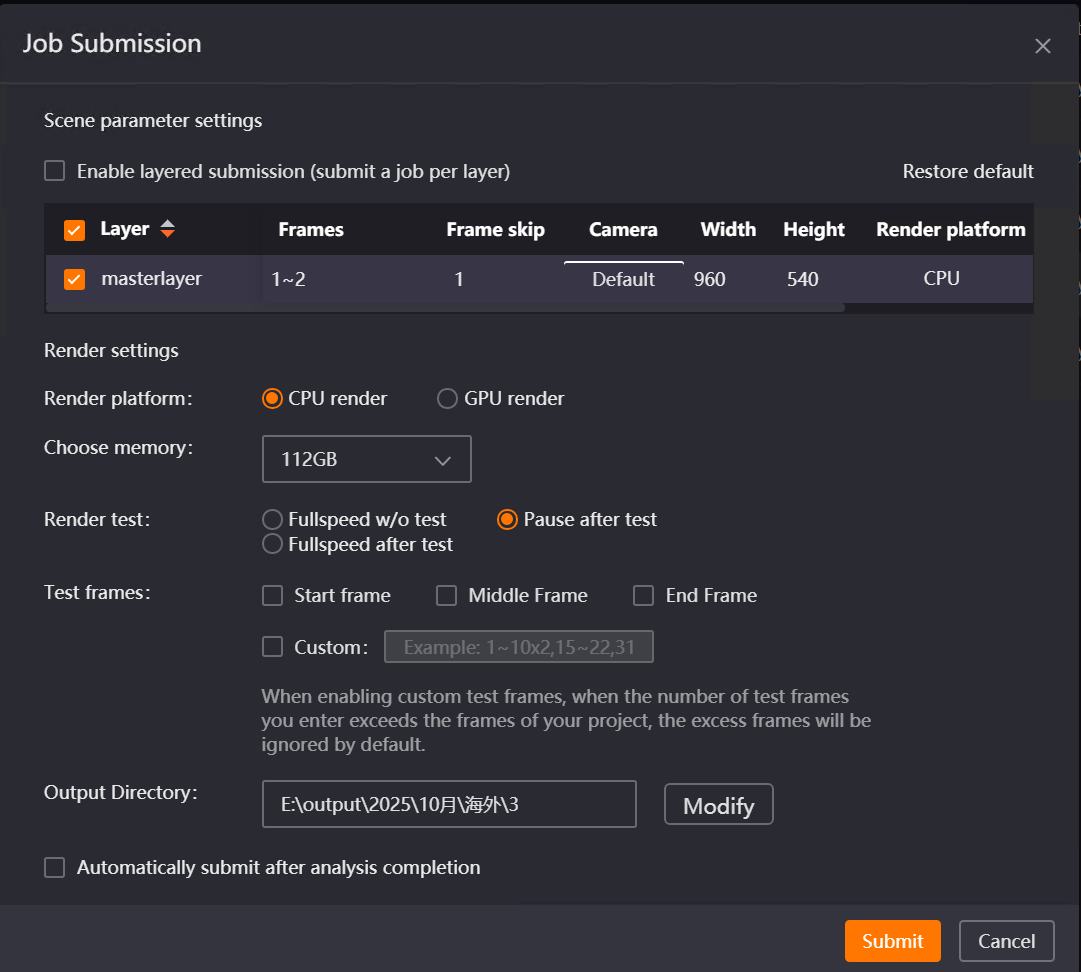
After clicking the "Submit" button in the previous step, the job submission window appears. Set the layer to render, frame range, width and height, and set relevant parameters as needed, then click the "Submit" button. The job will start packaging and uploading to the cloud for rendering.
Note:
If more than 24 hours have passed since job analysis completion without submission, the job will time out and cannot be submitted, displaying a "Timed Out" status. You need to re-drag and submit for analysis.
When using for the first time, Maya will prompt that the system automatically optimizes the number of frames rendered per machine. If the scene requires one machine per frame rendering, you can contact customer service at this point. (Other software do not have this prompt.)
Renderwow supports batch submission of drag-and-drop jobs of the same type with no parameter changes needed after analysis. During operation, hold the Shift key to select multiple jobs of the same type, right-click and select "job Submission" to batch submit these jobs.
Special Cases
For Unreal Engine, if in [Settings] → [Submission Settings] → [UE] page, in General Settings, you uncheck "Enable scene analysis (use new drag-and-drop analysis UE workflow)" (this option is checked by default), you cannot use Render Preset to submit Unreal Engine jobs. It is not recommended to uncheck this option.
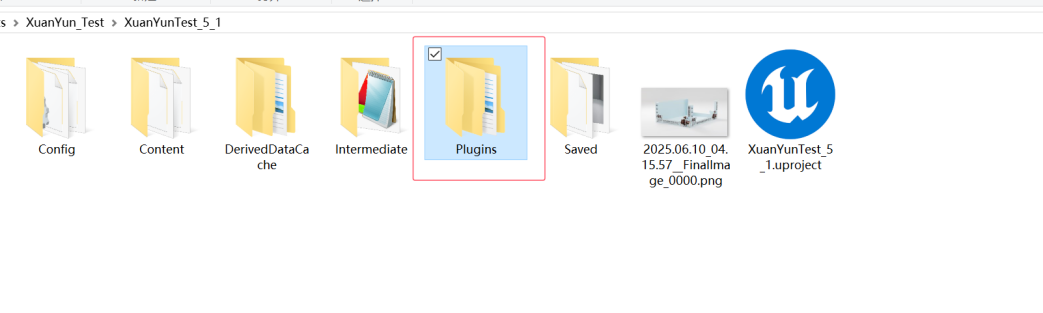
If Unreal Engine uses third-party plug-ins, it is recommended to copy the third-party plug-ins to the Plugins folder under the project directory to ensure plug-in consistency.
4.7.3 Number of Parallel Analyses
When dragging and dropping multiple scene files simultaneously, you can adjust the "Number of Parallel Analyses for Drag-and-Drop Jobs" (1–5) in "Settings → Basic Settings" to control the number of jobs being analyzed simultaneously. Modification requires restarting the client to take effect. Supports: 3ds Max, Maya, Houdini, Clarisse, Katana, Unreal Engine.