Client Interface and Features
3.1 Interface Overview
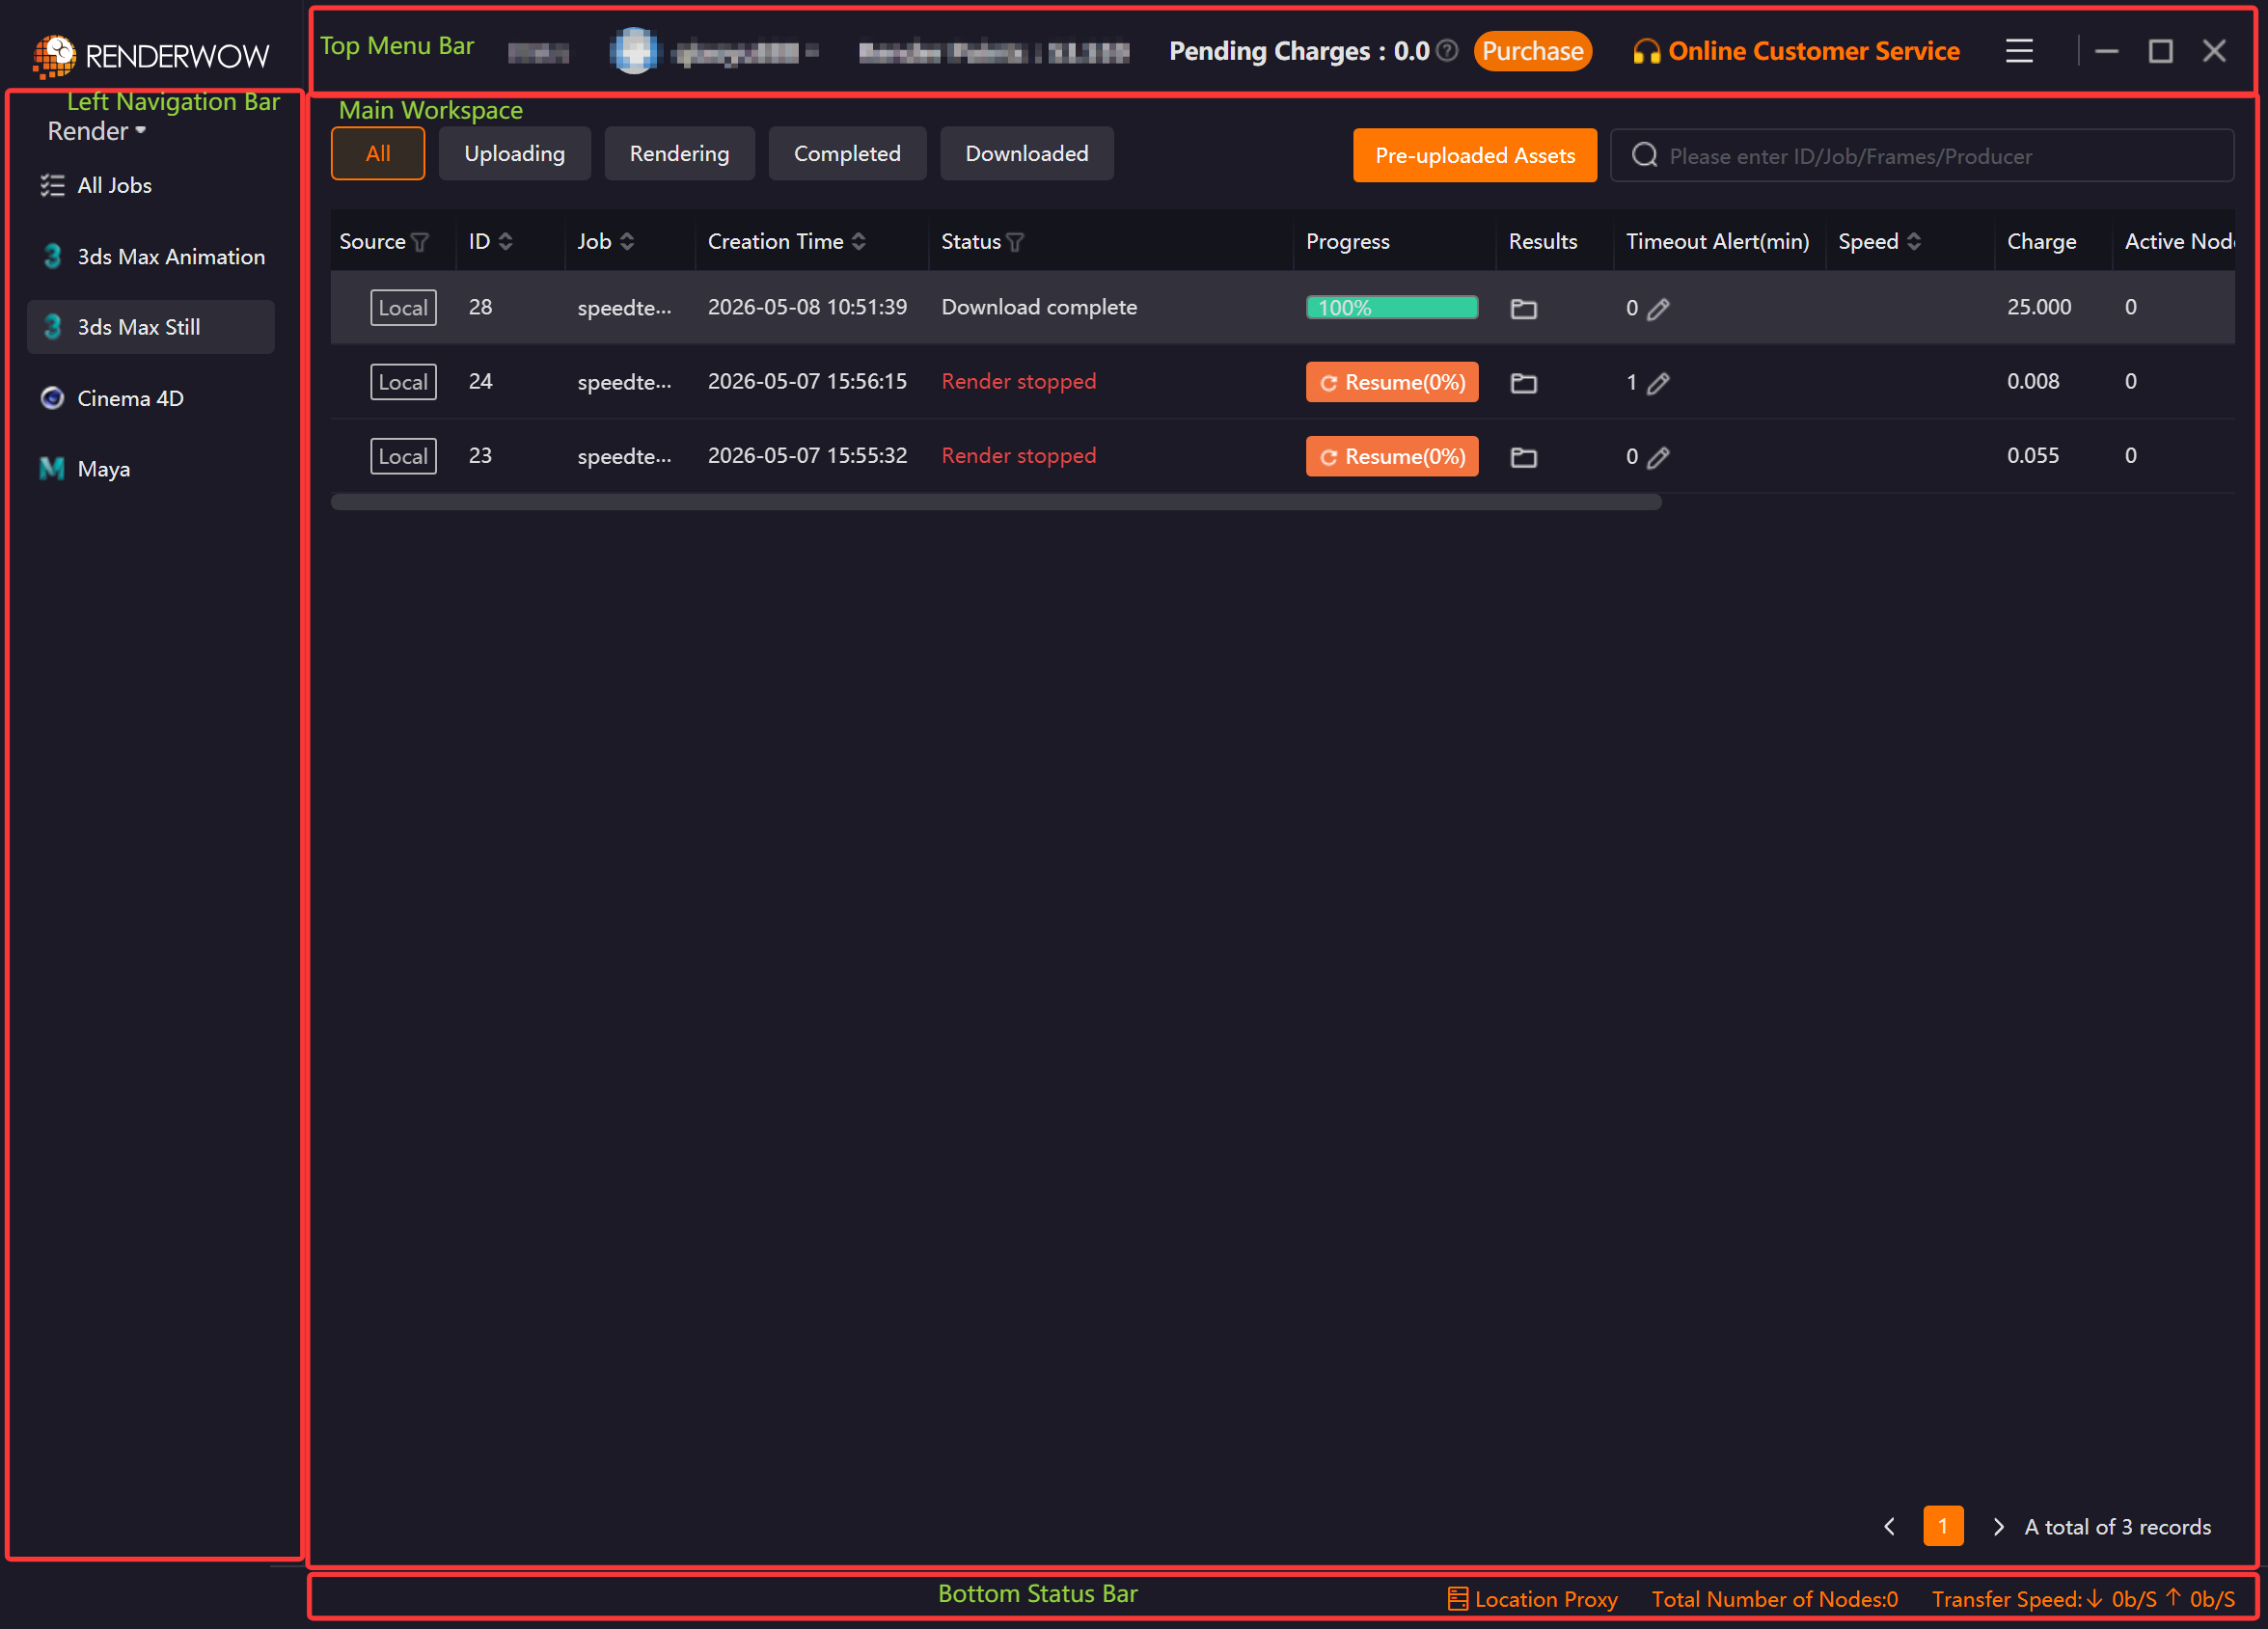
The Renderwow client features a clean and intuitive three-column layout: a top menu bar, a left navigation bar, and a central main workspace (job list). A status bar at the bottom displays real-time information such as Transfer Speed and Total Number of Nodes.
| Area | Position | Main Functions |
|---|---|---|
Top Menu Bar |
Top of the interface |
Account info, Render Points balance, Pending Charges, Purchase, Online Customer Service, Message, Setting, Plug-in Manager, Auto Shutdown, and Maximize/Minimize/Close window controls |
Left Navigation Bar |
Left side of the interface |
job overview, filter by software/type |
Main Workspace |
Center of the interface |
job status monitoring, job operations, Frame Details |
Bottom Status Bar |
Bottom of the interface |
Real-time display of upload/download Speed and Total Number of Nodes |
3.2 Top Menu Bar
3.2.1 Account Information Area
The left side of the top menu bar displays the currently logged-in username, avatar, account balance, and Pending Charges (amount to be deducted).
-
Pending Charges: The cost corresponding to the machine hours already consumed by jobs that are currently rendering but have not yet produced results. Charges are deducted upon normal job completion; no charges apply if rendering fails.
3.2.2 Account Menu
Hovering over the avatar displays a dropdown menu showing the following information: account name and avatar, Render Points balance, and Purchase button. Supported actions: About Us, Logout (switch user), and Exit.
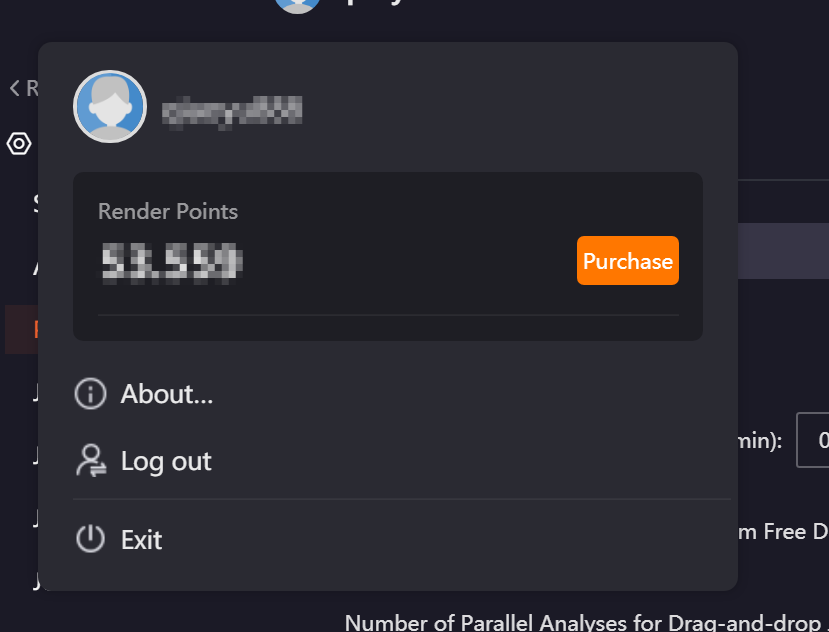
3.2.3 Purchase
Clicking the Purchase button in the top menu bar navigates directly to the Purchase page to perform a top-up.
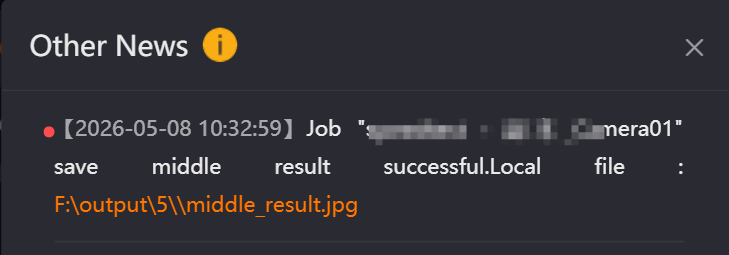
3.2.4 Message Center
The Message Center categorizes and displays various system notifications. It shows All Messages by default and can be switched to categories such as Activity Messages, Timeout Alert Messages, Exception Messages, and Other. The latest messages are always displayed at the top, and unread messages are marked with a red dot.
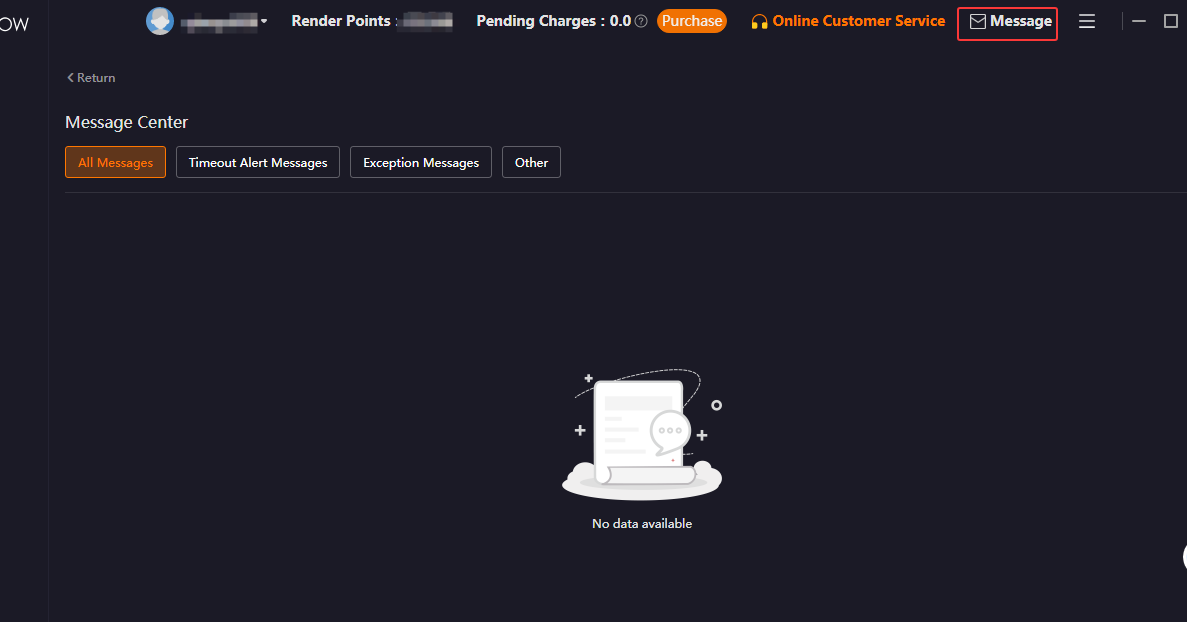
| Message Type | Description |
|---|---|
All Messages |
Displays all messages |
Timeout Alert Messages |
Job rendering timeout notifications |
Exception Messages |
Alerts for network disconnection, insufficient balance, scheduling failure, insufficient disk space, etc. |
Other |
Notifications for plug-in updates, intermediate result saves, etc. |
3.2.5 Setting
Clicking the Setting button in the top menu bar opens the global configuration center, which includes the following two major sections:
-
Basic Settings: Covers System Settings, Appearance, Project Management, Job Submission, Job Management, Job Download, Transfer Settings, and other configuration items.
-
Submission Settings: Render Preset configurations for Maya, Houdini, Clarisse, Katana, and Unreal Engine, including parameter templates for renderer version, memory settings, frame range, output path, etc. For detailed instructions, refer to the Render Preset, General, and Software Installation Path modules in the Renderwow plug-in feature introductions for Maya, Houdini, Clarisse, Katana, and Unreal Engine.
3.2.5.1 System Settings
Run at startup
If you need the Renderwow client to launch automatically upon system restart or next boot, enable this feature in Settings → Basic Settings.
![]()
Prevent sleep while jobs are running
When the Windows system is set to auto-sleep, enabling this option prevents jobs from being interrupted due to system sleep. Enabled by default. When the client has jobs in analyzing, packaging, uploading, unpacking, Waiting, Rendering, scheduling failure, stopped due to insufficient balance, or downloading states, the system will not enter sleep mode. To ensure jobs are submitted and rendered normally, it is not recommended to disable this option.
![]()
Notifications and Sounds
-
Show tray notifications: Receive reminders for job timeouts, render completion, download completion, and exceptions in the system tray (ensure that notification permissions for the Renderwow client are enabled in Windows first).
-
Play notification sound: Check this option to enable a sound alert when receiving messages in the system tray.

Data directory
-
If this machine is equipped with a Solid State Drive (SSD), it is recommended to select the SSD drive letter for faster job packaging speed.
-
If the job scene file is large, it is recommended to select a drive letter with ample disk space.

Connection timeout (s)
Default value is 10. The allowed modification range is integers from 10 to 30. Generally, no modification is needed. If the network environment is unstable, internal network restrictions are high, connection failures occur frequently, or service information cannot be retrieved, you may increase the value appropriately to improve connection success rate.
![]()
Response timeout (s)
Default value is 10. The allowed modification range is integers from 10 to 30. Generally, no modification is needed. If submitting render jobs during peak hours or frequently encountering job submission failures when submitting large project files, or if interface response is slow, you may increase this parameter appropriately.
![]()
Log level
Keep the default level 3 for normal daily use. When errors occur, jobs are abnormal, or client malfunctions require customer service investigation, temporarily increase it to level 5 to facilitate issue identification by customer service.
![]()
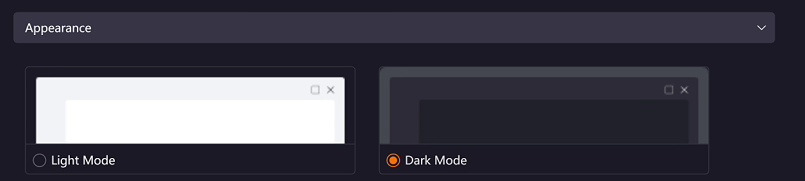
3.2.5.2 Appearance
To switch the display style of the Renderwow client, select a mode in Appearance. The default is the dark interface; checking Light mode switches the client to the light interface.
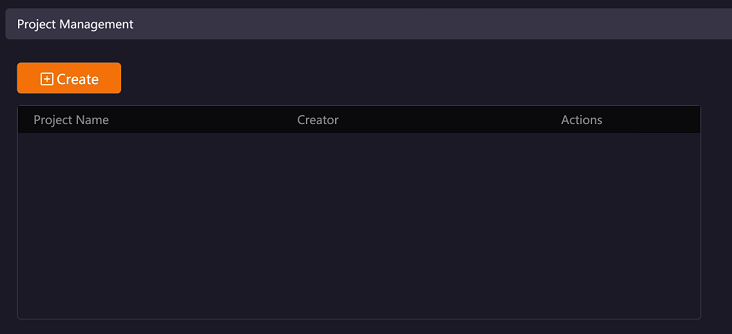
3.2.5.3 Project Management
When you need to archive and manage multiple projects simultaneously, it is recommended to specify a Project Name when submitting jobs, so you can quickly retrieve jobs for the corresponding project in the client job list.
Project Names can be created or used in the following locations:
-
Client → Setting → Basic Settings → Project Management: You can create, modify, and delete Project Names here. Main accounts and sub-accounts can share Project Names, and the main account can also modify Project Names created by sub-accounts.
-
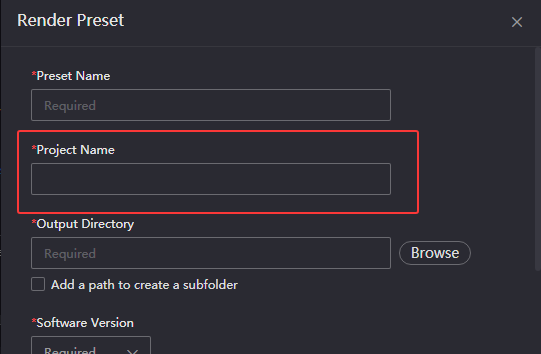
Client → Setting → Submission Settings → Render Preset: Project Names can be created or modified in the Render Presets for Maya, Houdini, Clarisse, Katana, and Unreal Engine.
-
Plugins based in-app submission interface: Currently supports 3ds Max, Cinema 4D, and Blender.
3.2.5.4 Job Submission
Producer
When an account is used collaboratively by multiple people, you can modify the Producer information in Settings → Basic Settings before submitting jobs. The Producer column in the client job list allows quick retrieval of jobs by the corresponding Producer.

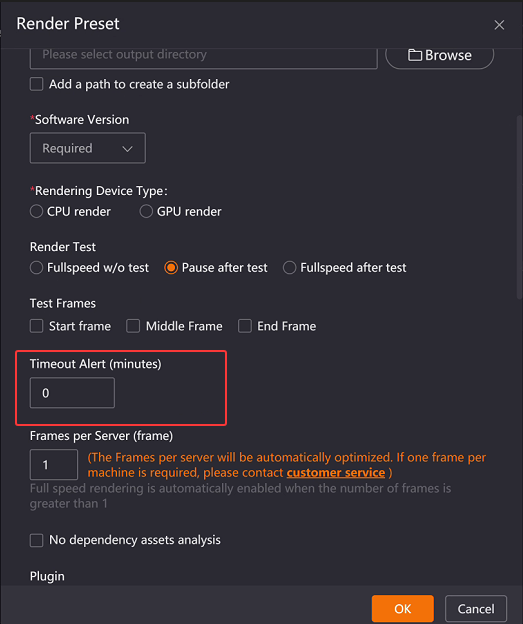
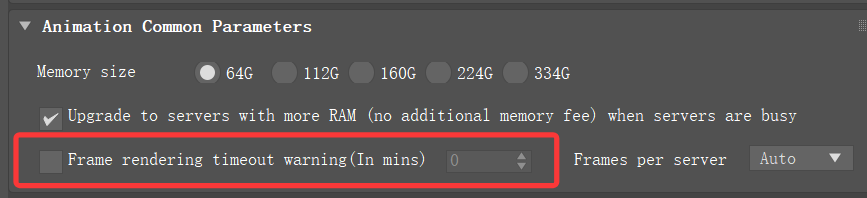
Single Frame Timeout Alert Threshold (min)
To monitor job rendering time, use the timeout alert feature. When the rendering duration of a frame exceeds the set time, the job row will highlight and flash. Double-click the job to enter the Frame Details page to check the specific situation. Timeout alerts can be set in the following locations:
-
Set in the Render preset of the Submission Settings interface. When submitting drag-and-drop jobs for the corresponding software, the Render preset time shall prevail.
-
Set in the job submission interface (e.g., 3ds Max submission interface). When submitting jobs, the setting in the submission interface shall prevail.
-
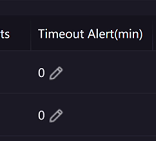
Click the pencil icon in the client job list to set or modify the timeout alert time at any time. After modification, the latest value shall prevail.
-
Set the global timeout alert time in Client → Setting → Basic Settings. If not separately set in the submission page or preset page when submitting jobs, this global time will be used (lowest priority).
![]()
Job Resubmission (Only applicable to 3ds Max)
If a job requires high-memory rendering but insufficient memory was selected during submission, you can select the job, right-click, and choose Resubmit to reselect the memory without analyzing the scene file again.

Note: ① After enabling this feature, only newly submitted jobs can use the resubmission function; ② jobs submitted more than 8 days ago cannot use this function; ③ Before use, ensure sufficient disk space, or adjust the Minimum free disk space value as needed. When below this value, the system will automatically clean up backups, causing resubmission to fail.
Number of Parallel Analyses for Drag-and-Drop Jobs
When dragging and dropping multiple scene files for simultaneous submission, you can control the number of jobs being analyzed simultaneously by modifying this value. The supported setting range is 1–5. Currently supports 3ds Max, Maya, Houdini, Clarisse, Katana, and Unreal Engine.

3.2.5.5 Job Upload
Upload without packaging
Enabled by default. When there are many large assets in the scene, enabling this option can significantly improve job submission speed.
![]()
Batch upload file size (MB)
This setting defines the maximum total size for a batch of files. If a single file exceeds this limit, it will be processed alone in its own batch.Default is 50 MB, modifiable to 10–1000 MB. Generally, no modification is needed. If the network is fast, upload files are large and numerous, time-consuming, and the network is stable without lag, you may increase the value.

Clear error texture cache
Clicking the button will automatically clear the asset MD5 cache on the client side and recalculate the asset MD5s. This is generally not required; however, it may be used if encrypted assets were uploaded by mistake. Simply click Clear and re-upload the assets.

3.2.5.6 Job Management
Job Merge Preview
To merge and display Maya multi-layer jobs, 3ds Max animation photon jobs, Cinema 4D jobs submitted by scene, and multi-sub-jobs of Houdini, Katana, Unreal Engine, and Clarisse for batch operations, check this feature. After enabling, Renderwow will generate parent jobs for related jobs. Right-click operations on the parent job will apply synchronously to all sub-jobs.
![]()
Hide deleted jobs
To hide deleted synchronized jobs in the job list, check this feature. After enabling, synchronized jobs deleted on any computer will not be displayed in the current job list.
![]()
Hide timed-out jobs
To hide jobs that have exceeded 24 hours in the analysis phase in the job list, check this feature.
![]()
Multi-client job synchronization
To view jobs from the same account on different computers, or jobs submitted by team sub-accounts, enable this feature. After enabling, jobs not deleted within 7×24 hours can be synchronized, and render progress and download results can be viewed: personal account jobs can be downloaded at any time by clicking the Start Download button; team sub-account jobs can only be downloaded after rendering is complete.

Note: After modifying and saving this option, the client must be restarted for it to take effect.
Jobs per sync
Controls the maximum number of jobs requested from the interface during client synchronization. Default is 50, modifiable to 1–60. Generally not recommended to modify. If jobs are not synchronizing during sync, you may adjust this value appropriately.

3.2.5.7 Job Download
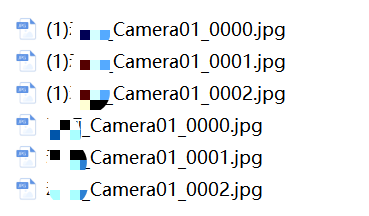
File Renaming
When duplicate download file names exist, you can modify this option according to your usage scenario:
![]()
-
Rename original file: For still image results, a "(n)" number will be added after the file name; for animation results, a "(n)" number will be added before the file name.
-
Overwrite original file: Directly overwrites previous render results. Please choose carefully.
Download Order (Only applicable to 3ds Max renderings)
When there are many render elements and you need to prioritize downloading the main image, it is recommended to select Prioritize downloading main image; if you only need to download the main image results, it is recommended to select Download main image only. Setting methods:
-
Right-click menu entry: Before downloading job results, select the job, right-click, and choose Effect diagram download order in the list to set the download method for a single job.
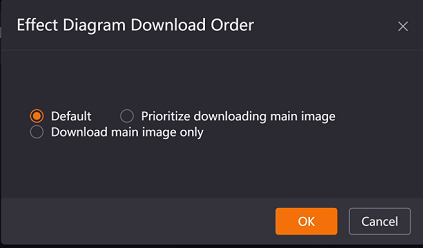
-
Global setting entry: Configure the globalstill image download order in the Settings interface. All newly submitted 3ds Max rendering jobs will follow this order, and individual jobs can also be modified separately.
![]()
Team Job Download Path
To standardize the download result paths of synchronized jobs, you can set the Team Job Download Path. After setting, the actual path for downloading team job results is: Team Job Download Path + original output path configured in the rendering software.
![]()

Download Thread Count
Default is 3. The allowed modification range is integers from 1 to 10. Generally not recommended to modify; keeping the default is the optimal option.
![]()
Download results immediately after rendering
After job results are rendered in the cloud, they will be automatically downloaded to the local machine immediately. Checked by default; generally not recommended to uncheck.
![]()
Download Thread Allocation Strategy
Used to control the thread allocation method for download jobs. The default is Download jobs one by one, where the system concentrates all threads to download the highest priority job one by one. If you need multiple jobs to download simultaneously, you can change it to Download multiple jobs concurrently.
Note: When downloading multiple jobs simultaneously, the download progress of individual jobs will slow down. Please choose according to your needs.
![]()
3.2.5.8 Transfer Settings
Transfer Timeout (s)
Default is 15 seconds. When there is no transfer speed for 15 consecutive seconds, the system will determine a transfer failure, stop the current transfer process, and restart the transfer. Applicable to both job upload and result download scenarios. Generally not recommended to modify; if the network is unstable, you may increase the time appropriately, recommended not to exceed 60 seconds.
![]()
Transfer Protocol
It is not recommended to modify the Transfer Protocol by default. Adjustment suggestions for special cases are as follows:
-
When the default is HTTP transfer, if there is no upload or download speed, try switching to TCP transfer; if there is still no improvement, select the job, right-click, and choose Switch Transfer Method to modify to proxy transfer.
-
When the default is TCP transfer, if there is no upload or download speed, first right-click and choose Switch Transfer Method to modify to proxy; if there is still no improvement, try switching to HTTP transfer.

Note: Normal transfer speed ranking: HTTP transfer > TCP transfer. UDP is a bandwidth-preemptive transfer method. If UDP needs to be enabled, it is recommended that all users in the enterprise enable it simultaneously to avoid situations where some users cannot upload.
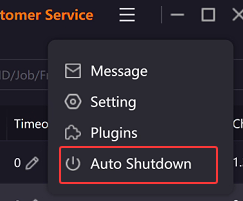
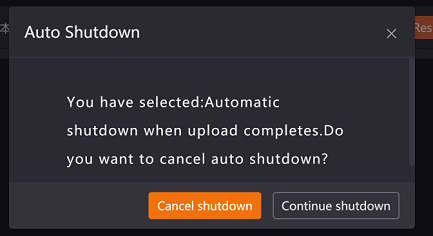
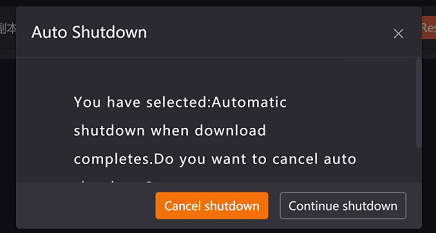
3.2.6 Auto Shutdown
Clicking the Auto Shutdown button in the upper right corner of the client allows you to set automatic shutdown after upload completion or download completion.
Automatic shutdown when upload completes
The Renderwow client will detect the status of all jobs. When no jobs are in preparing, analyzing assets, packaging, packaging completed, uploading, upload completed, unpacking, or unpacking completed states, a 30-second shutdown countdown will be triggered. You can choose Shut down now to execute shutdown immediately, or click Cancel / × to terminate the shutdown process.
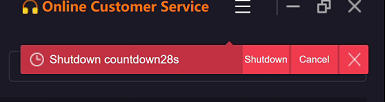
If there are jobs pending upload or currently uploading, you can click Auto Shutdown again and select Cancel shutdown to terminate the shutdown process.
Automatic shutdown when download completes
The Renderwow client will detect the status of all jobs. When there are no jobs with un-stopped downloads and incomplete downloads, a 30-second shutdown countdown will be triggered. You can choose Shut down now to execute shutdown immediately, or click Cancel / × to terminate the shutdown process.
If there are ongoing or incomplete download jobs, you can click Auto Shutdown again and select Cancel shutdown to terminate the shutdown process.
3.2.7 Minimize, Maximize, and Close
-
Minimize: The window will shrink and be fixed on the jobbar at the bottom of the screen; the program continues to run in the background.
-
Maximize: Clicking the Maximize button (□) displays the window in full screen; clicking the Restore button again restores the window to its custom size.
-
Close: Only closes the currently displayed window interface of the client; the program process continues to run in the background (usually displaying an icon in the system tray area) and will not interrupt ongoing uploads or render jobs.
3.3 Left Navigation Bar
Clicking All jobs allows you to view all rendering records under the account. You can quickly filter jobs for specific software through software icons and job types; corresponding category items are automatically created after the first submission of that type. Currently supported categories include:
3ds Max Animation, 3ds Max Still, Cinema 4D, SketchUp, Blender, Rhino, KeyShot Animation, KeyShot Still, Maya, Clarisse, Houdini, Katana, Unreal Engine.
3.4 Main Workspace (Job List)
3.4.1 Job Status Filter Tabs
The top of the job list provides status filter tabs for quickly locating jobs at different stages.

| Tab | Applicable job Types | Description |
|---|---|---|
All |
All jobs |
Displays jobs at all stages |
Analyzing |
Drag-and-drop submission jobs |
Scene file is being analyzed |
Uploading |
All jobs |
Asset files are being uploaded to the cloud |
Rendering |
All jobs |
Cloud machines are rendering |
Render Completed |
All jobs |
Rendering completed, awaiting download |
Downloaded |
All jobs |
Render results have been downloaded locally |
3.4.2 Job List Fields
The job list displays different field content based on the current job stage tab, as follows:
-
All: ID, Project, Job, Creation Time, Status, Upload/Render progress, Download progress, Results, Waiting, Rendering, Completed, Failed, Timeout Alert (min), Speed, Charge, Active Nodes, Total Hours, Frame Time, Test Frames, Frames, Layer, Resolution, Producer, Producer Account, Note, Download Order, Upload Order.
-
Analyzing: Project, Job, Creation Time, Status, Scene Filepath, Analyze Order.
-
Uploading: ID, Project, Job, Creation Time, Status, Upload, Upload (Asset Count), Results, Speed, Missing Assets Count, Scene Filepath, Download Order, Upload Order.
-
Rendering: ID, Project, Job, Creation Time, Status, Render, Download progress, Results, Timeout Alert (min), Speed, Charge, Active Nodes, Total Hours, Frame Time, Test Frames, Frames, Layer, Resolution, Files Downloaded, Note, Download Order.
-
Render Completed: ID, Project, Job, Creation Time, Status, Download progress, Results, Speed, Charge, Total Hours, Frame Time, Test Frames, Frames, Layer, Resolution, Files Downloaded, Note, Download Order.
-
Downloaded: ID, Project, Job, Creation Time, Results, Test Frames, Frames, Layer, Resolution, Total Frames, Total Output Files, Scene Filepath, Note, Download Order.
3.4.3 Job List Field Selection and Reset
The Renderwow client supports customizing the display columns of the job list, flexibly controlling column show/hide and adjusting column order. It also provides shortcut operations such as Select All, Invert Selection, and Reset, allowing users to flexibly configure the list view according to their needs.
Function entry: Right-click on the header column name at the top of the job list to pop up two operation options: Choose Columns and Reset Columns.
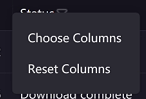
Choose Columns function:
Click Choose Columns. In the pop-up window, check the columns to display via checkboxes; unchecking hides the corresponding column. At least 1 column must be retained; otherwise, the configuration cannot be saved. Drag the ≡ icon on the right side of the column item to freely adjust the display order of columns. You can also use the following shortcut operations:
-
Check All: One-click to check all displayable columns.
-
Invert: Toggle the checked status of all columns (checked becomes unchecked, unchecked becomes checked).
-
Reset: Restore to the last successfully saved column configuration state, undoing all modifications made this time.
Click OK for the configuration to take effect immediately; the job list will update according to the new settings. Click Cancel or close the window to discard this modification.
Reset Columns function:
Click Reset Columns to directly restore the current list to the client’s initial default state, clearing all custom configurations.
Note: In the left navigation bar, column configurations for each software category and each job status page need to be set independently; configurations are not shared and need to be readjusted after switching.
3.4.4 Job List Field Filtering and Sorting
Filtering function:
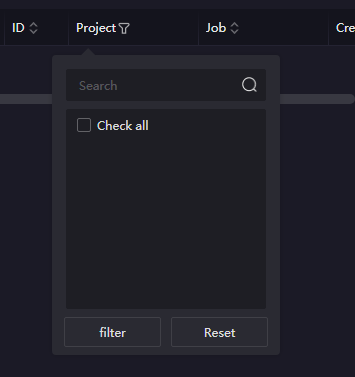
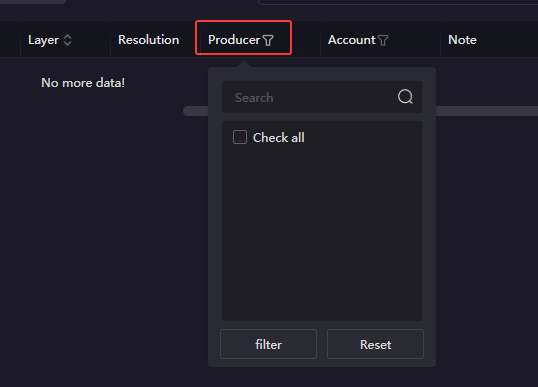
The client supports multi-dimensional job filtering. You can quickly filter jobs through columns such as Source, Project, Status, Producer, and Producer Account to help precisely locate target jobs. Click any filter column name to pop up the filter window, supporting the following operations:
-
Search: Supports fuzzy/exact search; automatically filters options after input. Deleting content restores all options and remembers the last input content.
-
Check filter items: Supports single/multiple selection. Select All allows one-click check or uncheck of all options. After checking, click Filter; the job list will only display corresponding jobs, and filtered options will be remembered.
-
Reset: Clear filter conditions and restore display of all data.
Sorting function:
The client supports multi-column custom sorting. You can flexibly adjust job display order by dimensions such as ID, Job, Creation Time, Download progress, Speed, Active Nodes, Frame Time, Frames, Layer, and Download Order. Click the up/down arrow icon next to the column name to sort:
-
Down arrow: Descending (highest to lowest / newest to oldest / Z to A).
-
Up arrow: Ascending (lowest to highest / oldest to newest / A to Z). When sorting in ascending/descending order, data with the same value will be automatically grouped together.
Note: ① If using the Job Merge Preview feature, parent jobs participate in overall sorting, and merged sub-jobs maintain their original submission order; ② When sorting on the All jobs page or the All page of each software category, jobs in analyzing states (analyzing/analyze failed/analysis completed) will be automatically pinned to the top and displayed in separate sorting, unaffected by other sorting rules.
3.4.5 Job List Search

A search box is located at the top of the client. Enter keywords to quickly locate target jobs, while supporting combination use with column sorting and filtering functions. The search fields supported by different pages vary slightly; refer to the hint information in the search box for details.
3.4.6 Job List Functions
Upload Order
When multiple jobs are uploading simultaneously and you need to control the upload order, you can adjust the priority in the Upload Order column of the job list before the job enters the Upload Completed state (10–1, decreasing step by step).

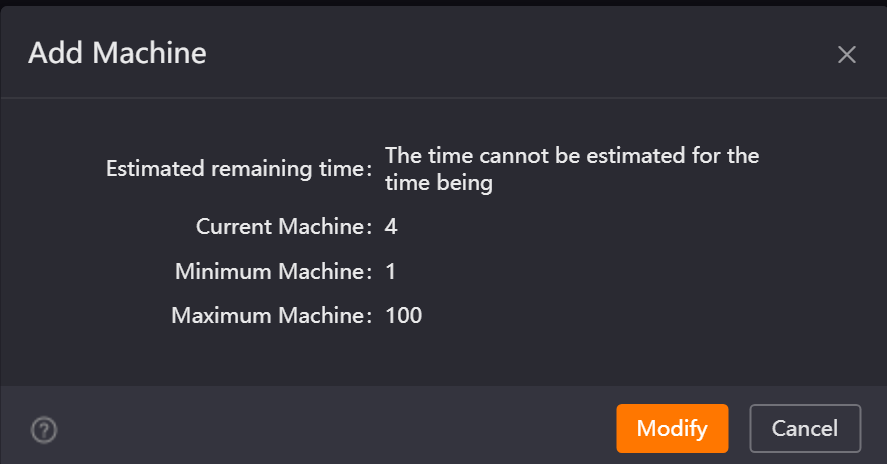
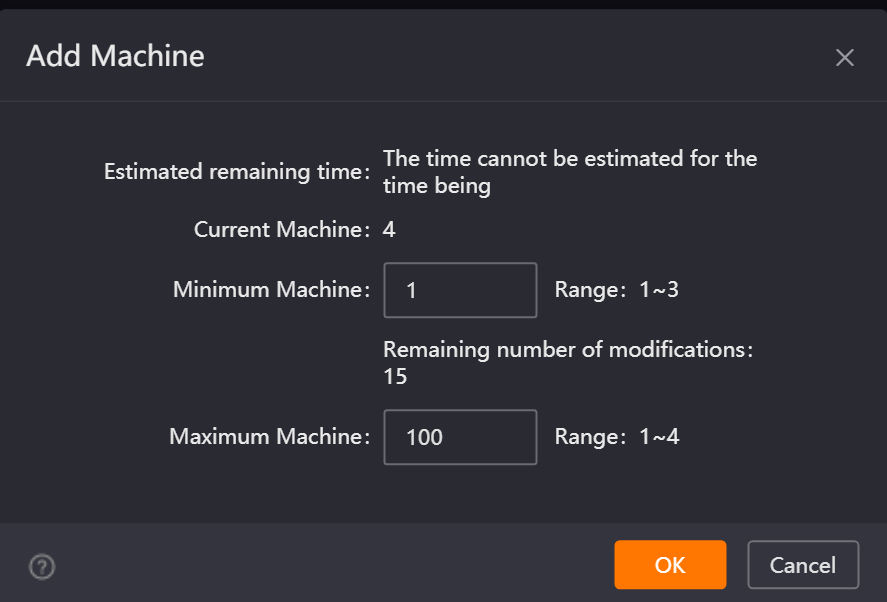
Add Nodes (Adjust Active Nodes)
When a job is Rendering, you can appropriately modify the number of full-speed rendering machines to increase rendering speed. Parameter descriptions are as follows:
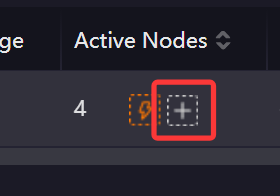
-
Estimated remaining time: The approximate time required for the current job to complete.
-
Current Active Nodes: The actual number of machines currently used by the job.
-
Minimum Active Nodes: The minimum number of machines guaranteed for the job.
-
Maximum Active Nodes: The upper limit of machines the job can request. When the minimum Active Nodes of all jobs in the farm are satisfied, if there are still idle machines, they will be allocated to jobs according to priority up to the maximum Active Nodes.
Timeout Alert
Can monitor job rendering time. After a job has frames exceeding the rendering duration, the job will highlight and flash. The timeout time can be set and modified in the Timeout Alert column.
Download Order
To adjust the download order of jobs, you can modify it in the Download Order column of the job list before job download is completed (10–1, decreasing step by step; default priority for all jobs is 5).

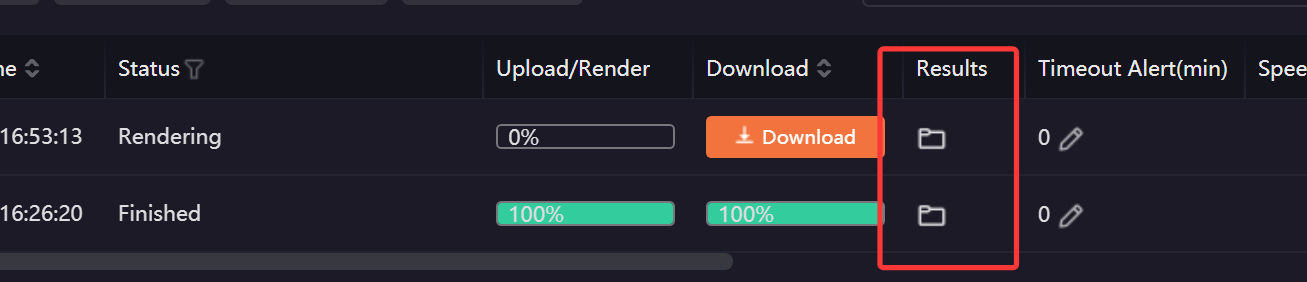
View Result
Clicking the folder icon in the Results column quickly opens the local save location of the render results.
Analyze Order
When dragging and dropping multiple scene files for submission simultaneously, you can adjust the priority in the Analyze Order column of the job list when the job status is Waiting for Analysis (10–1, decreasing step by step).
![]()
3.4.7 Job Frame Details
Double-clicking any job in the job list opens the job render details page, which includes two major modules: Frame Details and Download, used to view render progress, cost statistics, sub-job level details, and manage the download of render result files.
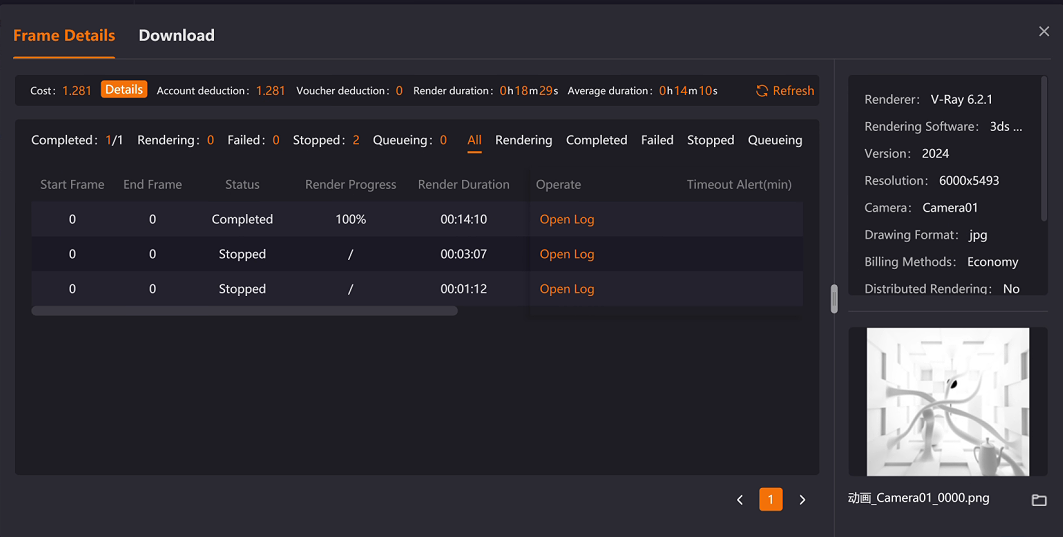
Frame Details:
Cost and Duration Description:
-
Cost calculation: Total Cost = Account deduction + Voucher deduction; hover over the Details button to view the breakdown of render fee, acceleration fee, and memory fee.
-
Duration statistics: Renderduration is the total time consumed by the job; Average duration is the average time per frame for completed frames.
-
Data update: Click the Refresh button to synchronize the latest cost and duration data in real time.
Frame List Description:
-
Frame list information: Intuitively displays the number of completed, rendering, failed, stopped, and pending frames, and supports filtering by All/Rendering/Completed/Failed/Stopped/Pending for easy location of problem frames and completed frames. Sub-job details under each category are also displayed.
-
Operations: Click Open Log to view the render log of a single sub-job for troubleshooting render failures, timeouts, etc. If the job has a timeout alert set, the Timeout Alert column will mark timed-out sub-jobs with a flashing exclamation mark.
-
Right-click function: When a sub-job renders abnormally, you can select it and right-click to choose re-render.
Scene Information Description:
Displays basic information such as the renderer name, rendering software and version, Resolution, camera name, output format, and scene file storage path used by the scene, as well as specific parameters for each renderer/rendering software.
Thumbnail Preview Description:
-
Supported scope: Only supports 3ds Max, Cinema 4D, Maya, and Houdini scenes.
-
Format support: Maya supports jpg/jpeg/png/gif/tiff/tif/exr; 3ds Max supports jpg/jpeg/png/tiff/tif; Cinema 4D supports png/tif/jpg; Houdini supports jpg/jpeg/png/tif/tiff.
-
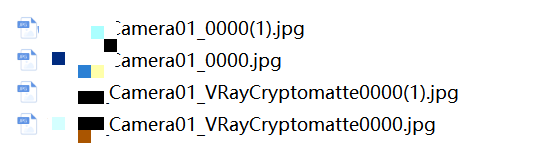
Display timing: Forstill images, thumbnails are only displayed after sub-job rendering is completed; for animation jobs, if the number of frames per sub-job is greater than 1, they can be displayed once a frame in the current sub-job is rendered. Multi-frame thumbnails can be switched via left/right buttons.
Note: ① 3ds Max requires locally downloaded render results to view thumbnails. If local files are deleted after download, they will not display normally; other software does not have this limitation. ② 3ds Max only displays main result thumbnails; additional results such as render elements are not displayed; other software will display all render result thumbnails, which can be switched via left/right buttons.
View Large Image function:
Except for EXR format, which does not support viewing large images, other formats can click the thumbnail to view the large image. However, ensure the original image has been downloaded locally; if the local file does not exist, Renderwow will automatically open the download path of the corresponding file.
Note: For 3ds Max, if the local file does not exist, a path does not exist prompt will be displayed, and zoom-in viewing is not possible.
Open result download path:
Click the folder button below the thumbnail to jump to the download result path.
Note: For 3ds Max, if the local file does not exist, a path does not exist prompt will be displayed, and jumping is not possible.
Download:
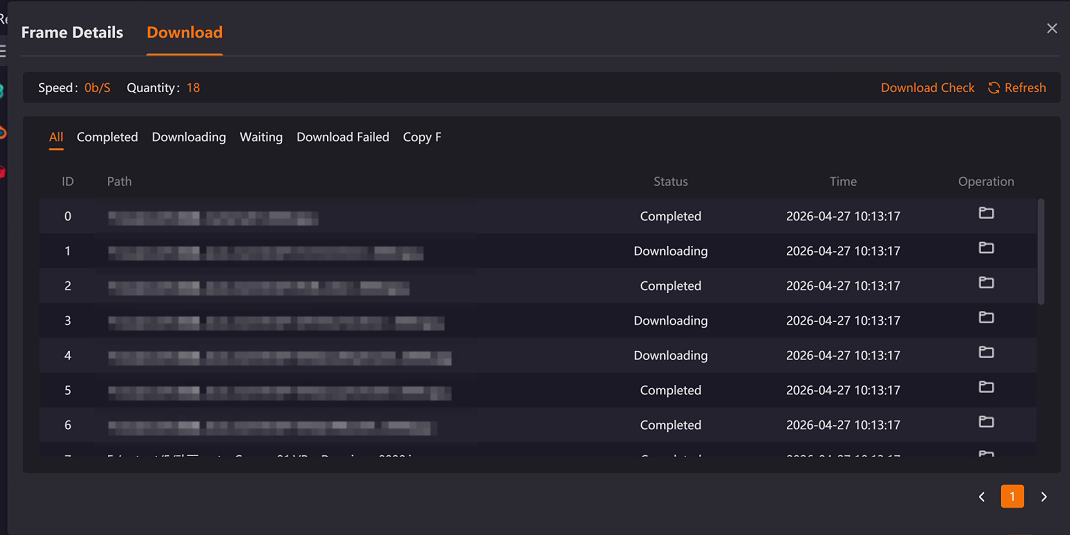
-
Status statistics: Real-time display of current download speed and total file count.
-
Operations: Click the Refresh button to synchronize the latest download status; if missing frames or download failures occur, use the Download Check function to verify file integrity.
-
Download file list: Supports filtering the file list by All/Download Completed/Downloading/Waiting/Download Failed/Copy Failed. You can view the local save path, download status, and completion time of each frame. Click Open Directory to directly open the local folder where the file is located.
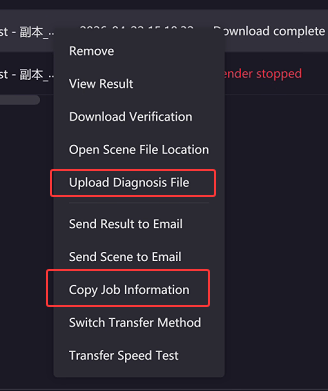
3.4.8 Right-Click Menu Functions
After selecting a job in the job list and right-clicking, you can perform the following operations (some operations vary depending on job status and software type):
Supply Asset Files
Applicable scope: Only supports Maya, Houdini, Clarisse, and Cinema 4D jobs.
When uploaded jobs miss asset files, or asset files are uploaded incorrectly causing incorrect render effects, you can upload assets separately without resubmitting the entire job. Operation steps:
-
After job upload is completed, select the job, right-click, and choose Supply Asset Files to upload the corresponding assets.
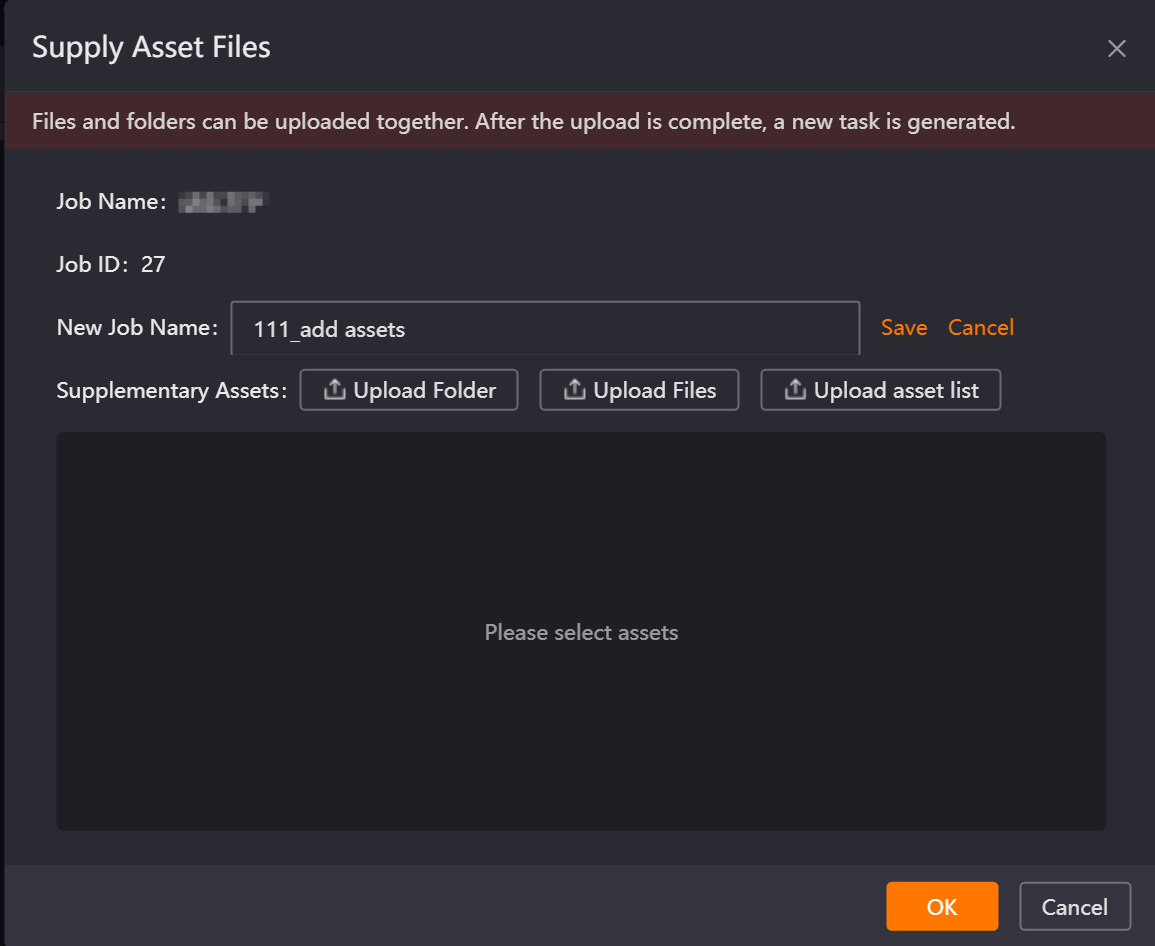
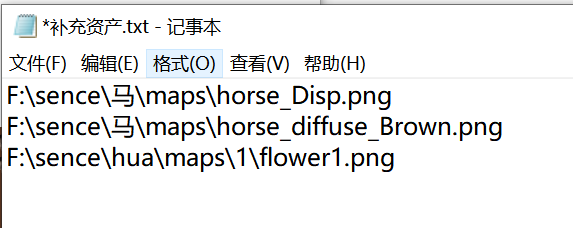
-
Note: When selecting Upload Asset List , only .TXT format files are supported. The file content should be asset paths and names (one per line).
-
After asset upload is completed, please contact customer service to process the job.
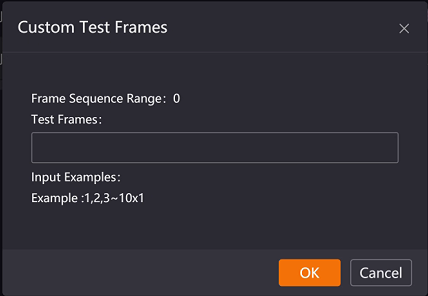
Custom Test Frames
To add or modify test frames for animation jobs, you can use the Custom Test Frames function when the job is in Waiting or Rendering state; after modification, the cloud will prioritize rendering test frames that have not yet been rendered.
Copy Job Information and Upload Diagnosis File
When encountering issues during cloud rendering, you can first upload the job’s diagnosis file, then copy the Job Information and send it to customer service for quick issue identification and resolution.
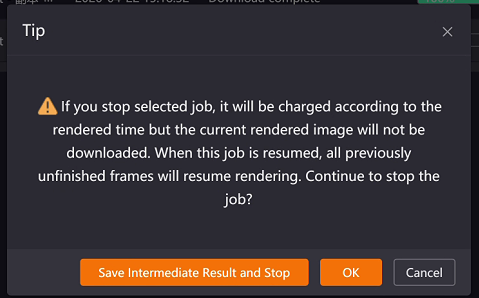
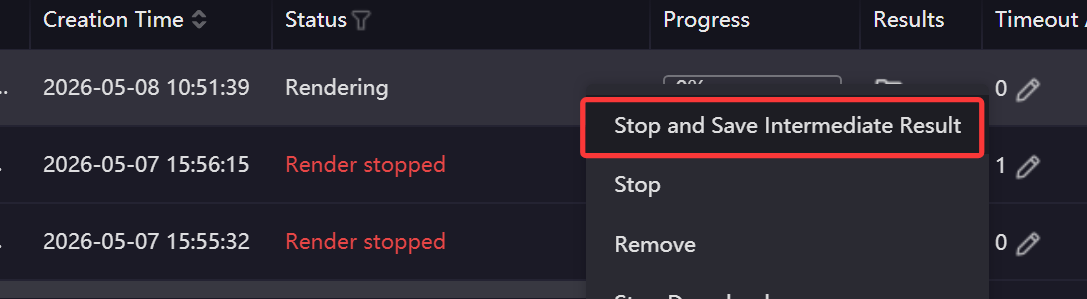
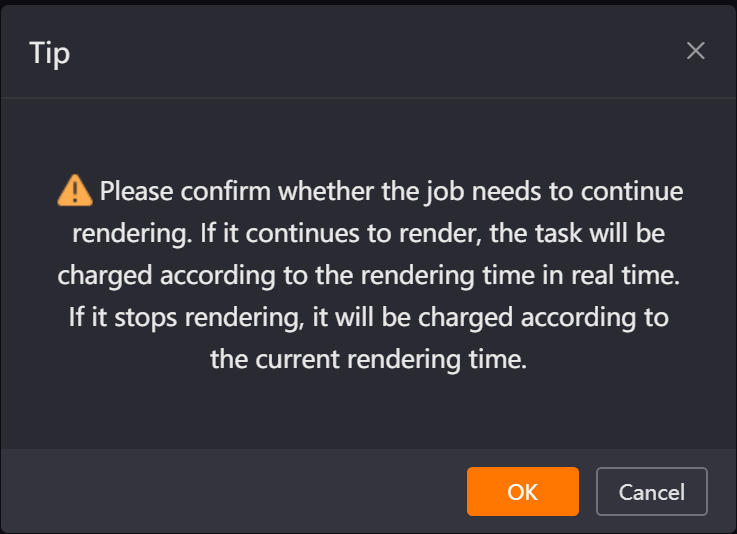
Stop and Resume
To stop rendering, right-click the job and choose Stop.
Important reminder: Before stopping a job, it is recommended to consult customer service to confirm whether stopping is necessary. After stopping, the cost of already rendered frames will be charged normally, and the current render progress cannot be restored; after resuming the job, there is no guarantee of immediate availability of idle machines, and queuing may occur. Please operate with caution.
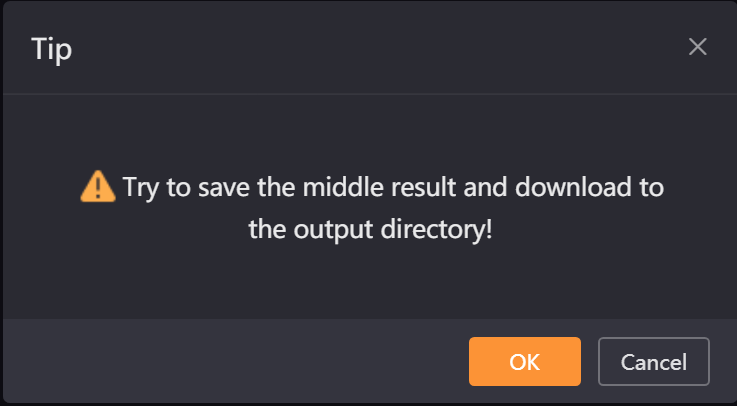
For 3ds Max VRay jobs: After selecting Stop, if you need to save the current render’s intermediate results, you can choose the Save Intermediate Result and Stop option. The job will save intermediate results to the output path before stopping; if not needed, directly click OK to stop the job.
If test frames were set during job submission and Pause rendering after test was selected, after test frame rendering is completed and results are confirmed to be correct, you can choose Resume to resume full-speed rendering of the remaining frames.
Stop Download and Start Download
To change the output path of render results, you can first right-click the job and choose Stop Download, use the Set up Path function to modify the path, and then choose Start Download. To download team job results, if the download path does not need to be modified, you can directly right-click and choose Start Download; if the path needs to be modified, you can use the Set up Path function before starting download.
Download Verification
When missing result files are found after job download is completed, or downloaded results are accidentally deleted, the Download Verification function can be used for jobs submitted within 7 days by default. After a job renders a frame and downloads it, the Download Verification button will appear when right-clicking the job list. You can choose Verify All or Partial Frame Verification as needed.
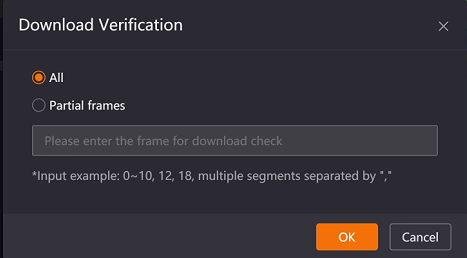
Note: 3ds Max jobs can only use All.
Effect diagram download order (Only applicable to 3ds Max renderings)
When there are many render elements and you need to prioritize downloading the main image, it is recommended to select Prioritize downloading main image; if you only need to download the main image results, it is recommended to select Download main image only.
-
Right-click menu operation: Select the job, right-click, and choose Effect diagram download order in the list to set the download method for a single job.
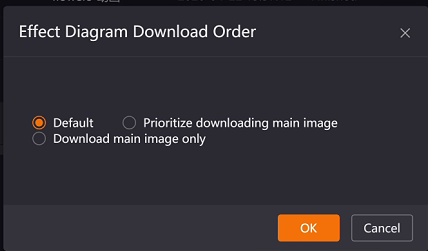
-
Global setting: Configure the global still image download order in the Settings interface. All newly submitted 3ds Max rendering jobs will follow this order, and individual jobs can also be modified separately.
![]()
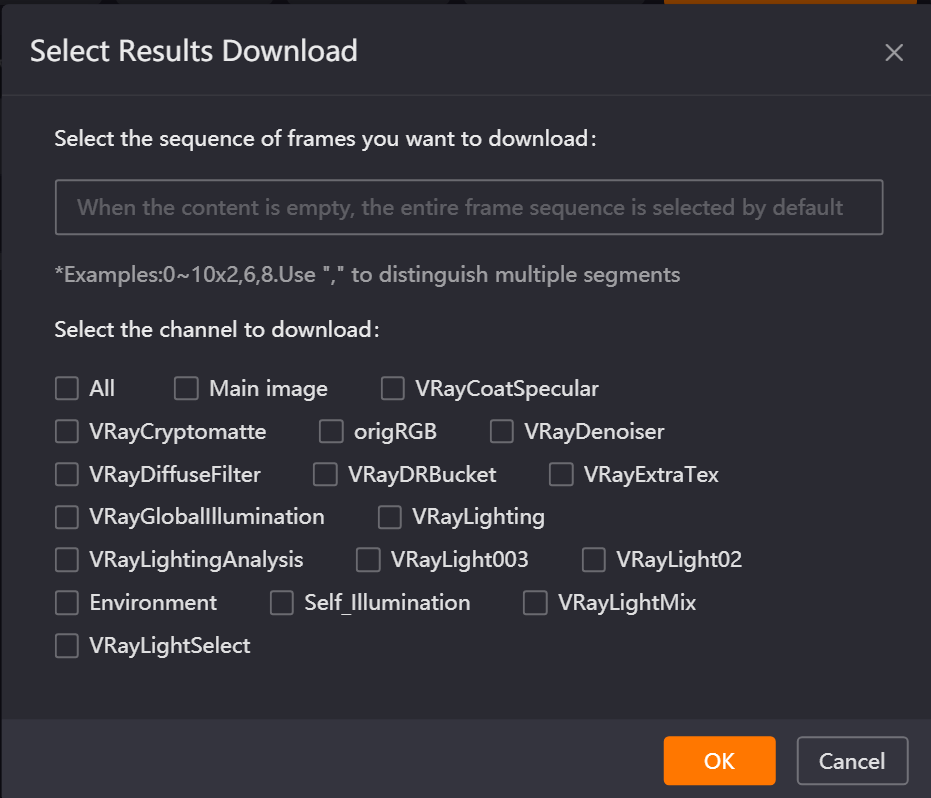
Select results download
Applicable to Maya, Houdini, Clarisse, Cinema 4D, and 3ds Max animation jobs. After a job downloads one frame of results, you can right-click the job and use the Select results download function to download only partial frame results or specific types of results.
Save Intermediate Result (Only applicable to 3ds Max still image jobs)
-
VRay jobs: When the job is Rendering, right-click and choose Save Intermediate Result to save the current render progress results to the output path. After successful save, the job will continue rendering; if you need to stop, you need to separately click the Stop button (after stopping, the current render state cannot be restored; please operate with caution and contact customer service if necessary).

-
Corona jobs: When the job is Rendering, right-click and choose Stop and Save Intermediate Result to save the current render progress results to the output path; after successful save, the job will stop rendering, and results will display the download completed status after download.
Set up Path
To change the download path of render results, you can select the job before it enters the download state, right-click, and choose Set up Path to reset.
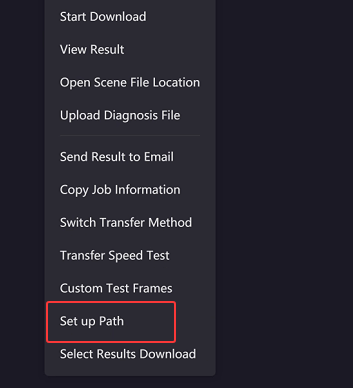
Note:
-
If Download results immediately after rendering is checked in the Settings interface and results have not yet been downloaded; or if the job download path does not exist (a yellow exclamation mark appears at the path), you need to first click Stop Download, then use the Set up Path function, and finally Resume.
-
If the job has already downloaded partial results, the Set up Path function cannot be used.
-
If it is a synchronized job, after using the Set up Path function, the Team Path set in the Settings interface will not be appended.
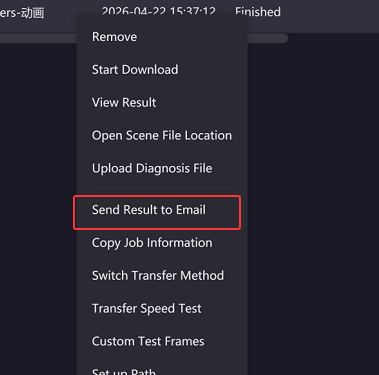
Send Result to Email
For flexible downloading of render results, you can use the Send Result to Email function. Renderwow will send a download link for the result compressed package to the email you provide, which needs to be downloaded within 24 hours.
Send Scene to Email
To obtain the original scene files of 3ds Max and Maya jobs, you can select the job, right-click, and choose Send Scene to Email. Enter the email address and confirm to send.
Note: Only valid for 3ds Max and Maya jobs submitted within 7 days (Maya jobs only send scene files, not textures). If the account is in arrears, this function cannot be used.
Open Scene File
After selecting a job, right-click and choose Open Scene File Location to quickly open the folder to the scene file’s location.
Remove
Used to clean up jobs with incorrect parameter settings, jobs that do not need to continue rendering, jobs that have been completed and downloaded, or failed jobs, to release cloud and local storage space and streamline the job list. In the job list, select one or more jobs, right-click and choose Remove, check the information in the confirmation prompt, and click OK to complete deletion.
Note: Deletion is irreversible; data will be completely cleared. Please operate with caution. Deleting jobs that are currently Rendering will be charged based on consumed duration; if jobs are abnormal, failed, or results do not match expectations, it is recommended to first contact Renderwow customer service for investigation before confirming deletion.