Animation Rendering Common Settings
Depending on the renderer, the submission dialog may display different content. The unified rollouts include Common Parameters, Render View, Render Software, and About.
Common Parameters Rollout

This rollout is collapsed by default.
Name — Job name. This edit box is automatically updated to the name of the currently opened scene each time a job is submitted. When multiple cameras are selected, each camera’s job is displayed in the client as "Job Name + Camera Name". This name can be modified as needed.
Version — The 3ds Max version used for cloud rendering. This version defaults to the current 3ds Max version, but can also be manually set to a higher version. If rendering errors occur with a lower version but render correctly with a higher version, changing this version can resolve the rendering error.
Project — Project name. The default value is empty. This is a dropdown list box from which an existing project can be selected. Project names come from two sources: one is created in the client, and the other is created using the "+" button to the right of the Project field. The project name is primarily used for categorizing and filtering jobs in the client. Note: this option is remembered; the selected project name will be displayed next time.
+ — Create Project. Clicking this button opens the Create New Project dialog. Enter the project name in the edit box and click OK.

Lost Assets List

When the "Lost assets check" option is enabled in the Cloud Rendering Preferences, this rollout appears. The total number of lost asset formats is displayed in parentheses at the end of the title, and the list shows the detailed path of each lost asset.
Render View
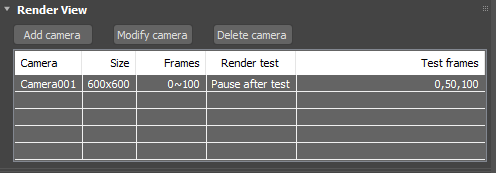
This rollout contains three buttons and a camera list. The camera list displays the camera name, output size, frame range, render test mode, and test frames for each camera to be rendered. Each time a new camera is added, the list height expands as needed. When the camera list height exceeds the overall submission window height, you can drag the right border of the list box up or down with the mouse to browse the entire camera list, or collapse the Render View rollout to display the camera list at its default height.
Add camera — Clicking this button opens the Add Camera dialog. After selecting the cameras and correctly setting the output size, frame range, render test mode, and test frames for this batch of cameras, click OK to add the selected cameras to the render camera list. Cameras with different output sizes, frame ranges, render test modes, or test frames must be added in separate batches.
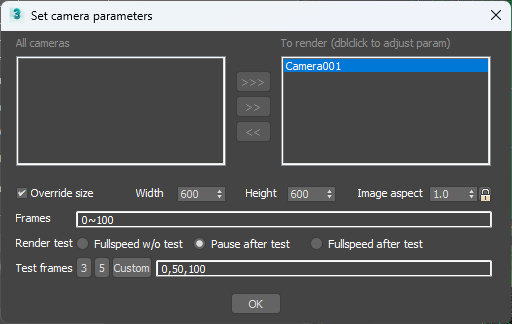
Modify camera — Select a camera and click this button to open a dialog basically identical to the Add Camera dialog, except that you cannot select cameras—only modify the output size, frame range, render test mode, and test frames. After modification, click OK.
Delete camera — Select the single or multiple cameras to be deleted (hold SHIFT to select multiple cameras), then click this button to remove the selected cameras from the camera list.
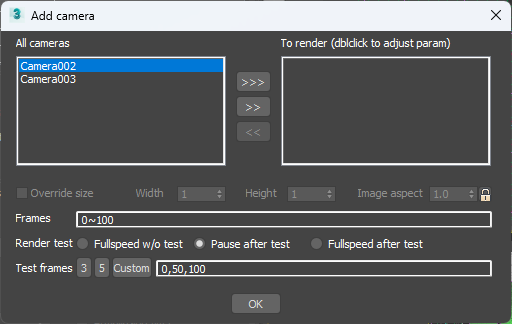
Add/Modify Camera Dialog Function Description:
This dialog contains two camera name list boxes. The left side is the "All Cameras" list box, which lists all cameras not yet added to the Render View camera list. The right side is the "To render (double-click to adjust parameters)" list box, which lists all cameras to be rendered in this addition.
>>> — Transfer all camera names from the left list to the right list.
>> — Transfer the selected cameras from the left list to the right list.
<< — Transfer the selected cameras from the right list to the left list.
Override size — Override output size. When this option is checked, you can set the output width, height, and aspect ratio for this batch of cameras. When the aspect ratio is locked, modifying the width automatically adjusts the height, and vice versa. When the aspect ratio is not locked, modifying the width and height automatically displays the correct aspect ratio; when modifying the aspect ratio, the height is automatically adjusted based on the width.
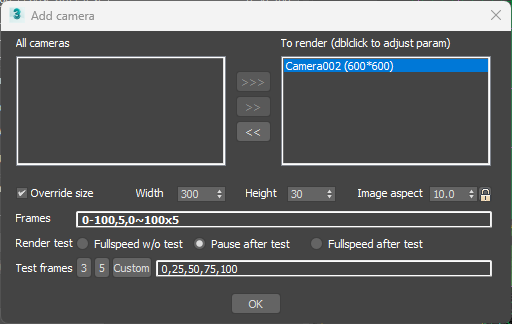
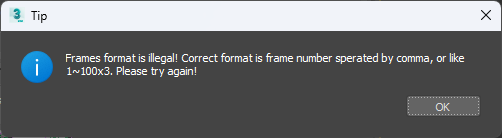
Frames — Frame range. The frame range accepts multi-segment input, with each segment separated by a comma. Each segment can be a specific frame (e.g., 5, meaning frame 5), a range (e.g., frames 2 to 4, written as 2~4, where the right number must be greater than the left), or a step frame (e.g., rendering every 10 frames between frames 2 and 100, written as 2~100x10, meaning 2, 12, 22, 32, 42…). If multiple segments are described, the frames to be rendered are the union of all segments. If a syntax error occurs, the text automatically becomes bold after pressing Enter, and the following error dialog appears when clicking OK.
Render test — Test mode. There are three types: (1) "Fullspeed w/o test" — no test frames, render at full speed directly without testing. (2) "Pause after test" — the job automatically stops after rendering the test frames; after confirming the render result is correct, manually resume rendering. (3) "Fullspeed after test" — continue rendering the remaining frames after the test frames are rendered.
Test frames — Test frame range. Each time the test frame range is modified, if the test mode is "Pause after test" or "Fullspeed after test", the first, middle, and last frames are automatically selected as test frames.
3 — 3 test frames. Clicking this button automatically selects the first, middle, and last frames as test frames.
5 — 5 test frames. Clicking this button selects 5 frames at equal intervals from the frame range as test frames.
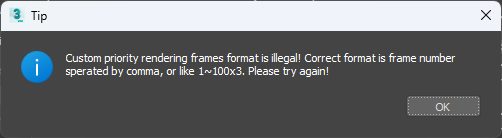
Custom — Custom test frames. Clicking this button makes the test frame range edit box editable for manual input. The test frame description format follows the same rules as the job frame range. After modification, press Enter. The entered test frame range is automatically processed into multiple single-frame descriptions, and frames outside the job frame range are filtered out. If there is a syntax error, the text automatically becomes bold after pressing Enter, and an error appears when clicking the OK button.
Animation Common Parameters
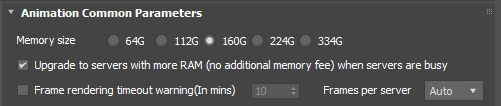
Memory size — Animation job memory size selection. Choose an appropriate memory size based on the maximum memory consumed during animation rendering. Generally, larger memory means faster rendering speed (the GHz of that machine type is also higher). Selecting larger memory incurs an additional memory fee. The memory fee standard for animation jobs is: for every 16 GB increase beyond 64 GB, the rendering fee increases by 4%. For example, if a 160 GB machine is selected, the memory surcharge is (160-64) / 16 = 6, 6 × 4% = 24%, meaning a 24% memory surcharge is added for selecting a 160 GB machine. When GPU rendering is used, this option is disabled and grayed out. Note: this option is remembered.
Upgrade to servers with more RAM (no additional memory fee) when servers are busy — This option is enabled by default. When the selected memory size machine type has many jobs and severe queuing, to complete the user’s job faster, the system automatically upgrades to a machine with larger memory for rendering. Automatic upgrades do not incur additional memory surcharges. For example, if 112 GB is selected but automatically upgraded to 160 GB, the memory surcharge is calculated based on 112 GB. When GPU rendering is used, this option is disabled and grayed out. Note: this option is remembered.
Frame rendering timeout warning (In mins) — This checkbox is unchecked by default. When checked, if a single frame of the job exceeds the set threshold, an alert is triggered in the Renderwow client. When the value is set to 0, it is equivalent to disabling the rendering timeout alert. On first use, this value defaults to 0 or the threshold set in the Settings section of the Renderwow client. During cloud rendering, 3ds Max may be launched once to render multiple frames; in this case, the timeout alert is calculated based on frame count × time threshold, rather than per single frame. Note: this option is remembered; the selected setting will be displayed next time.
Frames per server — The number of frames rendered each time. The default value is Auto. When set to Auto, the cloud rendering system automatically optimizes the number of frames rendered per 3ds Max launch based on single-frame rendering duration. If another option is selected, frames are distributed according to the user’s setting. During actual rendering, each render requires dynamically switching the rendering environment, including the renderer and plugins, and launching 3ds Max and loading the scene both take time. If single-frame rendering is fast, it is recommended to set this value to Auto or a larger value, so that the overhead per frame is much lower and rendering efficiency is higher. If some frames in the job are very fast and others are very slow, it is recommended to keep this value as Auto or set it to a smaller value to ensure the entire job’s render results are obtained faster. By default, the dropdown list does not include the option 1. If there is a genuine need, contact customer service to enable permission; after enabling, the dropdown list will show the option 1, but in this case the overhead is the greatest and efficiency is the lowest.
Render Software
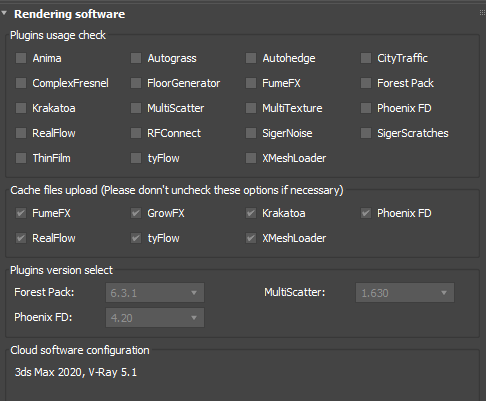
This rollout is used to set the plugins required for cloud rendering.
1) Plugins usage check. This list contains plugins supported by Renderwow in its early stages. Renderwow automatically detects which plugins are used in the scene and automatically checks the checkbox in front of the plugin name. Newly supported plugins are all automatically detected, so this list is no longer updated. After automatic selection, manual deselection is not supported. If you need to manually deselect an automatically checked plugin, enable the "Allow uncheck plugins" option in the Cloud Rendering Preferences.
2) Cache files upload. This list sets whether the cache used by the listed plugins is automatically uploaded to the cloud. All are selected by default. In special cases, such as when assets are manually uploaded, the selection for that plugin can be removed. By default, deselecting is not supported. If you need to manually deselect an automatically checked plugin, enable the "Allow uncheck plugins" option in the Cloud Rendering Preferences.
3) Plugins version select. This list is used to set the versions of Forest Pack, MultiScatter, and Phoenix FD for cloud rendering. The default display is the version automatically detected by Renderwow; generally no manual setting is required. When the detected version is the latest, the version cannot be manually selected.
4) Cloud software configuration. Displays the 3ds Max version, renderer and its version, and major plugins used for cloud rendering.
V-Ray CPU Cloud Rendering Settings
When the current renderer is V-Ray, the relevant parameter setting rollouts are displayed.
When the V-Ray image sampler is set to Progressive, the V-Ray Progressive Image Sampler rollout is additionally displayed to set parameters related to progressive rendering.
V-Ray Animation Parameters
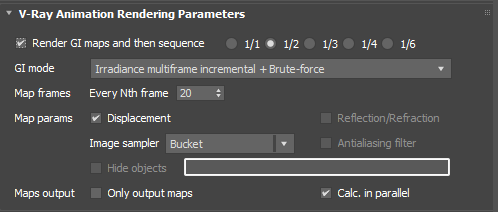
Render GI maps and then sequence — First render GI map files, then reference the GI map files to render the final sequence. Whether this feature can be enabled is determined by the combination of primary and secondary engines set in V-Ray’s GI. The supported primary/secondary engine combinations are shown in the table below. The value following the feature indicates the output resolution reduction factor when rendering Irradiance map GI map files. The default value is 1/2; generally keeping the default is sufficient. The smaller the value, the smaller the generated GI map file and the faster the rendering speed, but the lower the image quality. When submitting the job, the render settings should be configured for final sequence rendering.
Primary Engine & Mode |
Secondary Engine & Mode |
Cloud Rendering Method |
Irradiance map - Multiframe incremental |
Brute force\nLight cache - Single frame\nLight cache - From file |
Generates three jobs: the first job generates the Irradiance map file in Multiframe mode; the second job merges the GI map files; the third job references the merged GI map file in From file mode for final sequence rendering. |
Irradiance map - Incremental add to current map |
Brute force\nLight cache - Single frame\nLight cache - From file |
Generates three jobs: the first job generates the Irradiance map file in Incremental add to current map mode; the second job merges the GI map files; the third job references the merged GI map file in From file mode for final sequence rendering. |
Irradiance map - Multiframe incremental |
Light cache - Fly through |
Generates two jobs: the first job generates the Irradiance map file and Light cache file in Multiframe mode; the second job references the Irradiance map and Light cache GI map files in From file mode for final sequence rendering. |
Irradiance map - Incremental add to current map |
Light cache - Fly through |
Generates two jobs: the first job generates the Irradiance map file and Light cache file in Incremental add to current map mode; the second job references the Irradiance map and Light cache GI map files in From file mode for final sequence rendering. |
Irradiance map - Animation (prepass) |
Brute force\nLight cache - Single frame\nLight cache - From file\nLight cache - Fly through |
Generates two jobs: the first job generates GI map files in Animation (prepass) mode; the second job references the merged GI map files in Animation (rendering) mode for final sequence rendering. |
Irradiance map - Animation (rendering) |
Brute force\nLight cache - Single frame\nLight cache - From file\nLight cache - Fly through |
Generates two jobs: the first job generates GI map files in Animation (prepass) mode; the second job references the merged GI map files in Animation (rendering) mode for final sequence rendering. |
GI mode — GI map mode selection. Only one option is available and selected, displaying the primary/secondary engine combination configuration.
Map frames Every Nth frame — Sets how many frames apart an initial Irradiance map file is generated when rendering Irradiance map GI map files. Note: this value is calculated in addition to the step frame setting in the job frame range. The default value is 20, and the maximum value is 100. For example, if the job frame range is 0~100 and the Every N value is 1, this value is 20; when the Every N value is 2, this value becomes 40.
Map params — Parameters for rendering GI map files, specifically including:
-
Displacement — When checked, displacement is enabled; when unchecked, displacement is disabled. When displacement is disabled in the scene, this option is grayed out and cannot be selected.
-
Reflection/Refraction — When checked, they are enabled; when unchecked, they are disabled. When reflection and refraction are disabled in the scene, this option is grayed out and cannot be selected. Also, if "Calc. in parallel" is enabled, this option is grayed out and cannot be selected.
-
Image sampler — Sets the sampler used when rendering GI maps. It is recommended to use the default value.
-
Antialiasing filter — Anti-aliasing filter. When checked, it is enabled; when unchecked, it is disabled. When anti-aliasing is disabled in the scene, this option is grayed out and cannot be selected. Also, if "Calc. in parallel" is enabled, this option is grayed out and cannot be selected.
-
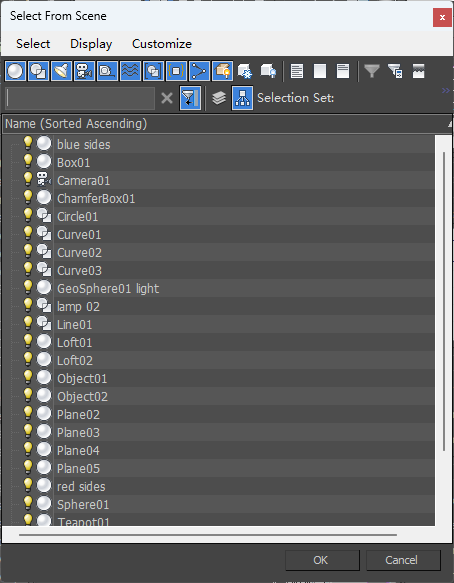
Hide objects — Hide some objects when rendering Light cache files. This option is valid when the primary engine is Irradiance map, the mode is Multiframe incremental or Incremental add to current map, and the secondary engine is Light cache in Fly-through mode. When this option is checked, an object selection dialog automatically opens. Select the objects to be hidden during GI map rendering in this dialog, and click OK; the selected objects are then displayed in the edit box.
Maps output — GI map output-related options.
-
Only output maps — Only generate GI map files, do not render the final sequence.
-
Calc. in parallel — Parallel GI map calculation. If the current mode allows parallel GI map calculation, this option is valid and selected by default. When checked, GI maps are calculated in parallel; when unchecked, GI maps are rendered on a single machine. Parallel calculation means that each frame requiring GI map generation is concurrently rendered by different render servers, and the generated GI map files are merged into a complete GI map file.
V-Ray Progressive Image Sampler

When using progressive rendering, reasonable thresholds must be set; otherwise, cloud rendering may never end. The default values for these three settings are all read from the current scene.
Max. subdiv — Sets the maximum subdivision for progressive rendering. When exceeding 100, the text turns red as a warning that the setting may be too high and could lead to excessively long rendering times.
Max render time (min) — Maximum rendering time in minutes. When the value is 0 (unlimited rendering time), the text turns red as a warning that the rendering time may be excessively long.
Noise threshold — When this value is below 0.01, the text turns red as a warning that the threshold is set too low and could lead to excessively long rendering times.
V-Ray Frame Buffer LUT

When the 3ds Max version is 2018 or higher and the V-Ray version is 5.0, V-Ray LUT-related APIs do not work. Users need to manually re-specify the LUT file in the submission dialog to ensure correct LUT effects during cloud rendering.
LUT-file — Click the browse button to locate the LUT file in the file manager.
Reset — Reset the LUT file path.
V-Ray GPU Cloud Rendering Settings

Samples limit — The default value is the setting in the scene.
Time limit mins — Rendering time threshold in minutes. The default value is the setting in the scene.
Noise limit — The default value is the setting in the scene.
GPU memory size — Minimum video memory size for cloud rendering. The cloud automatically allocates GPU machines that meet the video memory requirements. Note: this option is remembered.
Corona Cloud Rendering Settings
This section describes the relevant parameter setting rollouts when the current renderer is Corona.
Corona Parameters

Pass limit — The default value is the setting in the scene.
Time limit hours — Rendering time threshold in hours. The default value is the setting in the scene. When the value is 0 (unlimited rendering time), the text turns red as a warning that the rendering time may be excessively long.
Noise level limit — The default value is the setting in the scene. When the value is below 2 (i.e., less than 2%), the text turns red as a warning that the rendering time may be excessively long.
FStormRender Cloud Rendering Settings

Render samples — The default value is the setting in the scene.
Time limit mins — Rendering time threshold in minutes. The default value is the setting in the scene.
Noise threshold — The default value is the setting in the scene.
GPU memory size — Minimum video memory size for cloud rendering. The cloud automatically allocates GPU machines that meet the video memory requirements. Note: this option is remembered.