Blender Renderwow Plugin Features
7.1 Overview
The Renderwow platform supports rendering job submission for Blender versions 2 to 5 (version 5.1 is not yet supported), as well as commonly used cache files. Jobs are currently submitted via the Renderwow plugin within Blender.
The complete submission workflow for Renderwow Blender cloud rendering jobs is as follows:
1. Install the Renderwow Plugin
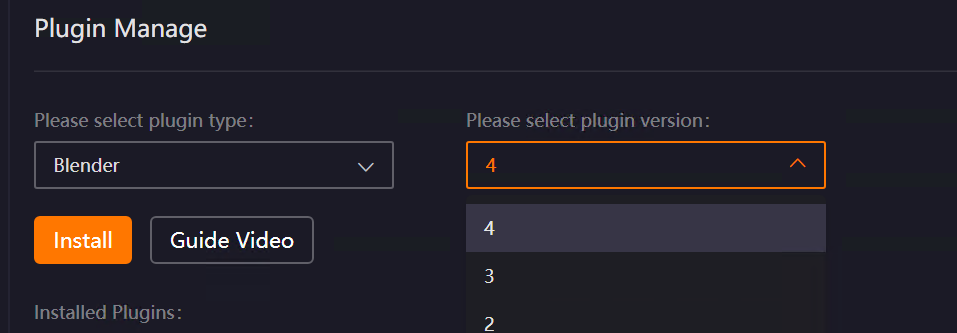
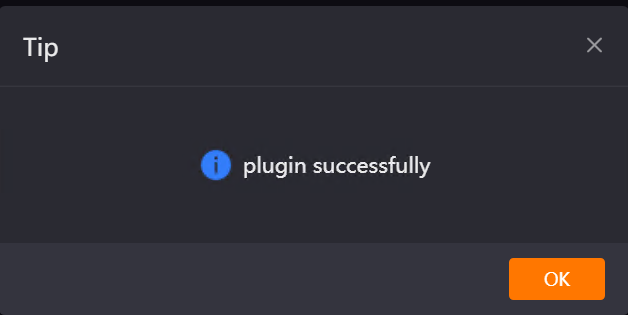
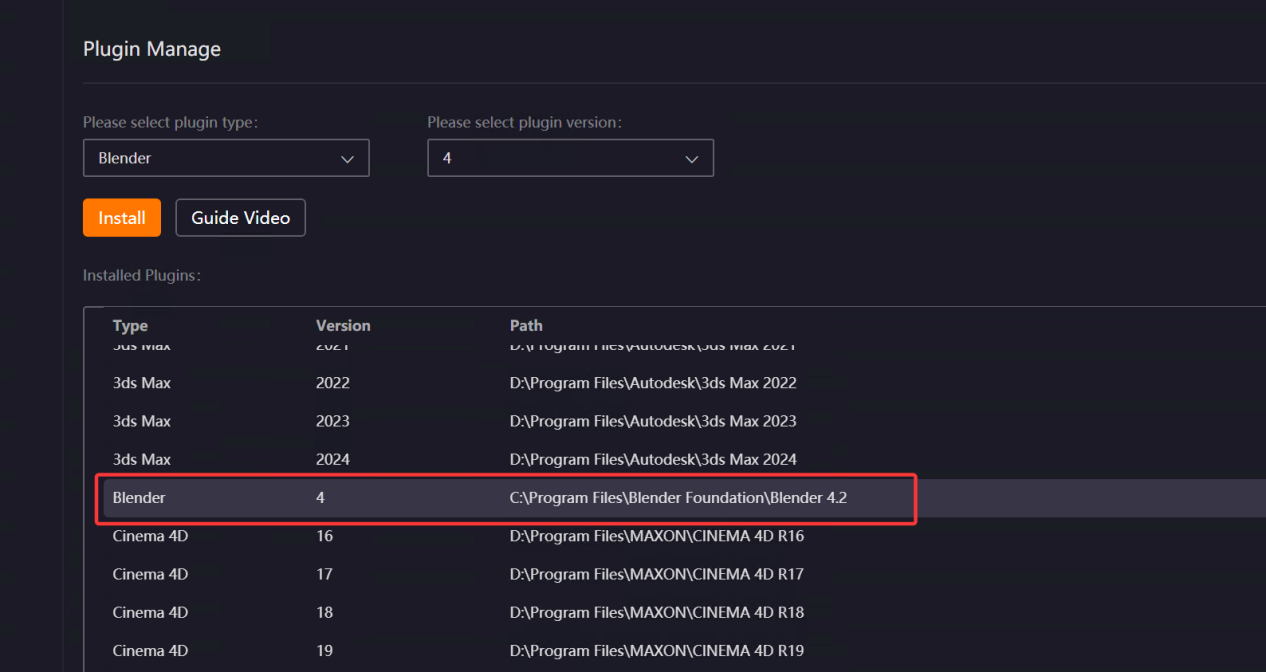
Open the Renderwow client and navigate to the [Plug-in Manage] page. Select [Blender] from the plugin type list, choose the version matching your local Blender installation from the version list, and click the [Install] button. Then manually select the local Blender installation path (if Blender is installed in the default path, Renderwow can detect it automatically). After the plugin installation is complete, Renderwow will display a [Plugin Installed Successfully] prompt. You can also view the corresponding Blender version and installation path information in the [Installed Plugins] list.
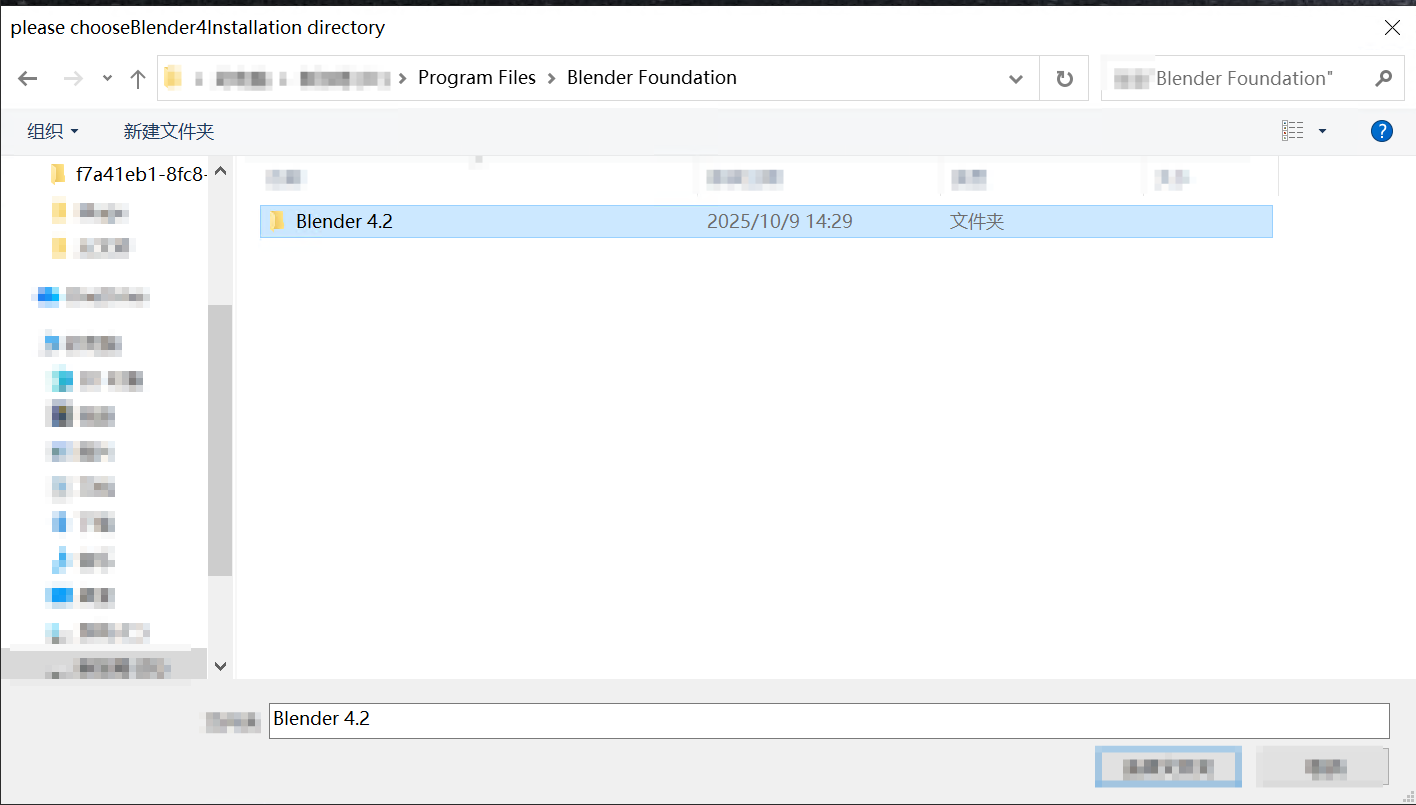
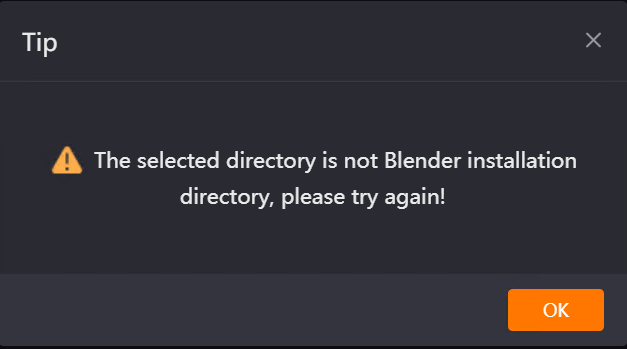
Note: Selecting an incorrect installation path will cause an error.
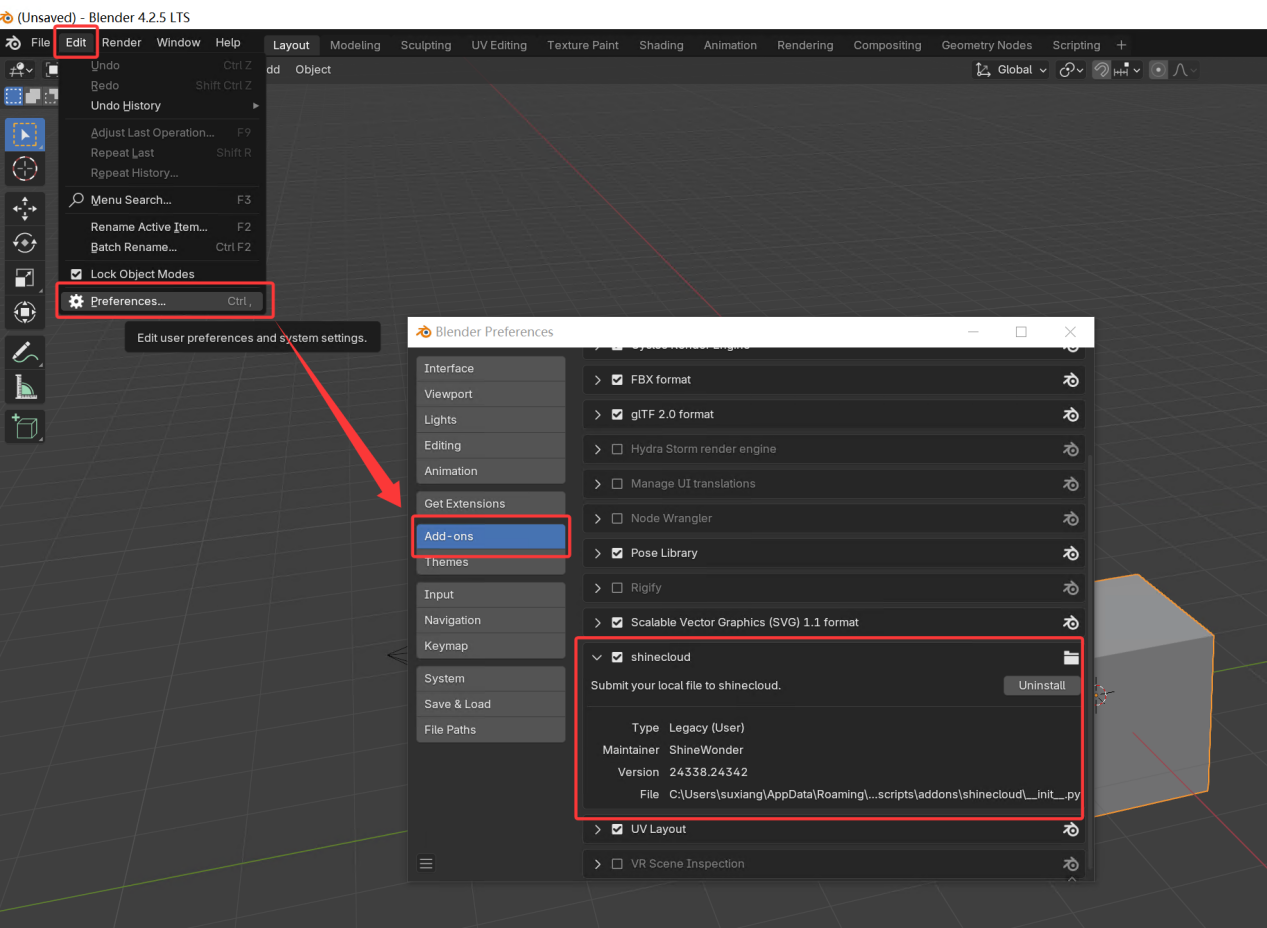
2. Load the Renderwow Plugin
Open Blender, click [Edit] → [Preferences] in the top menu bar, locate and check "Renderwow Plugin (shinecloud)" in the [Add-ons] list on the left, and the plugin will be loaded.
3. Open the Renderwow Submission Interface
After completing the previous step, ensure that all rendering-related parameters (such as output path, render resolution, and other necessary information) are correctly configured in the scene file. Once all parameters are verified, locate "ShineCloud Render" in the [Output] panel on the right-side navigation bar of Blender and click it to display the plugin submission interface.

4. Select Submission Type and Configure Parameters
To submit a still image (single frame): In the Renderwow plugin submission interface, switch [Mode] to "Current Frame", fill in or modify each configuration item as needed, then click "Save Blender File" to prepare for submission.

To submit an animation (multiple frames): In the Renderwow plugin submission interface, switch [Mode] to "Animation", fill in or modify each configuration item as required, then click "Save Blender File" to prepare for submission.
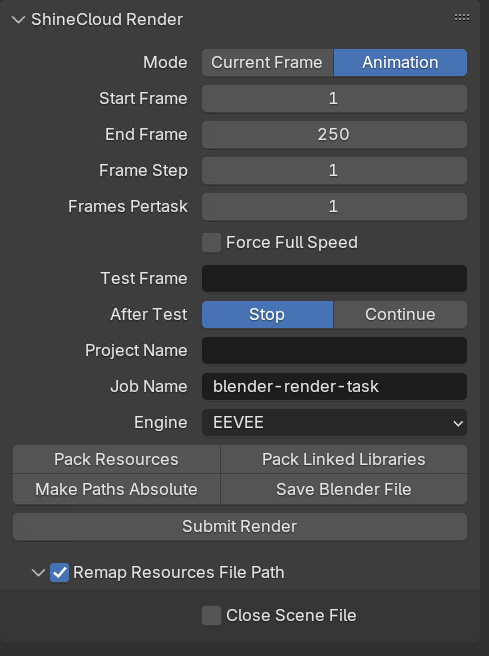
Note: If the scene has unsaved modifications and you have not clicked "Save Blender File", a prompt will appear and submission will be blocked.

5. Submit the Job and Track Rendering Progress
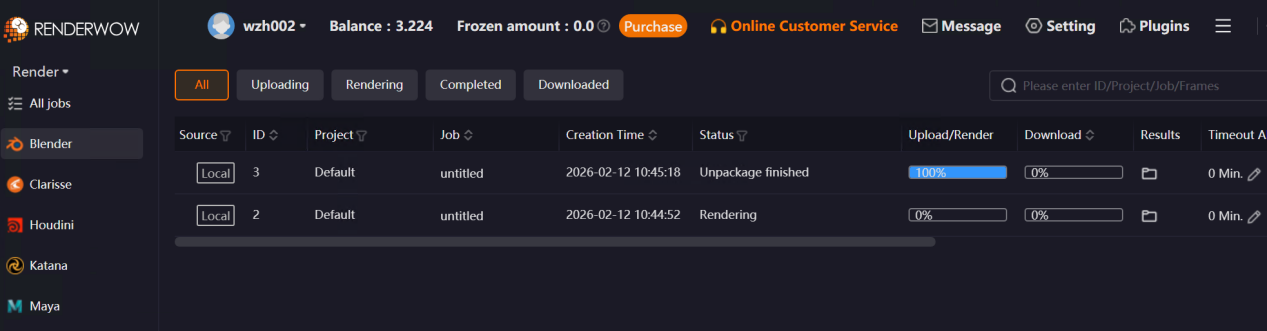
After confirming that all basic configurations and detailed parameters are correct, click the [Submit Render] button in the plugin interface. A success message will appear, and the job will be automatically submitted to the Renderwow client. After submission, return to the Renderwow client to view the full process progress of Packaging → Uploading → Rendering → Downloading for this job in the job list. Once rendering is complete, the results will be automatically saved to the client’s default path.

7.2 Submit Interface Parameter Details
7.2.1 Common Parameters for Still Images and Animation
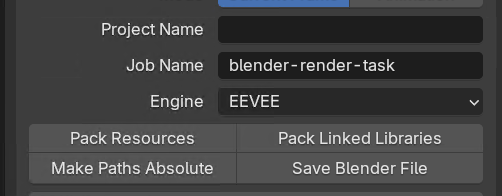
Project Name
Used to categorize and manage multiple rendering jobs, facilitating quick filtering of similar jobs in the client later. This field is optional.
Job Name
Automatically recognizes the name of the current Blender scene and supports manual modification.
Engine
Automatically detects the rendering engine currently set in the Blender scene. You may manually switch it before submission according to actual rendering requirements.
-
Workbench: Extremely fast rendering speed; displays only the basic form of models or animations. Suitable for quickly inspecting model structures, distinguishing object hierarchies, or previewing keyframe motion logic.
-
EEVEE Engine: Rendering speed is second only to Workbench; suitable for quick previews and still images or animations where image quality requirements are not high.
-
Cycles Engine: Produces more refined and realistic rendering quality; supports high-precision lighting and shadow effects, volumetric fog animation, etc. Suitable for high-precision deliverables requiring formal handover.
Note: After switching, ensure that materials and lighting settings in the scene are compatible with the selected engine to avoid rendering anomalies.
Pack Resources
Used to pack all external assets used in the current scene into the .blend project file, including texture images, external models, material maps, lighting presets, etc. This effectively prevents rendering failures caused by missing external resources (such as moved or deleted resource paths).
Note: Clicking this will significantly increase the project file size, thereby slowing down file upload speed. It is recommended to check this option when the network is stable. If all resources are in local default paths and will not change, you may leave this option unchecked.
Pack Linked Libraries
Used to pack all linked Blender library files in the scene into the .blend project file. This effectively prevents rendering failures caused by missing external resources.
Make Paths Absolute
Used to automatically convert all external asset reference paths in the scene to absolute paths (i.e., the complete local file path, such as "D:\Blender\Materials\Texture1.jpg"). This effectively prevents rendering failures caused by missing resources.
Save Blender File
Used to save parameter modifications in the current scene (such as material, lighting, and rendering parameter adjustments). If there are unsaved modifications, you must click this option; the plugin will automatically save all modifications before submission. Otherwise, job submission will fail.
Remap Resource File Paths
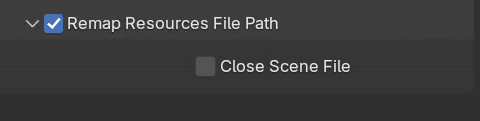
Used for users submitting jobs whose scene files or resource files are located on the C: drive or network paths.
When checked, the plugin automatically renames all resources in the scene (including textures, linked library files, etc.) and uploads them to the cloud.
Note: If scene files or resource files are located on the C: drive or network paths, jobs cannot be submitted without checking this option, and an error will occur.

Close Scene After Submission
Can only be checked together with the "Remap Resource Paths" parameter; checking it alone has no effect. When checked, the currently open Blender scene file will be automatically closed after the job is successfully submitted and file packaging and upload initialization are completed.
7.2.2 Animation-Specific Parameters
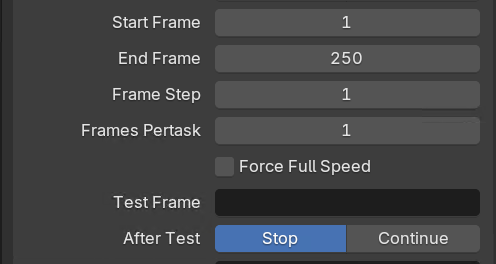
Start Frame / End Frame / Frame Step
All three will automatically detect the frame range and frame step set in the current Blender scene timeline. You may manually modify them before job submission according to actual animation requirements.
Frames Per Job
Used to control the number of frames rendered per session by each cloud rendering machine. The default is 1, meaning each cloud rendering session renders 1 frame per Blender launch. This can be customized based on the total number of animation frames and rendering efficiency requirements, effectively reducing scheduling overhead for rendering machines and improving overall rendering speed.
Force Full Speed
When this option is checked, test frames cannot be set. After the job is submitted to the Renderwow client, all frames will be rendered at full speed according to the "Frames Per Job" setting. This parameter is suitable for scenes where rendering parameters, lighting, materials, etc. have been confirmed as correct, saving test time and enabling rapid completion of animation rendering.
Test Frame
Used to preview animation rendering effects and avoid errors in batch rendering.
Supports three input formats:
-
Frame ranges: consecutive frames (e.g., 1–10)
-
Step frames: frames with an interval (e.g., 1–10x2, where the number after x is the step)
-
Individual frames: discrete frames (e.g., 1,5,8)
Multiple formats can be combined (e.g., 1–5,7–15x3,20). Test frames are rendered with priority over other frames. After rendering is complete, the results can be viewed in the Renderwow client. This is especially suitable for complex animation scenes and can effectively prevent batch rendering errors.
Note: Jobs cannot be submitted if test frames are not set in the correct format, and an error will occur.

After Test
Used to set the rendering rule after testing. Two modes are available: "Stop" and "Continue", which can be selected according to actual requirements.
When "Stop" mode is selected, the entire animation job will automatically pause after the test frames are rendered. You must manually locate the job in the Renderwow client, right-click, and select "Resume" to start rendering the remaining frames. This is suitable for scenes with high requirements for animation quality where test results need to be confirmed frame by frame, minimizing rendering errors to the greatest extent.
When "Continue" mode is selected, the job will automatically enter full-speed rendering after the test frames are rendered, without requiring manual operation. This is suitable for time-sensitive scenarios where there is reasonable confidence in the rendering quality. It is recommended to monitor the test frame results promptly after selecting this mode; if issues are found, the job can be paused at any time for modification.